Updated April 7, 2023
Introduction to Install Raspberry Pi
The following article provides an outline for How to Install Raspberry Pi. Raspberry Pi is a small-sized computer that gets easy plugs into your computer monitor, TV using a standard keyboard or mouse. It does every task that a user expects from a computing device. Apart from this, it has huge capabilities.
- It can interact with the outside world.
- IoT enabled devices.
- Enhancing devices like cameras, detectors, and instruments.
Quick Facts about Raspberry Pi
Since we have understood that Raspberry Pi is a small-sized computer that has countless possibilities, let’s see some facts associated with it. First, Microprocessors are crucial for any computing device, so let’s start with these. Microprocessors have come a long way since their inception in the early ’70s. RAM stats compared to Raspberry Pi.
- Apple II – 4kb RAM
- ZX Spectrum – 16 to 48 kb RAM
- ATARI 800Xl – 64kb RAM
- Raspberry Pi – 256 MB RAM
Components
- ARM/CPU
- GPIO
- RCA
- Audio Out
- LED’s
- USB
- HDMI
- Power
- SD Cardslot
- Ethernet
In this how-to install the Raspberry Pi article, we will be dealing with issues we come across while installing raspberry pi. This blog will show how to use a PC and get running with your raspberry pi.
Steps to Install Raspberry Pi
Given below are the steps required to install the Raspberry Pi:
Step 1
Download and Install the Virtual box of Raspberry Pi.
First, understand what Virtual Box is, a Virtual Box (an acronym for VB) is software capable of running multiple OS types within it. This is the best and effective definition from us to our readers.
It is capable of running OS like:
- Linux based OS
- Windows-based OS
- Solaris based OS
- IDM based OS
A user can do this by virtually booting the OS into Virtual Disk. So we have to download an Oracle VM Virtual Box. It is a powerful x86 and AMD64/Intel64 virtualization product for enterprise and home use.
All, you need to choose the right version with respect to your operating system. There are 2 versions available – windows and macOS. Once you have downloaded the executable file, go ahead while installing the Virtual box. This we have provided with related screens and instructions helpful for complete novice users.
Step 2
Download the Debian with Raspberry Pi Desktop.
A user must download the Raspberry Pi desktop image file from the raspberry pi foundation site to install. They are responsible for creating a live disc, run and even installation process successful on your PC.
Step 3
Launch the Virtual Box and Establish a New Virtual Machine.
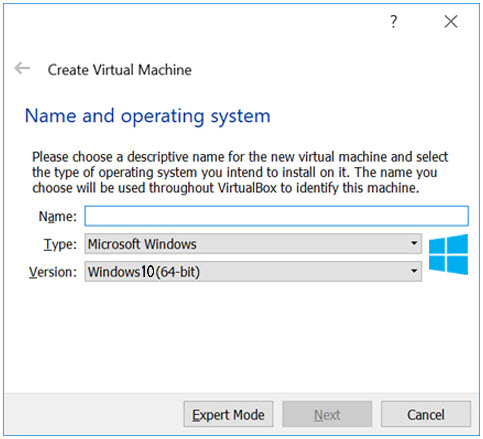
Since we have VB and Raspberry Pi desktop downloaded with us, we can now move ahead by launching the VB and creating a new virtual machine in it. If you click on the ‘new’ button, you will get a screen, like what we have demonstrated.
A user must provide a distinct name in the ‘Name’ field and then select OS type (we have chosen Windows) with version details (like 32-bit or 64-bit) from the dropdown menu. After then, click Next.
In the next screen, a user must select the memory size in accordance with the Raspberry Pi versions they are working on (Pi 2 or Pi 3 or any other model).
Now add a hard disk to your new Virtual machine; click on the Create button. After this, again click the next on further screens. Finally, a user can select the size of the hard disk. In general, 8GB is recommended by users. If you are ready, click Create.
After this, we have the settings of our virtual machines in place.
Step 4
Install the Raspberry Pi on your Desktop.
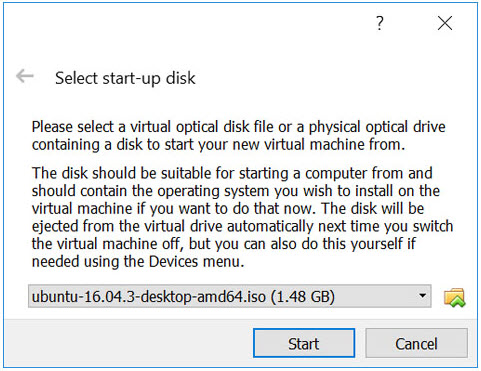
Click on Start to start the installation process.
The below screen shows the related information:
A user must browse to the respective folder where the image file of the Raspberry file is saved. You must select the file and click ‘Start.’ With this, a user will witness is the menu titled ‘Windows installer boot menu.
Select your preferences and install. On the next screen, select your preferred keyboard layout by pressing enter. If you have done with the disk partitioning, go for writing the changes to your disk.
With this, the installation wizard will prompt the user: “Install the GRYB boot loader to the master boot record? Where you must choose ‘yes’ and select /dev/sda.
Once the installation wizard is installed, you will see the below details on your screen:
Step 5
Make your Virtual Machine Interactive.
If you have reached this step, you will notice that the Virtual machine will be running raspberry pi desktop fine. There is a setup called Virtual Machine Guest addition; this guest addition makes it easier for the users to adjust the screen as per our need, share the files between our PC and the VM’s we want to work with.
Before you do a thing, do a quick check of your system updates with these small commands lines:
With this, you will be ready with your guest addition setup.
Step 6
Shared Folder Setup.
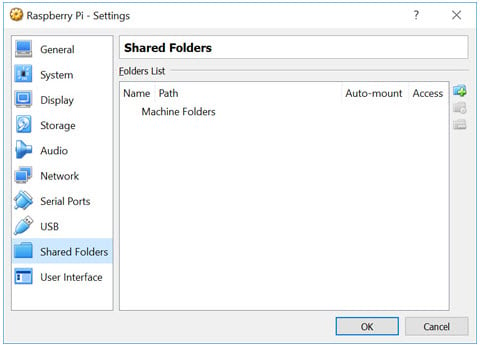
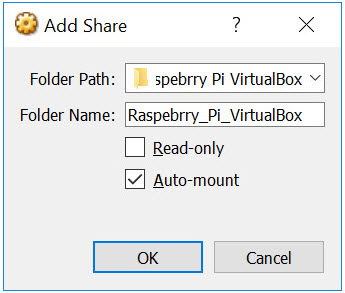
For setting a shared folder, right-click on your VM name and settings, or you can even work with shortcuts (Ctrl+S). With this, select ‘Shared Folders.’
The steps are similar to installing software in your system. The setup will guide the users to what to perform next.
After this, a user must start the VM again and launch the file manager. These details will be reflected in the shared drive locations. With this, you have Raspberry Pi running on your VM on your PC or laptop.
Recommended Articles
We hope that this EDUCBA information on “install raspberry pi” was beneficial to you. You can view EDUCBA’s recommended articles for more information.
