Updated July 6, 2023

Introduction to ASP.NET ListBox
List box control in ASP.Net is a web control derived from the List Control Class, which in turn is derived from System.Web.UI.WebControls class.
It allows the selection of single and multiple items in the list, unlike the dropdown list control, which enables the selection of a single item at a time; this list can also be bound to the data source.
Syntax:
The list box control can be dragged and dropped from the ASP.Net toolbox on the web form created, following the code in the .cs file.
<asp: ListBox id="ListBox1" Rows="6" Width="100px" SelectionMode="Single" runat="server"> </asp: ListBox>Vice versa, writing the above code in a .cs file creates a list box control on the web form. The following code can be used to add the elements to the list.
<asp: ListItem>Item 1</asp: ListItem>The above code creates a single element named “Item 1” in the list box.
Properties of ASP.NET ListBox
The list box is like a set of radio buttons except that the list box is scrollable and can contain more items than a set of Radio Buttons. The number of entries added to the list box can also be at the run time. The list box is a web server control. The web control class provides the properties, methods, and events common to all web server controls. The appearance and behavior of these controls can be controlled with this web control class. Example: The font color and background color can be controlled using the ‘ForeColor’ and ‘BackColor’ properties.
The control can be enabled or disabled using the ‘enable’ property, or the place of the control can be controlled using the ‘TabIndex.’ The control can also have a tooltip using the ‘ToolTip’ property. The main difference between a list box and a combo box is that you can edit values in the combo box, while you can only select values in the list box.
- Items.Count: Returns the total number of items in the list box.
- Items.Clear: Clears all the items from the list box.
- SelectedItem.Text: Returns the text of the selected item.
- Items.Remove(“name”): Removes the item with the text “name.”
- Items.RemoveAt(int index): Removes the item present at the given index.
- Items.Insert(int index, “text”): Inserts the “text” at the given index.
- SelectedItem: Returns the index of the selected item.
- SelectionMode: Specifies the selection mode as “single or multiple.”
To connect a data source to a list box control, you must first create a data source using the DataControlObject. The data source will hold the items that the list box will display. Link the data source to the List Box control by utilizing the DataBind method after creating it. The two different properties, “DataTextField’ and “DataValueField,” can specify which fields in the data source to bind to the text and the Value properties, respectively.
The properties for binding the list box to the database are:
- DataSource: Represents a DataTable or dataset.
- DataTextFieldL: This property binds the text to Listbox.
- DataValueField: this property binds the value to Listbox.
Examples of ASP.NET ListBox
Below are examples of ASP.NET ListBox.
Example #1
Code:
<%@ Page Language="C#" AutoEventWireup="true" CodeBehind="WebForm1.aspx.cs" Inherits="WebApplication1.WebForm1" %>
<!DOCTYPE html>
<html xmlns="http://www.w3.org/1999/xhtml">
<head runat="server">
<title> An example of ASP.Net ListBox</title>
</head>
<body>
<form id="form1" runat="server">
<div>
<h2>Choose a color:</h2>
<asp: ListBox ID ='ListBox1’ runat = 'server' AutoPostBack = 'true' Font-Size = 'X-Large' Rows = '5'
ForeColors = 'Tomato' Width = '350' >
<asp: ListItem> Dark Grey </asp: ListItem>
<asp: ListItem> Red </asp: ListItem>
<asp: ListItem> Green </asp: ListItem>
<asp: ListItem> Blue </asp:ListItem>
<asp: ListItem> Yellow </asp: ListItem>
<asp: ListItem> Black </asp: ListItem>
</asp: ListBox>
</div>
</form>
</body>
</html>
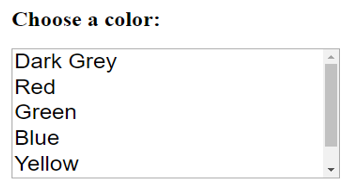
You can access the list and make necessary changes using the ID value “ListBox1” in the code.
Output:
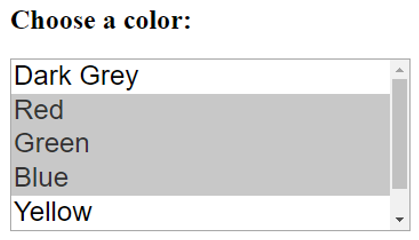
Including the property SelectionMode=” Multiple” allows users to select multiple values from the list box. To perform the action, click on the desired items while pressing the Ctrl or Shift key. This shortcut can be tricky for most of the users. In such cases, the better approach can be to use the Checkbox List control or the multi-select list control. For multiple selections, the SelectedIndex, and the SelectedValue properties return only the first list item selected. When multiple items are selected, it is necessary to iterate through the collection of items in the List Box control to detect them.
Example #2
Code:
<%@ Page Language="C#" AutoEventWireup="true" CodeBehind="WebForm1.aspx.cs" Inherits="WebApplication1.WebForm1" %>
<!DOCTYPE html>
<html xmlns="http://www.w3.org/1999/xhtml">
<head runat="server">
<title> An example of ASP.Net ListBox</title>
</head>
<body>
<form id="form1" runat="server">
<div>
<h2>Choose a color:</h2>
<asp: ListBox ID ='ListBox1’ runat = 'server' AutoPostBack = 'true' Font-Size = 'X-Large' Rows = '5'
ForeColors = 'Tomato' Width = '350' SelectionMode="multiple">
<asp: ListItem> Dark Grey </asp: ListItem>
<asp: ListItem> Red </asp: ListItem>
<asp: ListItem> Green </asp: ListItem>
<asp: ListItem> Blue </asp: ListItem>
<asp: ListItem> Yellow </asp: ListItem>
<asp: ListItem> Black </asp: ListItem>
</asp: ListBox>
</div>
</form>
</body>
</html>
Output:
Identifying which entry has been selected is important when using a list since you can make multiple choices. When you select an item from the list box, it links to a corresponding integer number. One can easily identify the chosen items in the list by using this corresponding integer. The list boxes allow for sorting or leaving the items unsorted. By default, the list box sorts alphabetically, starting with A. Whenever the list box appears on the screen, it sorts and displays the contents in the order selected for “sorted.”
Conclusion
The ASP.NET ListBox is a web control that eases the task by listing the options in one box and providing the facility to select multiple elements simultaneously. In addition, you can connect the list box to a data source to assign values during runtime. This small functionality is useful in many instances as it provides better data display on a web page.
Recommended Articles
We hope that this EDUCBA information on “ASP.NET ListBox” was beneficial to you. You can view EDUCBA’s recommended articles for more information,


