Updated March 27, 2023
Introduction to React Native Components
React Native provides various built-in components. Through components, one can break the UI into reusable, independent pieces, and can think about each piece in isolation. The components in React Native are defined as functions or classes. To define the React component class, a React.component is extended. To define a React.component subclass, the only method is known as render(). It has several “lifecycle methods” that can be overridden to run code at a particular time in the whole process. They are similar to JavaScript Functions.
Syntax:
class  Welcome  extends  React.Component  { render() {
return  <h1>  Hello,  {this.props.name}</h1>;
}
}
Components & Uses of React Native
Below are the components with its uses:
Example #1 – View
Use: To build a user interface, the view is the most important component.
Code:
import React, { Component } from 'react';
import {AppRegistry,StyleSheet,Text,View} from 'react-native';
export default class NativeSample extends Component { render() {
return (
<View style={{backgroundColor:"yellow",margin:5}}>
<Text>Parent View</Text>
<View style={{backgroundColor:"red",margin:5}}>
<Text>first Child view</Text>
<View style={{backgroundColor:"green",margin:5}}>
<Text>Second Child view</Text>
</View>
</View>
</View>
);
}
}
AppRegistry.registerComponent('NativeSample', () => NativeSample);
Output:
Example #2 – StyleSheet
Use: It can be defined as the style in which the mobile application will appear, so it is used to style the mobile application and will make the application attractive.
Code:
import React, { Component } from 'react';
import {AppRegistry,StyleSheet,Text,View} from 'react-native';
export default class NativeSample extends Component {
constructor() {
super()
this.state = {
firstVar: 'It displays using styleSheet'
}
}
render() {
return (
<View >
<Text style={styles.textStyle} > {this.state.firstVar}</Text>
</View>
);
}
}
AppRegistry.registerComponent('NativeSample', () => NativeSample);
const styles = StyleSheet.create ({
textStyle: {
margin: 50,
fontSize: 30,
color:'red',
fontWeight: 'bold',
}
})
Output:
Example #3 – TextInput
Use: It is a component that is used to input text into the mobile application through a keyboard.
Code:
import React, { Component } from 'react';
import {AppRegistry,StyleSheet,Text,TextInput,View} from 'react-native';
export default class NativeSample extends Component {
constructor() {
super()
this.state = {
firstVar: ' '
}
}
render() {
return (
<View style={{margin:50}}>
<TextInput style={{height: 40}}
placeholder="Type your text!"
onChangeText={(firstVar) => this.setState({firstVar})}
/>
<Text style={{padding: 10, fontSize: 42}}>
{this.state.firstVar}
</Text>
</View>
);
}
}
AppRegistry.registerComponent('NativeSample', () => NativeSample);
Output:
Example #4 – ScrollView
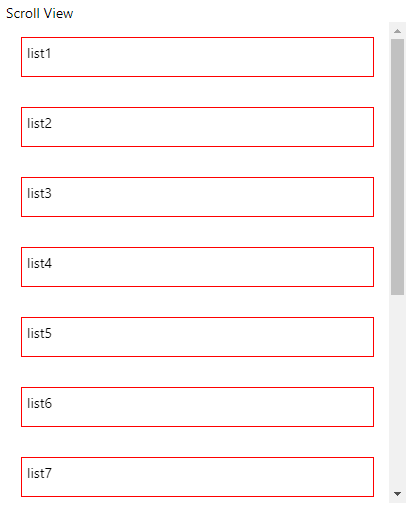
Use: It is used to provide a large list or large content in view with the scrollbar. It helps in viewing the large content.
Code:
import React, { Component } from 'react';
import {AppRegistry,StyleSheet,Text,ScrollView,View} from 'react-native';
export default class NativeSample extends Component {
constructor() {
super()
this.state = {
firstVar: ' ',
listvalue: [
{'name':'list1',               'id':         1},
{'name':'list2',               'id':         2},
{'name':'list3',               'id':         3},
{'name':'list4',               'id':         4},
{'name':'list5',               'id':         5},
{'name':'list6',               'id':         6},
{'name':'list7',               'id':         7},
{'name':'list8',               'id':         8},
{'name':'list9',               'id':         9},
{'name':'list10',             'id':         10},
{'name':'list11',             'id':         11},
{'name':'list12',             'id':         12},
]
}
}
makeList= (item) => (
<Text
key={item.id}
style={styles.list}>
{item.name}
</Text>
);
render() {
return (
<View style={{margin: 50,
height: 500,}}>
<Text>Scroll View</Text>
<ScrollView>
{ this.state.listvalue.map(this.makeList)}
</ScrollView>
</View>
);
}
}
AppRegistry.registerComponent('NativeSample', () => NativeSample);
const styles = StyleSheet.create ({
list: {
margin: 15,
padding: 5,
height: 40, borderColor: 'red', borderWidth: 1
}
})
Output:
Example #5 – ListView
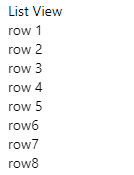
Use: It provides the dataSource array value to the view. ListView is used in displaying the vertically scrolling list of changing data.
Code:
import React, { Component } from 'react';
import {AppRegistry,StyleSheet,Text,ListView,View} from 'react-native';
export default class NativeSample extends Component {
constructor() {
const ds = new ListView.DataSource({rowHasChanged: (r2, r3) => r2 !== r3});
super()
this.state = {
dataSource: ds.cloneWithRows(['row 1', 'row 2', 'row 3', 'row 4', 'row 5','row6','row7','row8']),
}
}
render() {
return (
<View style={{margin: 50,
height: 500,}}>
<Text>List View</Text>
<ListView
dataSource={this.state.dataSource}
renderRow={(rowData) => <Text>{rowData}</Text>}
/>
</View>
);
}
}
AppRegistry.registerComponent('NativeSample', () => NativeSample);
Output:
Example #6 – Container Component
Use: It is used to handle all functionalities and states.
Code:
import React, { Component } from 'react';
import { AppRegistry, View,Text } from 'react-native';
import presentationalComponent from './presentationalComponent';
class Helloworld extends Component {
constructor() {
super()
this.state = {
firstVar: 'It display using state'
}
}
hideText = () => {
this.setState({firstVar: ' '})
}
render() {
return (
<View style={{backgroundColor:'blue'}}>
<presentationalComponent
myText = {this.state.firstVar}
deleteText = {this.hideText}
/>
</View>
);
}
}
AppRegistry.registerComponent('Helloworld', () => Helloworld);
Example #7 – Presentation Component
Use: It is used to display the view by using the props.
Code:
import React, { Component } from 'react'
import {Text,View} from 'react-native'
const presentationalComponent = (props) => {
return (
<View>
<Text onPress = {props.deleteText}>
{props.myText}
</Text>
</View>
)
}
export default presentationalComponent
Example #8 – FlexDirection
Use: It is used to define the primary axis of the layout.
Code:
import React, { Component } from 'react';
import {AppRegistry,StyleSheet,Text,View} from 'react-native';
export default class NativeSample extends Component {
render() {
return (
<View style={{flex: 1, flexDirection: 'row'}}>
<View style={{width: 50, height: 50, backgroundColor: 'blue'}} />
<View style={{width: 50, height: 50, backgroundColor: 'red'}} />
<View style={{width: 50, height: 50, backgroundColor: 'green'}} />
</View>
);
}
}
AppRegistry.registerComponent('NativeSample', () => NativeSample);
Output:
Example #9 – AlignItems
Use: It is used to determine the alignment in the secondary axis of the children.
Code:
import React, { Component } from 'react';
import {AppRegistry,StyleSheet,Text,View} from 'react-native';
export default class NativeSample extends Component {
render() {
return (
<View style={{flex: 1, flexDirection: 'row', justifyContent: 'space-between', alignItems: 'center'}}>
<View style={{width: 50, height: 50, backgroundColor:'blue'}} />
<View style={{width: 50, height: 50, backgroundColor:'red'}} />
<View style={{width: 50, height: 50, backgroundColor:'green'}} />
</View>
);
}
}
AppRegistry.registerComponent('NativeSample', () => NativeSample);
Output:
Conclusion
On the basis of the above discussion, it is used to develop the User Interface of the mobile application. We also got to know about the uses of different components of React Native. As there is a huge variety of built-in components in It which helps in making mobile applications for both iOS and Android with great User Interfaces. So we can say that a component is a JavaScript function that optionally accepts input and returns React element.
Recommended Articles
This is a guide to React Native Components. Here we discuss the introduction to React Native Components and their Examples along with Code Implementation. You can also go through our other suggested articles to learn more –


