Updated April 11, 2023
Introduction to Docker Images
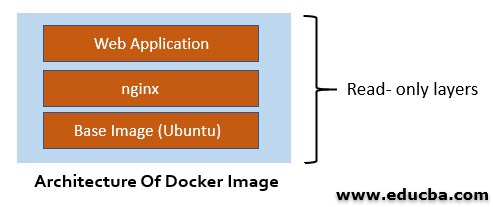
Docker Images consist of one or more read-only layers that include our application code, libraries, and dependencies needed to run the application. In other words, Images are immutable files that mean we cannot make changes to the existing image directly; either we need to re-write the Dockerfile and re-build the Docker Image with a new Dockerfile or run a container using the image and then make changes inside the container and commit the running container as a Docker Image. There are official Images available for popular OS and software such as Ubuntu, CentOS, nginx, nodejs, etc., on hub.docker.com, which is a public repository for Docker Images provided by Docker. Anyone can pull a Docker image from it; however, you must have an account on hub.docker.com in order to push images to hub.docker.com.
How do Images Work in Docker?
As mentioned above, an image consists of multiple layers; let’s understand it with an example. We want to create our own nginx Docker Image. It will consist of the below layers: –
- Base OS image(for ex. Ubuntu)
- Update the base image
- Install nginx on Ubuntu
- Configure CMD or entrypoint to run nginx when any container gets created with this image.
Syntax
docker build -t <name of the docker image>:<tag> <path of the Dockerfile>
Example
docker build -t my_nginx .
Here is the snippet of Dockerfile to create the above image: –
Explanation
The above command will build a new Image with the name my_nginx, and the daemon considers the ‘latest’ tag as it is not specified and check the current working directory for Dockerfile.
- It will download an ubuntu image first and run an intermediate container using ubuntu Image
- Update the ubuntu image and commit a new intermediate Image and remove the intermediate container.
- Run a new intermediate container using Image committed in step 2.
- The same process will continue till the last line of the Dockerfile.
- The last committed Image will be the final Image, and the daemon will give it a name and tag.
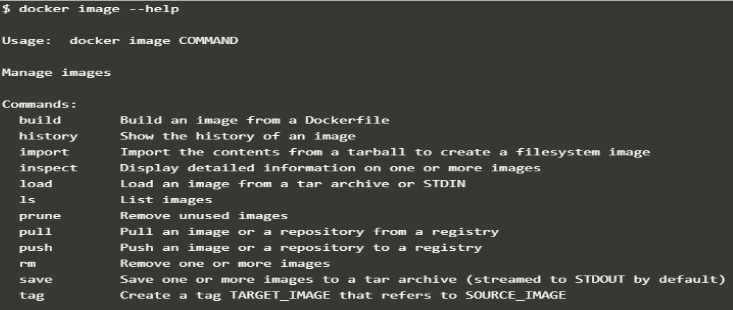
Below is the syntax to manage the image: –
docker image <command>
snapshot of all commands that we can use with Docker Image: –
How to Display Docker Images?
Commands to display images that are available on host locally, all below commands will give us the same output: –
docker image ls
docker images
docker image list
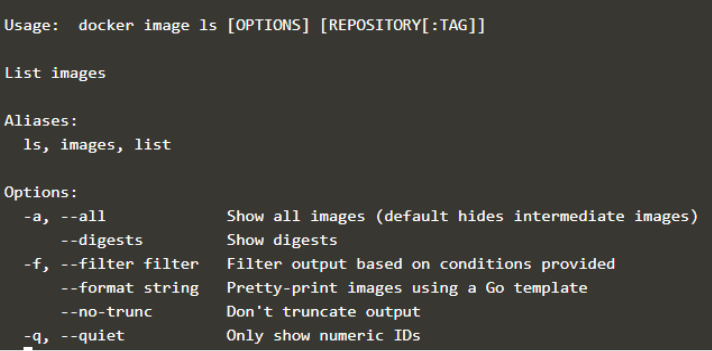
There are multiple options that we can use with the above command. For example, if we want to list all images, including intermediate images, we need to use -a option with the above commands: –
Here is a snippet of all options available to display Images: –
How to Download Docker Images?
We use the pull command to download Images locally.
Syntax
docker pull <image_name>
Example
docker pull ubuntu
The above command will pull ubuntu Image from hub.docker.com to localhost. It will pull the image that has the latest tag as shown in the below snapshot: –
If we have to download a specific tag or version of any Image, we need to specify the tag while pulling the Image.
Syntax
docker pull <image_name>:tag
Example
docker pull ubuntu:xenial
The above example will download Ubuntu image which has a xenial tag with it as shown in the below snapshot: –
If we have a private registry, then we need to give the registry name, most probably the hostname on which the registry container is running. Let’s understand it with an example.
1. First, we need to create a private registry using the below command: –
docker run -d -p 5000:5000 --restart always --name registry registry:2
Explanation: – above command creates a container with an image registry and expose it to port 5000 on the host as well as inside the container and set the restart option to always, which means the daemon will restart the container every time if the container is not running.
2. Retag existing Docker image with localhost:5000 as below: –
docker image tag ubuntu localhost:5000/ubuntu
Explanation: – above command retags the exiting ubuntu image with localhost:5000/ubuntu as we have exposed the container to localhost on 5000 port.
Note: – Docker image name must start with localhost:5000, and after / we can name it as we want, here we keep ubuntu itself.
3. Let’s push the image to our private registry: –
docker push localhost:5000/ubuntu
Explanation: – above command pushes the newly tagged Docker image to our private registry that is running as a container.
4. Now we remove the Docker image available locally: –
docker image rm localhost:5000/ubuntu
Explanation: – above command will untag the ubuntu Images that we have just tagged in the above step; however, we have already pushed this image to our private registry so we can run a container using ‘localhost:5000/ubuntu’.
5. Run a container using ‘localhost:5000/ubuntu’ as shown below: –
docker run -d localhost:5000/ubuntu sleep 3000
Explanation: – In the above snapshot, you can see daemon is pulling the image from ubuntu instead of library/ubuntu. Below are the containers that are running currently. We can see one of them is running using the ‘localhost:5000/ubuntu’ image.
How to Remove Docker Images?
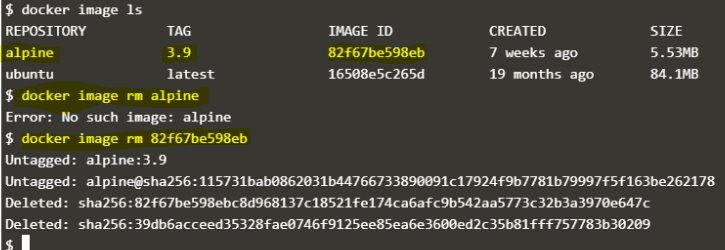
We can remove any Docker Images using the ‘rm’ command if it is not referenced by any container; however, we can force remove the Images even if it is referenced by any container.
Syntax
docker image rm <image_name>
or
docker image rm <image_id>
Example
docker image rm alpine

docker image rm 82f67be598eb
Explanation: – In the above snapshot, the alpine Docker image has been removed with the latest tag. Remember, if we don’t specify the tag, it will take the latest tag. In the below snapshot, we have an alpine image with tag 3.9; if we try to remove it with the command ‘docker image rm alpine’, it will throw an error ‘No such image: alpine’; either we need to specify the tag or remove using Image ID as below: –
docker image rm alpine:3.9
or
docker image rm 82f67be598eb
As mentioned above, we can remove the Images even if it is referenced by any container that might be in the running or excited state. We have to use -f to forcefully remove any Docker Image as below: –
Syntax
docker image rm -f <image_name>or<image_id>
Example
docker image rm -f ubuntu
In the above snapshot, we can see there is a container referencing the ubuntu image, and if we try to simply remove the image, the daemon is complaining about conflict; however, in the next command, using the -f option able to remove the ubuntu Image.
Advantages
1. Portability – Images are portable as it includes all the required dependencies and libraries to the application, so it runs exact same way on any platform like Linux, Windows, Cloud and even Raspberry Pi.
2. Lightweight – It has a multi-layer file system that makes images extremely lightweight because each layer includes only differences from other layers.
3. Consistency – Images have powerful characteristics of inability to change; that’s called immutability. It is very useful while testing new features of any application as it is not going to break our existing image. If something goes wrong, we can run the application again using the existing image as that is unchanged. Immutability also provides the consistency that means if the application is running as expected in the test environment, then it is going to run in the same manner in other environments as well.
4. Sharing – We can store Images in a repository. We have a public repository hub.docker.com provided by Docker itself; however, we can create our own repository on hub.docker.com and keep our Images privately if we want. We can create our own private registry as well. It helps us to share images more easily
5. Secure – Docker Images are secure. Every Image has its hash value. We can also digitally sign the Images, so if someone tries to run a container using an unsigned image, the daemon is not going to start the container.
Conclusion
Docker Images are the core object of Docker. We cannot imagine Docker without images. It is the initial thing that we need to work with Docker after installing it. Images are like template or snapshot of a VM but not limited to as it has more advantages over template or snapshot.
Recommended Articles
This is a guide to Docker Images. Here we discuss How do Images Work in Docker, along with How to Display, Download and Remove images. You may also have a look at the following articles to learn more –


