Updated April 10, 2023

Introduction to Docker Push
Docker Push is a command that is used to push or share a local Docker image or a repository to a central repository; it might be a public registry like https://hub.docker.com or a private registry or a self-hosted registry. We need to login to the registry before pushing the Docker image to the registry if proper authentication is setup. Data pushed to the registry is compressed before sending it to the registry. It daemon pushes five layers of a image at a time by default however, we can change it using the option ‘–max-concurrent-uploads’ while pushing the Docker image to the registry.
Syntax:
$docker push [OPTIONS] NAME[:TAG]
Let’s understand each part of the command: –
[OPTIONS] – We have only one option ‘–disable-content-trust’ in Docker commands and by default it is true.
NAME[:TAG] – We need to specify the name of the registry followed by repository and then the tag of the Docker image.
Functions of Docker Push
As we know, we can share images to the public registry or private registry. When we push any image, Docker daemon first checks its tag, how the image is tagged to determine where to push the image. If there is no repository mentioned in the name of the Docker image, it will send it to the [docker.io/library] which requires authentication. Mostly official images are available at that location. So we cannot push any Docker images over there which means we need to re-tag our image before pushing it to the registry. If we have an account on hub.docker.com then we get a default repository with our Docker Id so that we can push our Docker image on hub.docker.com and make it public or keep it private as our requirement.
The same goes for any self-hosted private registry. In order to push the image to our private registry, we have to re-tag our image with the hostname of the machine on which the registry is running. A simple implementation of the private registry is to run registry as a container and we can get the official image for the same from hub.docker.com however, we use ‘DTR’ at enterprise level i.e. Docker Trusted Registry that comes with Docker Enterprise Edition.
How Docker Push Works?
Let’s say, we already have an Nginx Docker image pulled locally and running a container using it. We make the required configuration changes in the container and commit it as a image. Once we have a new configured Docker image we can push it to the registry. Now we have two scenarios as below:
Example #1
In the first scenario, we will push the image to the public registry. If we do not re-tag the Docker image, it will push to a public repository [docker.io/library/nginx] however it will require Docker login.
Code:
$docker login

$docker push nginx
Output:
Explanation: In the above example, after providing credentials, tried to push the image to the public registry, however, that image already exists and also authentication failed as we are pushing it to a public registry. We need to tag the image to send it to our own repository that is created when we sign up on hub.docker.com. It creates a default repository with our Docker ID.
Let’s re-tag the Docker image and try to re-push it to the hub.docker.com once again.
Re-tagged nginxDocker image with my repository as below: –
Code:
$docker tag nginx sarab303/nginx

$docker push sarab303/nginx
Output:
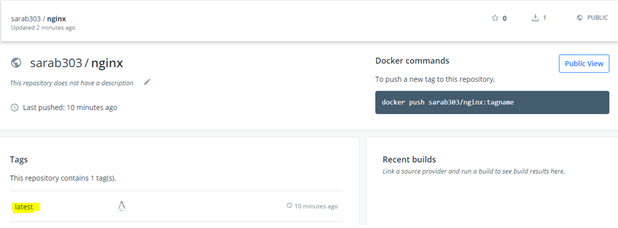
Explanation: In the above example, we can see that the Docker image is successfully pushed to the hub.docker. com and we can confirm it by logging to hub.docker.com. There should be a new repository created with nginx and it has a Docker image with the latest tag as if we don’t provide the tag it adds the ‘latest’ tag.
We can give it tag like version V1, V2, stable, and so on. Let’s re-tag our Docker image with a tag of ‘stable’ and re-push it.
Code:
$docker tag sarab303/nginx sarab303/nginx:stable

$docker push sarab303/nginx:stable
Output:
Explanation: In the above example, Docker image has been retagged with the ‘stable’ tag and re-pushed to the repository however it’s daemon says that Layer already exists as there are no changes made to the Docker image, it is just retagged. This is the awesomeness of the Docker in terms of storage utilization. It does not just copy the same thing again and again because it provides an ID to each layer of the Docker image and if there are no changes to the layer it shares the layers with other Docker images. In the above example, there are no changes to any of the layer so it does not really push the image, instead, it just provides the existing image a new tag on the hub.docker.com as well.
Example #2
Let’s assume we have our own self-hosted registry that is running as a container, however, there is another one called ‘DTR’ i.e. Docker Trusted Registry that provides a nice web console to access it and we can apply RBAC. For testing purposes, we will simply run a registry as a container using below command, it does not have an authentication setup.
Code:
$docker run -d -p 5000:5000 --restart always --name my_registry registry:2

$docker tag nginx localhost:5000/nginx

$ docker push localhost:5000/nginx
Output:
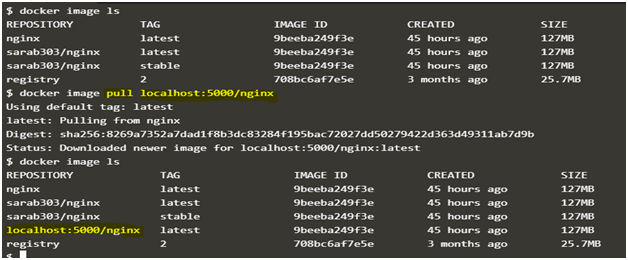
We can confirm that the image is really pushed to our self-hosted registry by deleting the local copy of the Docker image ‘localhost:5000/nginx’ and then try to pull it from our self-hosted registry. If the image exists on our self-hosted registry or the private registry, we can pull it from there without any issues.
Code:
$Docker imagerm localhost:5000/nginx

$Docker image pull localhost:5000/nginx
Output:
Explanation: In the above example, there was no Docker image named ‘localhost:5000/nginx’ locally available. We used pull command to pull it from our self-hosted registry and after successfully pulling the Docker image, it is available locally. This means we successfully ‘Pushed’ the Docker image to the self-hosted registry and pulled it back from there without any issue.
Advantages of Docker Push
Below are some advantages:
1. SharingDocker images: We can easily share our Docker images with our colleagues, teams by pushing the Docker image to the registry.
2. KeepDocker Images centralize: We can keep our Docker images to a centralized repository by pushing the Docker images to a registry so that other teams or individuals can use it whenever they require it.
3. Provide security to Docker images: We can digitally sign the Docker image before pushing it to the registry that helps us to avoid maliciouslyDocker images to be pushed to the registry and prevents unexpected outage.
Conclusion
Docker Push is used to push the images, however, it only pushes the layers of any Docker images if there is any change detected by it’s daemon; unchanged layers are not pushed and those layers get shared among the other Docker images. This is a very nice feature that helps to utilize the storage properly.
Recommended Articles
This is a guide to Docker Push. Here we discuss the Introduction and how Docker Push Works along with its Examples and Code Implementation. You can also go through our other suggested articles to learn more –


