Updated April 15, 2023

Introduction to C++ vector Initialization
The following article provides an outline for C++ vector Initialization. vector initialization means storing elements inside the vector; also, initialization of vector takes a fixed size of inputs via a constructor or any method. This can be done in five different ways: we can initialize a vector using an existing vector, array while creating an object, and most importantly, using push back method. The iterator can access initialized vectors after this initialized vector placed in contiguous memory.
How to Initialize vector in C++ using Various Methods?
We can easily copy one vector to another by using operators; this will help us maintain a vector copy if needed.
We will now see the syntax for vector how we can initialize them, but before moving ahead, we need to create a vector.
Syntax:
So we will see the syntax to create a vector in c++:
vector <type_varibale> variable_name (element)Let’s see each of them in detail:
- variable_name: By the use of it, we can assign a name to our vector that can be used later to initialize it and access it.
- type_variable: This represents the type of the vector that means the type of value our vector will hold while initializing it what type of value we can assign to it.
- element: This param specifies the number of elements that we can assign to the vector.
Now we will see different types to initialize our vector object by using different approaches:
- Initializing vector by using push back method in C++.
- By defining the size of the vector.
- Vector initialization like an array.
- Array to vector.
- Copy one vector from another.
1. Initializing vector by using push back method in C++
In this approach, we can use the ‘push_back’ method to initialize our vector. It is the easy way to this because we just call and assign value to the method. For better understating, we can see the example of how we can use this in our program to prepare vector.
Example:
Code:
#include <iostream>
#include <bits/stdc++.h>
using namespace std;
int main()
{
cout << "Demo to initialize vector using push back method" << "\n";
vector<int> vectDemo;
vectDemo.push_back(200);
vectDemo.push_back(300);
vectDemo.push_back(100);
vectDemo.push_back(36);
vectDemo.push_back(900);
cout << "printing values of vector below :" << " \n";
for (int value : vectDemo)
cout << value << " ";
return 0;
}
Output:

Explanation:
- In this example, we are creating a vector object by using the ‘vector’ keyword here.
- After this, we are calling the push_back method to assign value to the vector object. We can assign any number of elements inside it as it is dynamic in nature.
- In the end, we are printing the output using for loop in C++.
2. By defining the size of the vector
In this approach, we can define the vector’s size and specify the values at the same moment. For this, we can specify both this param inside the vector object.
Example:
Code:
#include <iostream>
#include <bits/stdc++.h>
using namespace std;
int main()
{
cout << "Demo for initilizin vector using size and value" << "\n ";
int size = 10;
cout << "size of vector is " << " ";
cout << size << " \n";
vector<int> vectordemo(size, 001);
cout << "Values inside vector are::" << "\n";
for (int value : vectordemo)
cout << value << " ";
return 0;
}
Output:
Explanation:
- In this example, we are creating a vector object, but while doing so, we are specifying two parameters as well.
- The first parameters are the size of the vector that means how many elements it will hold, and another one is the value present inside the vector as an element.
- At last, we are just printing the vector elements using for loop.
3. Vector initiation like array
In this approach, we can initialize the elements of the vector while creating the object of the vector.
Example:
Code:
#include <iostream>
#include <bits/stdc++.h>
using namespace std;
int main()
{
cout << "Demo for initilizin vector as array in c++" << "\n ";
vector<int> vectordemo{ 20, 40 , 50 , 60, 70 , 100, 400 };
cout << "Printing vector values using for loop" << "\n ";
for (int value : vectordemo)
cout << value << "\n";
return 0;
}
Output:
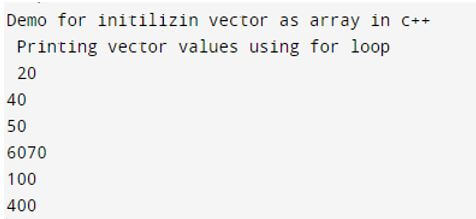
Explanation:
- We are creating vector object while certain it we are assigning values also as we do in arrays.
- It is a very easy approach to follow.
4. Array to vector
In this approach, we can initialize the vector by using the array itself.
Example:
Code:
#include <iostream>
#include <bits/stdc++.h>
using namespace std;
int main()
{
cout << "Demo for initilizin vector as array in c++" << "\n ";
int array[] = { 100,200, 300, 400, 500 };
int sizeCal = sizeof(array) / sizeof(array[0]);
cout << "size iss :::" << " ";
cout << sizeCal << " \n";
vector<int> vetcrdemo(array, array + sizeCal);
cout << "Printing vector values using for loop" << "\n ";
for (int value : vetcrdemo)
cout << value << " ";
return 0;
}
Output:
Explanation:
- In this, we are creating one array; after this, we are using this array to initialize the vector object.
- For this, we are passing our array inside the vector object as well as the size that we have calculated.
5. Copy one vector form another
In this approach, we can copy vector values to another vector using two methods specified below.
Example:
Code:
#include <iostream>
#include <bits/stdc++.h>
using namespace std;
int main()
{
cout << "Demo for initilizin vector from another" << "\n ";
vector<int> vectordemo1{ 200, 300, 400, 500, 600, 700 };
cout << "Printing vector first values using for loop" << "\n ";
for (int value1 : vectordemo1)
cout << value1 << "\n";
cout << "copying values for one to two " << "\n ";
vector<int> vectordemo2(vectordemo1.begin(), vectordemo1.end());
cout << "Printing vector two values using for loop" << "\n ";
for (int value2 : vectordemo2)
cout << value2 << "\n";
return 0;
}
Output:
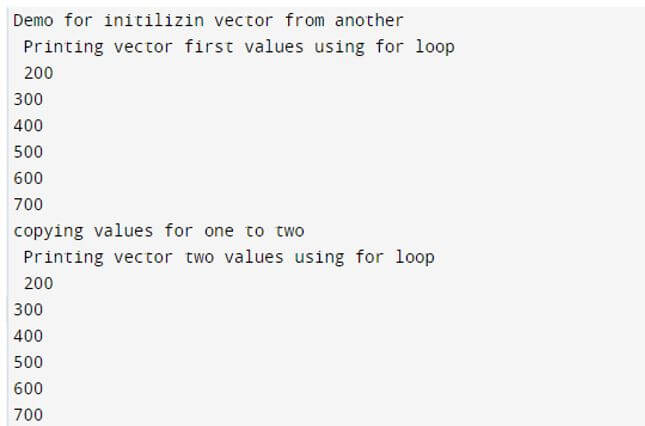
Explanation:
- In this example, we are creating a vector object and initializing its value, but we have created two vectors here by copying vector one value to another using begin() and end() method of a vector.
- This will copy all the elements of the vector to anther vector.
Conclusion
As of now, we know that vectors are used to store elements. They can handle dynamic data well; it is very easy to initialize data in vector by using methods available in C++. They also provide resizing of the data because they provide and come up with better flexibility to handle the dynamic data. We always know our data won’t be fixed in size, so arrays cannot be used everywhere.
Recommended Articles
This is a guide to C++ vector Initialization. Here we discuss the introduction and how to initialize vector in C++ using various methods? You may also have a look at the following articles to learn more –


