Updated April 10, 2023
Introduction to React Native Keyboardavoidingview
Keyboards are an important part of a smartphone. Various applications need the user to fill in some text or information, for this automatically a keyboard appears on the screen. Keyboard Avoiding View is generally used for closing the keyboard. It is used for wrapping the complete form we made through Text Input and closes the keyboard when touched outside the Text Input box. Keyboard avoiding view is very much useful for iOS as it has a back button for closing the keyboard. This feature is available by default for React Native Text Input. While using the Request focus keyboard avoiding view is necessary to use. This article explains the concept of the Keyboard Avoiding view through different examples. In this topic, we are going ot learn about React native keyboardavoidingview.
Keyboardavoidingview Syntax
Below syntax shows the syntax to import keyboardAvoidingView in React Native based application and also focuses on the usage of keyboardAvoidingView in React Native based application.
import { View
, KeyboardAvoidingView
, Image
, TextInput
, StyleSheet
, Text
, ImageBackground
, Platform
, TouchableWithoutFeedback
, Button
, Keyboard } from 'react-native';
<KeyboardAvoidingView>
// style according to your requirement
</KeyboardAvoidingView>
Example of React native keyboardavoidingview
Keyboardavoidingview usage in React Native explained with examples:
Example #1
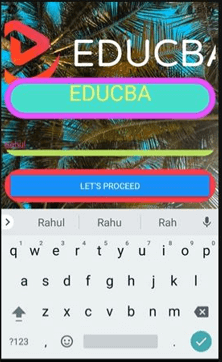
Below, we have developed a page in React Native based application that is styled using different React Native components including stylesheet, image, text, imagebackground, and button. We have also imported keyboard and keyboardAvoidView components from react-native. When we click above the green line to data enter, the keyboard appears to let users input data with the best user experience.
[i] App.js –
import React from 'react';
import { View
, KeyboardAvoidingView
, Image
, TextInput
, StyleSheet
, Text
, ImageBackground
, Platform
, TouchableWithoutFeedback
, Button
, Keyboard } from 'react-native';
const styles = StyleSheet.create({
docker: {
flex: 1,
alignItems: 'center'
},
inside: {
padding: 24,
flex: 1,
justifyContent: "space-around"
},
input: {
height: 40,
borderColor: "#bbed64",
color: '#e32480',
textShadowColor : '#79edd0',
borderBottomWidth: 10,
marginBottom: 36,
borderRadius: 100/2
},
});
const keyboardavoidingviewexample = () => {
return (
<ImageBackground
source={{
uri:
'https://images.pexels.com/photos/1862695/pexels-photo-1862695.jpeg?auto=compress&cs=tinysrgb&dpr=1&w=500',
}}
style={{flex: 1}}
>
<KeyboardAvoidingView
behavior={Platform.OS === "ios"
? "padding"
: "height"}
style={styles.docker}
>
<TouchableWithoutFeedback onPress={Keyboard.dismiss}>
<View style={
styles.inside
}>
<Image
source={{
uri:
'https://cdn.educba.com/academy/wp-content/uploads/2020/05/cropped-website_logo_transparent_background_white.png',
}}
style={{
height: 130,
marginTop: 10,
width: 350,
}}
/>
<Text style={
{ fontSize: 36
, marginBottom: 48
, color: '#faf569'
, backgroundColor: '#54f0cb'
, alignItems: 'center'
, borderWidth: 10
, textAlign: 'center'
, borderRadius: 100
, borderColor: '#d938f5'
, justifyContent: 'center'}
}>EDUCBA
</Text>
<TextInput
placeholder="Yourentry"
style={
styles.input
} />
<View
style={{
backgroundColor: "#d83ef0",
marginTop: 12,
color: '#f2bf7c',
borderWidth: 10,
borderRadius: 100,
borderColor: '#f0294d'
}}>
<Button
title=
"Let's Proceed"
onPress={() => null} />
</View>
</View>
</TouchableWithoutFeedback>
</KeyboardAvoidingView>
</ImageBackground>
);
};
export default keyboardavoidingviewexample;
Output:
- On code execution –
- On entering your entry above the green line –
Example #2
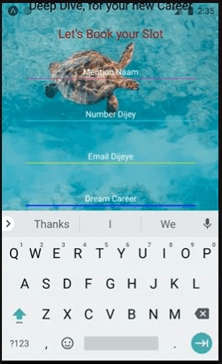
Below, we have developed a page in React Native based application which is styled using different React Native components including stylesheet, image, text, imagebackground, scrollview, touchableopacity, and button. We have also imported keyboard and keyboardAvoidView components from react-native. When we click “Mention Naam” to data enter, the sentence keyboard appears to let users input data with the best user experience. When we click “Number Dijey” to data enter, the number keyboard appears to let users input data with the best user experience. Similarly, different keyboards appear on clicking “Email Dijey” and “Dream Career” texts respectively.
[i] App.js
import React
, {useState
, createRef} from 'react';
import {
SafeAreaView
, StyleSheet
, ImageBackground
, TextInput
, View
, Image
, Button
, Text
, KeyboardAvoidingView
, Keyboard
, TouchableOpacity
, Dimensions
, ScrollView
} from 'react-native';
const styles = StyleSheet.create({
container: {
flex: 1,
backgroundColor: 'white',
},
textInputStyle: {
flexDirection: 'row',
height: 40,
marginTop: 20,
marginLeft: 35,
marginRight: 35,
margin: 10,
},
});
const App = () => {
const userRegisterFunction = () => {
alert('User Registered');
};
const [naam
, setUserNaam] = useState('');
const [Email
, setUserEmail] = useState('');
const [number
, setUserNumber] = useState('');
const [career
, setUsercareer] = useState('');
return (
<SafeAreaView style={styles.container}>
<ScrollView keyboardShouldPersistTaps="handled">
<View style={styles.container}>
<View>
<ImageBackground
source={{
uri:
'https://images.pexels.com/photos/4784955/pexels-photo-4784955.jpeg?auto=compress&cs=tinysrgb&dpr=1&w=500',
}}
style={{flex: 1}}
>
<Image
source={{
uri:
'https://cdn.educba.com/academy/wp-content/uploads/2020/05/cropped-website_logo_transparent_background_white.png',
}}
style={{
height: 130,
marginTop: 10,
width: 350,
}}
/>
<Text style={{fontSize: 20,
textAlign: 'center',
margin: 10,}}>
Deep Dive, for your new Career
</Text>
<Text style={{fontSize: 20,
textAlign: 'center',
margin: 10,
color: '#9c062c',}}>
Let's Book your Slot
</Text>
<KeyboardAvoidingView enabled>
<View style={styles.textInputStyle}>
<TextInput
style={
{flex: 1
, color: '#1218db'}
}
onChangeText={
(naam) => setUserNaam(naam)
}
underlineColorAndroid="#e016b1"
textAlign= 'center'
placeholder="Mention Naam"
placeholderTextColor="#fafaff"
autoCapitalize="sentences"
ref={naamInputRef}
returnKeyType="next"
onSubmitEditing={() =>
EmailInputRef.current &&
EmailInputRef.current.focus()
}
blurOnSubmit={false}
/>
</View>
<View style={styles.textInputStyle}>
<TextInput
style={
{flex: 1
, color: '#1218db'}
}
onChangeText={
(number) => setUserNumber(number)
}
underlineColorAndroid="#4cfcee"
textAlign= 'center'
placeholder="Number Dijey"
placeholderTextColor="#fafaff"
autoCapitalize="sentences"
keyboardType="numeric"
ref={numberInputRef}
onSubmitEditing={() =>
careerInputRef.current &&
careerInputRef.current.focus()
}
blurOnSubmit={false}
/>
</View>
<View style={styles.textInputStyle}>
<TextInput
style={
{
flex: 1
, color: '#1218db'
}
}
onChangeText={
(Email) => setUserEmail(Email)
}
underlineColorAndroid="#fbff17"
textAlign= 'center'
placeholder="Email Dijeye"
placeholderTextColor="#fafaff"
autoCapitalize="sentences"
keyboardType="email-address"
ref={EmailInputRef}
returnKeyType="next"
onSubmitEditing={() =>
numberInputRef.current &&
numberInputRef.current.focus()
}
blurOnSubmit={false}
/>
</View>
<View style={styles.textInputStyle}>
<TextInput
style={
{flex: 1
, color: '#1218db'}
}
onChangeText={
(career) => setUsercareer(career)
}
underlineColorAndroid="#1326f2"
borderColor= '#222dbf'
textAlign= 'center'
placeholder="Dream Career"
placeholderTextColor="#fafaff"
autoCapitalize="sentences"
ref={careerInputRef}
returnKeyType="next"
onSubmitEditing={Keyboard.dismiss}
blurOnSubmit={false}
/>
</View>
<TouchableOpacity
style={{
backgroundColor: '#bbf765',
borderWidth: 5,
color: '#FFFFFF',
borderColor: '#222dbf',
height: 40,
alignItems: 'center',
borderRadius: 50,
marginLeft: 35,
marginRight: 35,
marginTop: 30,
}}
activeOpacity={0.5}
onPress={userRegisterFunction}>
<Text style={
{color: '#0d0c0d',
paddingVertical: 10,
backgroundColor: '#f0a356',
fontSize: 16,}}>
ENTER DREAM CAREER
</Text>
</TouchableOpacity>
</KeyboardAvoidingView>
</ImageBackground>
</View>
</View>
</ScrollView>
</SafeAreaView>
);
const naamInputRef = createRef();
const EmailInputRef = createRef();
const numberInputRef = createRef();
const careerInputRef = createRef();
};
export default App;
Output:
- On Code execution –
- Click to fill “Mention Naam” –
- Click to fill “Number Dijey” –
- On clicking “Email Dijey” –
- Click to Fill “Dream Career” –
Conclusion
Based on the above article, we understood the concept of Keyboard avoiding view in React Native. This article explains multiple examples of the implementation of Keyboard avoiding view. This article would help the budding web developers in understanding the Keyboard avoiding view.
Recommended Articles
This is a guide to React native keyboardavoidingview. Here we discuss the introduction, syntax, and different examples of React native keyboardavoidingview along with code implementation. You may also have a look at the following articles to learn more –


