Updated April 19, 2023
Introduction to Flask API
Flask API is defined as a methodology to make HTTP calls to the server to get the data to populate the dynamic parts of the application. Flask is a framework that allows users to fetch data for the server, and corresponding to the use case, API is the most preferred methodology. The data that Flask API retrieves can be represented in a database, stored in a file, or accessible by network protocols. The job of API is to decouple the data and the application and take care of hiding the data implementation details. This article will look at Flask API’s implementation and its syntax and look at the said theory’s hands-on implementation. Without much further ado, let’s get started!
Syntax
Before we look at the syntax involved in Flask APIs, we must understand that API stands for Application Programming Interface. As the name suggests, it is an interface that helps to define the interactions of multiple software applications or any hardware or software intermediate. In this section, we will learn about the creation of API in a flask from the syntax perspective so that when we learn about how to create an API in Flask so that it is easier to map it back with the syntax learned here for a complete picture of the topic in discussion.
Instantiating return of JSON library:
from flask import jsonifyReturn JSON from a function:
return jsonify({'key 1': 'value 1',
'key 2': 'value 2'})
Mention the request method:
@< Flask app variable >.route('/', methods=['< Request Method >'])Of the request methods available, the syntax for each looks like this:
@< Flask app variable >.route('/', methods=['< GET >'])
@< Flask app variable >.route('/', methods=['< POST >'])
@< Flask app variable >.route('/', methods=['< PUT >'])
@< Flask app variable >.route('/', methods=['< DELETE >'])
@< Flask app variable >.route('/', methods=['< PATCH >'])
@< Flask app variable >.route('/', methods=['< HEAD >'])
Defining the API endpoint:
@<Flask app variable>.route('/< characters signifying end point >')How to Create API in Flask?
In order to start talking about creating API in Flask, it is important to know about some prerequisites that come in handy so that one doesn’t encounter a problem while starting to create API in Flask. Below are the steps we follow:
1. Install Python 3: In this article, we will focus on building APIs through Flask in Python 3. In case python is not installed, it is mandatory to install Python, and in case Python is installed, we would double-check if the version is the same as Python 3 by executing the python –version.
2. Install Flask: The next step is to ensure that the Flask is installed in our system in case it is not already installed. This can be done by running pip install Flask. Once the module is installed, we can write down a small Hello World code as a python file and run that python file to check if everything is working. After we run the python code, we would need to go to a web browser and enter http://localhost:5000 to see if you see Hello World getting printed there. The code is as follows:
from flask import Flask
appFlask = Flask(__name__)
@appFlask.route("/")
def hello_world():
    return "Hello, World!"
3. Create RESTFul API with Flask: now that the Flask application background is set up and is well structured, we would be to architecture relevant endpoints. These endpoints should be defined to allow users to manage the utility of the function that will be defined for the corresponding endpoint.
4. Adding variables to the URL: In order to make the API more dynamic, one can add a variable name into the endpoint by wrapping it within < >, something like < variable name>.
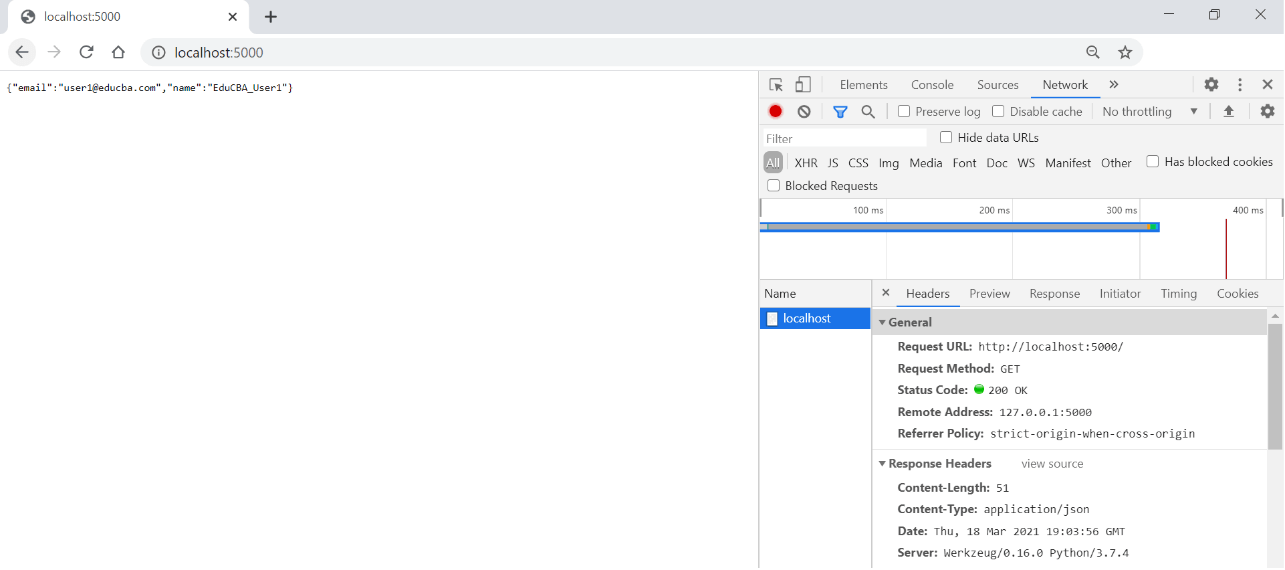
5. Return of JSON object: One of the most critical places in an API is to be able to return the output as a JSON object. For this, we use a module in Python named jsonify. Jsonify can be used to serialize lists and tuples automatically to JSON and also for dictionary objects. The JSON data type can be checked with google dev tools to make sure it is actually JSON and a string that looks like JSON. We will look at it in our examples.
6. Redirection: Another unique behavior of URLs is having the ability to redirect. Not every URL should have individual content. Some of them are meant for redirection and can be done using API.
7. Return of Status Code: Now, every API call is attached with the status code. These codes can be either 200, i.e., success, or something we have in common, like 404.
8. Logging: Each Flask API built enables you to have a logging system so that one can debug the logs to get to the root cause if anything in the application behaves weird.
Examples of Flask API
Below are the different examples of API in Flask:
Example #1
Instantiating return of JSON library:
Code:
from flask import jsonify
jsonify
Output:
Example #2
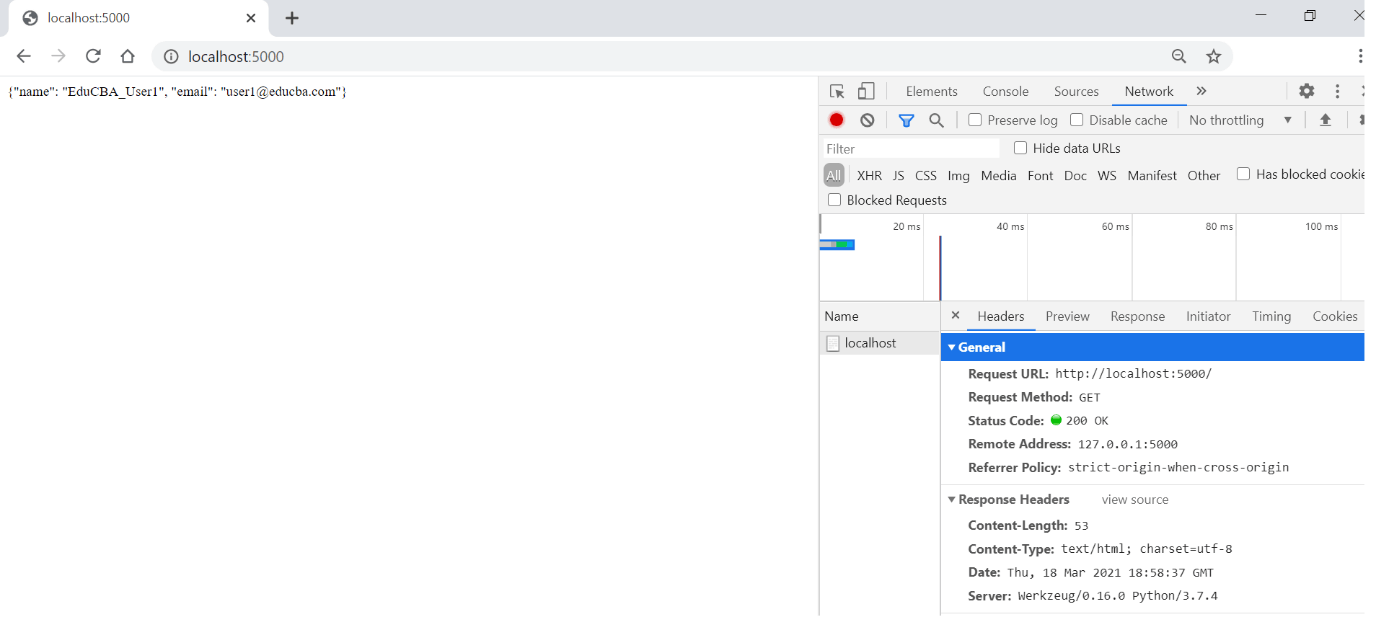
Build an application with just JSON string:
Code:
import json
from flask import Flask
appFlask = Flask(__name__)
@appFlask.route('/')
def index():
    return json.dumps({'name': 'EduCBA_User1',
'email': '[email protected]'})
appFlask.run()
Output:
Example #3
Build an application with just a JSON object:
Code:
import json
from flask import Flask, jsonify
appFlask = Flask(__name__)
@appFlask.route('/')
def index():
    return jsonify({'name': 'EduCBA_User1',
'email': '[email protected]'})
appFlask.run()
Output:
Here we can see the content type change from text/html, as seen in example 2, to something which is application/json, as seen in this example.
Conclusion
In conclusion, in this article, we have learned about how API is configured and created in Flask. We can also use hands-on examples to include all the features we mentioned in the making of API in Flask and keep in mind the nuances that might make the APIs heavier. Use the template which suits best the application. Like anytime else, the rest is to you for experimentation to try out the blueprint that is mentioned here in this article!
Recommended Articles
We hope that this EDUCBA information on “Flask API” was beneficial to you. You can view EDUCBA’s recommended articles for more information.


