Updated December 21, 2023
Introduction to OpenCV on Ubuntu
Open-source computer vision (OpenCV) is a publicly accessible artificial intelligence and machine learning software library for computer vision applications. OpenCV adapts to multiple programming platforms and offers various tools and algorithms. It aligns best with segments like image processing, object detection, motion tracking, facial recognition, etc. Deploying OpenCV on Ubuntu allows smooth functioning and high performance.
Installation and Implementation are quite convenient using the Ubuntu terminal. Let us dive into its installation process.
Table of contents:
- Introduction of Install OpenCV on Ubuntu
- Prerequisites
- Update and upgrade system packages
- Install Dependencies
- How to Install OpenCV on Ubuntu?
- Troubleshooting Common Issues
- Example of Using OpenCV in Python
Key takeaway
- OpenCV integrates with various programming languages.
- OpenCV is a versatile library comprising over 2500 algorithms and countless functionalities for computer vision tasks.
- OpenCV facilitates parallel processing and computing, allowing for superior performance.
- It is easily integrated with the scientific computational library for influential vision projects.
- Easy installation and Implementation.
Prerequisites
- Installed Ubuntu system with version 20.04 or 22.04 and a good internet connection
- Essential command skills and terminal access
- A user account with administrative privileges
- Updated and upgraded system
- Installed development tools and dependencies.
Update and upgrade system packages
Ensure the system is updated and upgraded with the latest packages before installing OpenCV to avoid conflict. To update and upgrade the system, use the following command line. Search for “terminal” to open a command prompt.
- Update command
sudo apt update
It is good practice to use the update command before every software installation.
- Upgrade
sudo apt upgrade
Install Dependencies
We must install the essential development tools, image and video processing libraries, Python packages, and other dependencies to set up OpenCV and ensure its smooth functioning. Below is the command line to install the essential dependencies
1) Basic Development Tools
sudo apt install build-essential cmake2) Graphical user interface libraries
sudo apt install libgtk-3-dev3) Audio and video processing and support
Library for Audio and Video Codes:
sudo apt install
libavcodec-dev
libavformat-dev
libswscale-dev
Library for Video4Linux and capture support
sudo apt install libv4l-devLibrary for Xvid and x264 video codecs
sudo apt install libxvidcore-dev libx264-dev4) (HDR) Image Format:
sudo apt install openexr libopenexr-dev5) Algebra and Mathematical Optimization:
sudo apt install libatlas-base-dev gfortran6) Multimedia Libraries:
sudo apt install libgstreamer-plugins-base1.0-dev libgstreamer1.0-dev7) Python libraries
For Integrating Python and OpenCV
sudo apt install python3-devAllow package management with pip and set virtual environment.
sudo apt install python3-pip
sudo apt install python3-venv
To perform Python numerical operations with OpenCV
pip install numpy8) Threading Building Blocks library
sudo apt install libtbb
2 libtbb-dev
9) Image formatting Libraries:
sudo apt install libjpeg-dev libpng-dev libtiff-dev10) FireWire Camera Support:
sudo apt install libdc1394-devHow to Install OpenCV on Ubuntu? (Step by Step)
Ubuntu allows us to install OpenCV with different methods, some of which are listed below:
Method 1: Installing OpenCV from Ubuntu Repositories
The easiest and most efficient way to install OpenCV is from the standard Ubuntu repository. Run the below command for easy installation. But 1st, update the Ubuntu packages.
Step 1: Update the Ubuntu packages list
sudo apt update
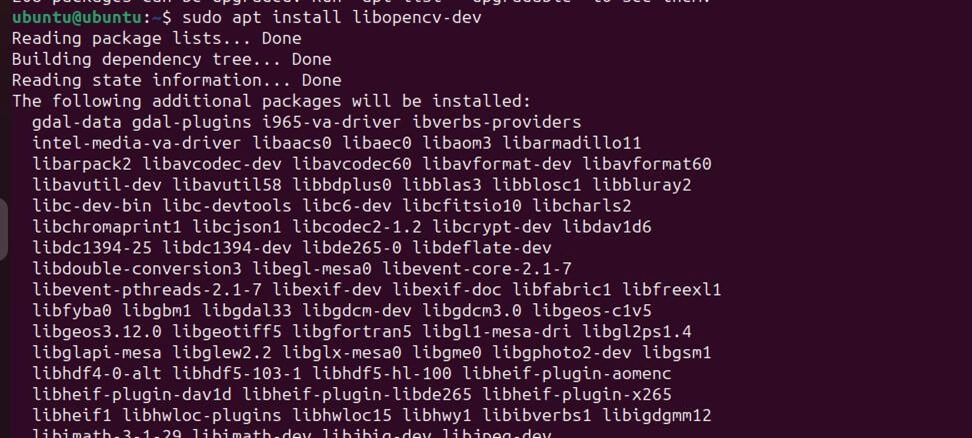
Step 2: Install OpenCV
sudo apt install libopencv-dev
Use the apt package manager to install OpenCV. The command above will install the latest development library in the Ubuntu repository.
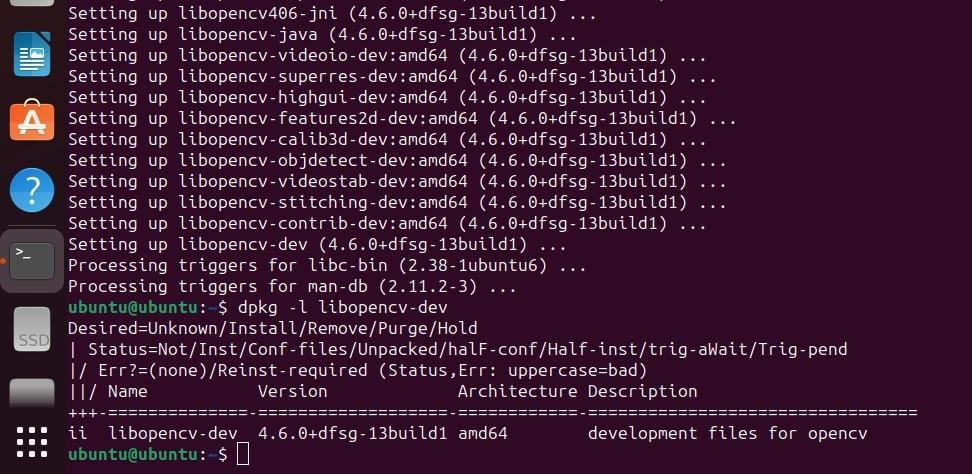
Step 3: Check the version to confirm the OpenCV installation by using the command:
dpkg -l libopencv-dev
As we can see, 4.6.0 is installed.
Method 2: Installing OpenCV on Ubuntu from the source.
This means we will make a folder to copy the OpenCV repo using git. This copying of the files is known as cloning, and after the cloning is done, we will install OpenCV.
Step 1: Let us start with our step of updating the Ubuntu.
sudo apt update
Step 2: Install essential libraries and plugins to build OpenCV, as explained in the “install dependencies” section.
Step 3: Create a build directory as “opencv_build” or any other convenient name you choose, and access the directory.
mkdir ~/opencv_build && cd ~/opencv_build
Step 4: clone the official OpenCV repository with git
git clone https://github.com/opencv/opencv.git
Step 5: We also need to copy some additional remaining modules of OpenCV
git clone https://github.com/opencv/opencv_contrib.git
Step 6: We need to build an additional folder inside the opencv_build folder and go inside that folder
mkdir -p ~/opencv_build/opencv/build && cd ~/opencv_build/opencv/build
Step 7: Now, we need to set the configuration of the OpenCV before building and installing it. In the below command, we will specify the type of build, installation of Python and C, prefixes required for installation, etc.
cmake -D CMAKE_BUILD_TYPE=Release
-D CMAKE_INSTALL_PREFIX=/usr/local
-D INSTALL_C_EXAMPLES=ON
-D INSTALL_PYTHON_EXAMPLES=ON
-D OPENCV_GENERATE_PKGCONFIG=ON
-D BUILD_EXAMPLES=ON
-D OPENCV_EXTRA_MODULES_PATH=~/opencv_build/opencv_contrib/modules ..
Step 8: Once all the configurations are defined, start to build.
make -j3
Step 9: Installing is the last step.
sudo make install
Method 3: Installation using Python
In this method, it is recommended to create an environment where the code is clean, there is no conflict between projects and packages, and the storing of dependencies is done separately. Such an environment is technically termed a virtual environment. This virtual environment can be achieved using the Python module
named “venv.”
Step 1: “venv” doesn’t come by default with Python, so we need to install it.
sudo apt install python3.10-venv –y
Step 2: Create a suitable environment with a proper name after the installation. In our case, it is “myenv.”
sudo python3 -m venv myenv
Step 3: In order to work under the environment, we need to activate the environment.
Source myenv/bin/activate
Step 4: Once we have entered the virtual environment, install OpenCV
sudo pip3 install opencv-python
Method 4: Installation using Anaconda.
Anaconda is a Python distribution mainly known for installing and managing packages and creating a package management system.
The installation algorithm is the same as the above method; only the commands differ.
Step 1: Set up an environment to work in.
Conda create -n myenv python=3.10.6
Step 2: Once the environment is created, activate it using the below command
conda activate myenv
Step 3: After entering into the environment, installation of OpenCV can be executed using the command
conda install -c conda-forge opencv
Troubleshooting Common Issues
We might face some issues and errors while installing OpenCV
Here are some common problems and techniques to encounter them
1. Missing dependencies
Issue: Errors during installation indicating the missing packages
Solution: look for the lost package from the error window and install that package. Use the below command.
sudo apt install <missing_package_name>
2. Dependencies package
Issue: For different projects, we require different versions of packages and these cause dependencies conflict
Solution: set up the virtual environment using the “venv” module of Python. This creates a package management system to avoid conflicts.
3. Permission issue
Issue: Permission is denied while installing a particular package.
Solution: Make sure to add “sudo” at the start of the command.
Example of Using OpenCV in Python
Explanation of crucial steps in the below program
Step 1: Import the OpenCV library and OS module to define the image path.
Step 2: Define a function to display and save the image: display_Python_image and save_Python_image
Step 3: Read the image with the cv2.imread function
Step 4: Check for the image; display an error message if it is not found.
Step 5: Display the original image with the display_Python_image function
Step6: perform different OpenCV functions on the image to alter the image and display them
- Manipulate the image to black and white format with the cv2.cvtColor function
- Change the dimensions of the image with the cv2.resize function
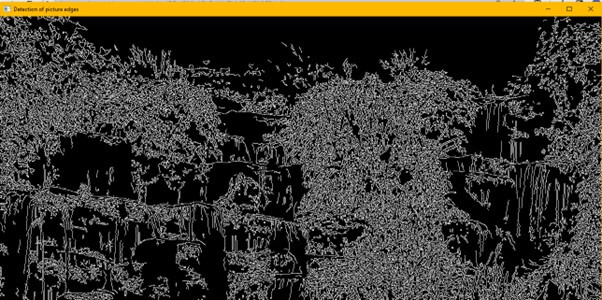
- Detect image edges with cv2.Canny function
- Rotate the image to a certain angle with the cv2.getRotationMatrix2D function.
import cv2
import os

def display_Python_image(window_name, image):
    cv2.imshow(window_name, image)
    cv2.waitKey(0)
    cv2.destroyAllWindows()

def save_Python_image(image, output_path):
    cv2.imwrite(output_path, image)
    print(f"Image is saved at {output_path}")

# Read Python image from the file
script_directory = os.path.dirname(os.path.realpath(__file__))
Python_image_path = os.path.join(script_directory, "Python_image.jpg")
original_Python_image = cv2.imread(Python_image_path)

# load the image
if original_Python_image is None:
    print(f"Image_Error: Unable to load the original image from {Python_image_path}")
else:
    # Displaying the original image
    display_Python_image("Displaying Original Image", original_Python_image)

    # Converting image to Black and White color
    BlackWhite_image = cv2.cvtColor(original_Python_image, cv2.COLOR_BGR2GRAY)

    # Displaying the Black and White image
    display_Python_image("Displaying image as balck and white", BlackWhite_image)

    # Save Black and White image
    BlackWhite_output_path = "path/to/your/BlackWhite_image.jpg"
    save_Python_image(BlackWhite_image, BlackWhite_output_path)

    # Resizing Image
    resized_pythonimage = cv2.resize(original_Python_image, (450, 450))
    display_Python_image("image with new dimension", resized_pythonimage)

    # Edge Detection
    image_edges = cv2.Canny(original_Python_image, 100, 200)
    display_Python_image("Detection of picture edges", image_edges)

    # Rotating Image
    rotation_matrix = cv2.getRotationMatrix2D((original_Python_image.shape[1] // 2, original_Python_image.shape[0] // 2), 45, 1)
    rotated_pythonimage = cv2.warpAffine(original_Python_image, rotation_matrix, (original_Python_image.shape[1], original_Python_image.shape[0]))
    display_Python_image("Rotated python Image", rotated_pythonimage)

    # Save Rotate Image
    rotated_image_route = "path/to/your/rotated_pythonimage.jpg"
    save_Python_image(rotated_pythonimage, rotated_image_route)
Output:
Displaying original image:
Displaying Black and White image:
Displaying image with new dimensions:
Detecting image Edges:
Rotated Image:
Conclusion
OpenCV allows developers to unlock robust computer vision features and create superior applications. It offers flexible methods to install virtually according to the developer’s requirements. With the help of an Ubuntu terminal and simple commands, OpenCV can be installed using four methods (repository, git, Anaconda, pip ), as discussed above.
FAQs
Q 1. How to integrate OpenCV with NumPy, TensorFlow, and PyTorch library
Answer: Integrating OpenCV with these libraries allows a smooth process for performing computing tasks. Below is a step-by-step guideline for library integration
Step 1: Import essential libraries for a specific task to be performed
Step2: Pre-process image with OpenCV functions like read, resize, and format image
Step3: Choose the appropriate model architecture from these computational libraries to define a mode
Step4: Train model with labeled datasets of images and perform data manipulation with OpenCV functions
Step 5: Make predictions and perform image analysis
Q2. How to manage multiple OpenCV versions on my OS
Answer: Some ways to manage various versions are:
- Isolated environment: Make a virtual environment separately for each specific OpenCV project
- Package manager: To manage different versions, use conda, pipenv, venv, pyenv, and virtualenvwrapper tools
- Installing manually: Make installation in separate directories and paths.
Q 3. How do you encounter dependency issues on Ubuntu?
Answer: To resolve the dependency issue, follow some steps:
1) Recognize missing package: In the error message, check the required dependency. To check package dependency, run the below command:
apt show [package name] or dpkg -I [package file]
2) Keep the package list up to date by below command
sudo apt update
3) Install missing dependencies. There are two ways to install dependencies:
Automatic installation:
sudo apt install [package name] -f
Manual installation
sudo apt install [dependency name]
Recommended Articles
We hope this EDUCBA information on “OpenCV on Ubuntu” benefited you. You can view EDUCBA’s recommended articles for more reports.


