What is Photoshop Generative Fill?
Imagine you have a photo and need to add or remove some elements from it. Instead of spending time manually editing it in Photoshop, you can use this interesting feature: Photoshop Generative Fill.
Generative Fill is a feature in Adobe Photoshop that allows users to customize images by adding, removing, or expanding content using simple text prompts. Adobe powers this feature with Adobe Firefly, a generative AI technology that Adobe developed.
Just type what you need, and it will work for you in seconds. This feature uses smart technology to fill in parts of the image using the surrounding details, making it look natural and realistic.
Table of Content
- Introduction
- Features of Generative Fill
- 4 Examples of Photoshop Generative Fill
- Tips for Effective Text Prompt
- How to Download?
- How to Access?
- Drawbacks
Features of Photoshop Generative Fill
Here are the features of Photoshop generative fill:
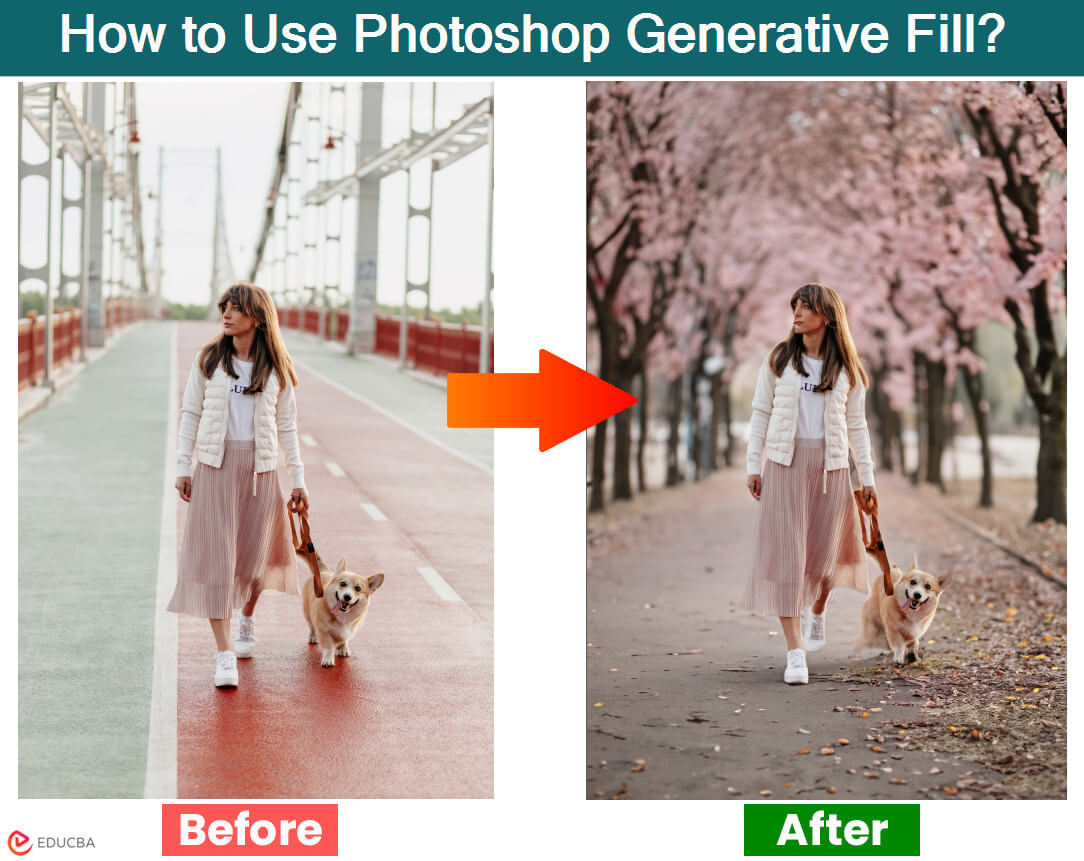
#1. Generate a New Background
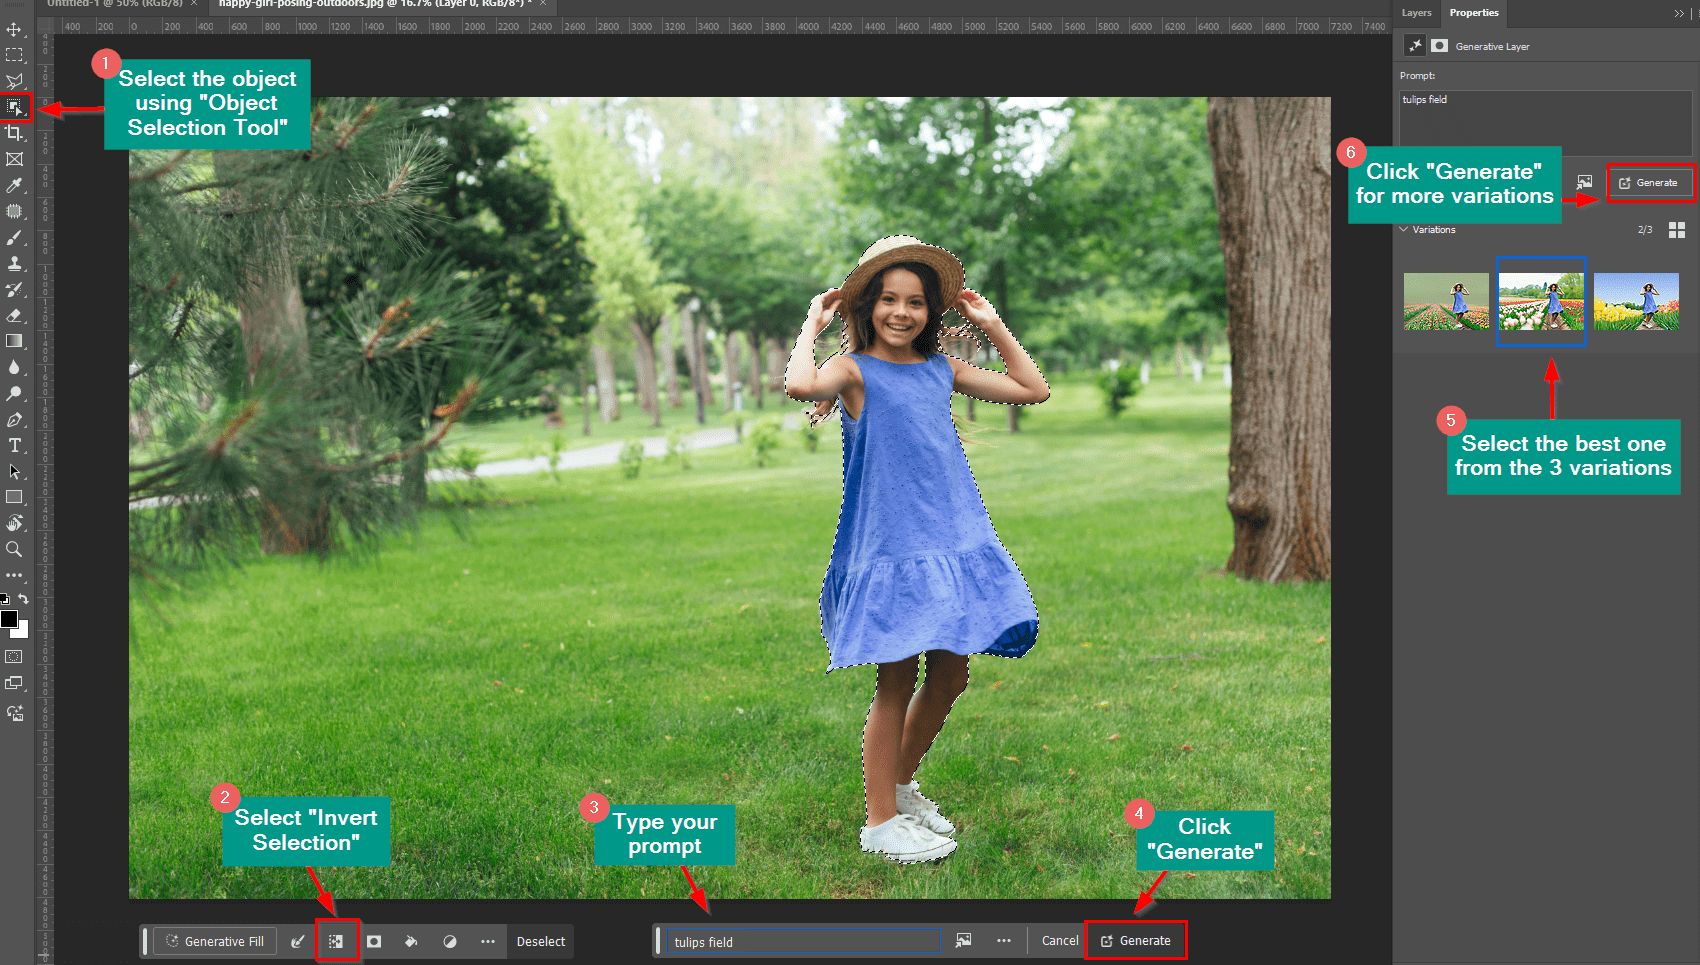
Imagine you have a photo of a girl standing in a park, but you want to make the background look more beautiful. To do this, you can change the background to a tulip garden. Here are the steps to follow:
Open the image in Photoshop and follow the below steps:
Step 1: Select the object using the “Object Selection Tool.”
Step 2: Select “Invert Selection” from the generative fill bar. This will select your entire image, leaving the subject unselected.
Step 3: Type your prompt in the prompt box like: “Tulips Field.”
Step 4: Click “Generate.”
Step 5: You will get 3 variations. Select the best one that suits you.
Step 6: If you don’t like the variations, you can click “Generate” again.
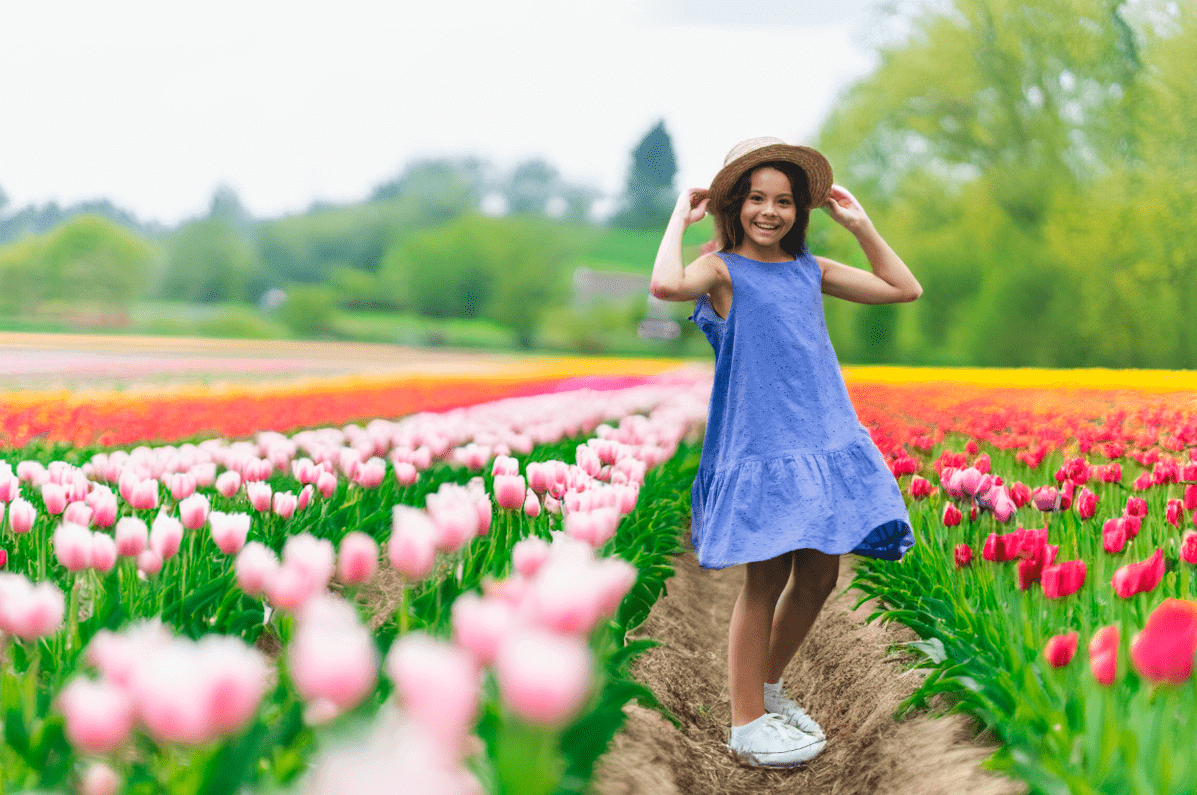
Result:
Generative fill changes the picture’s background to show a lovely garden full of tulips.
#2. Remove an Object
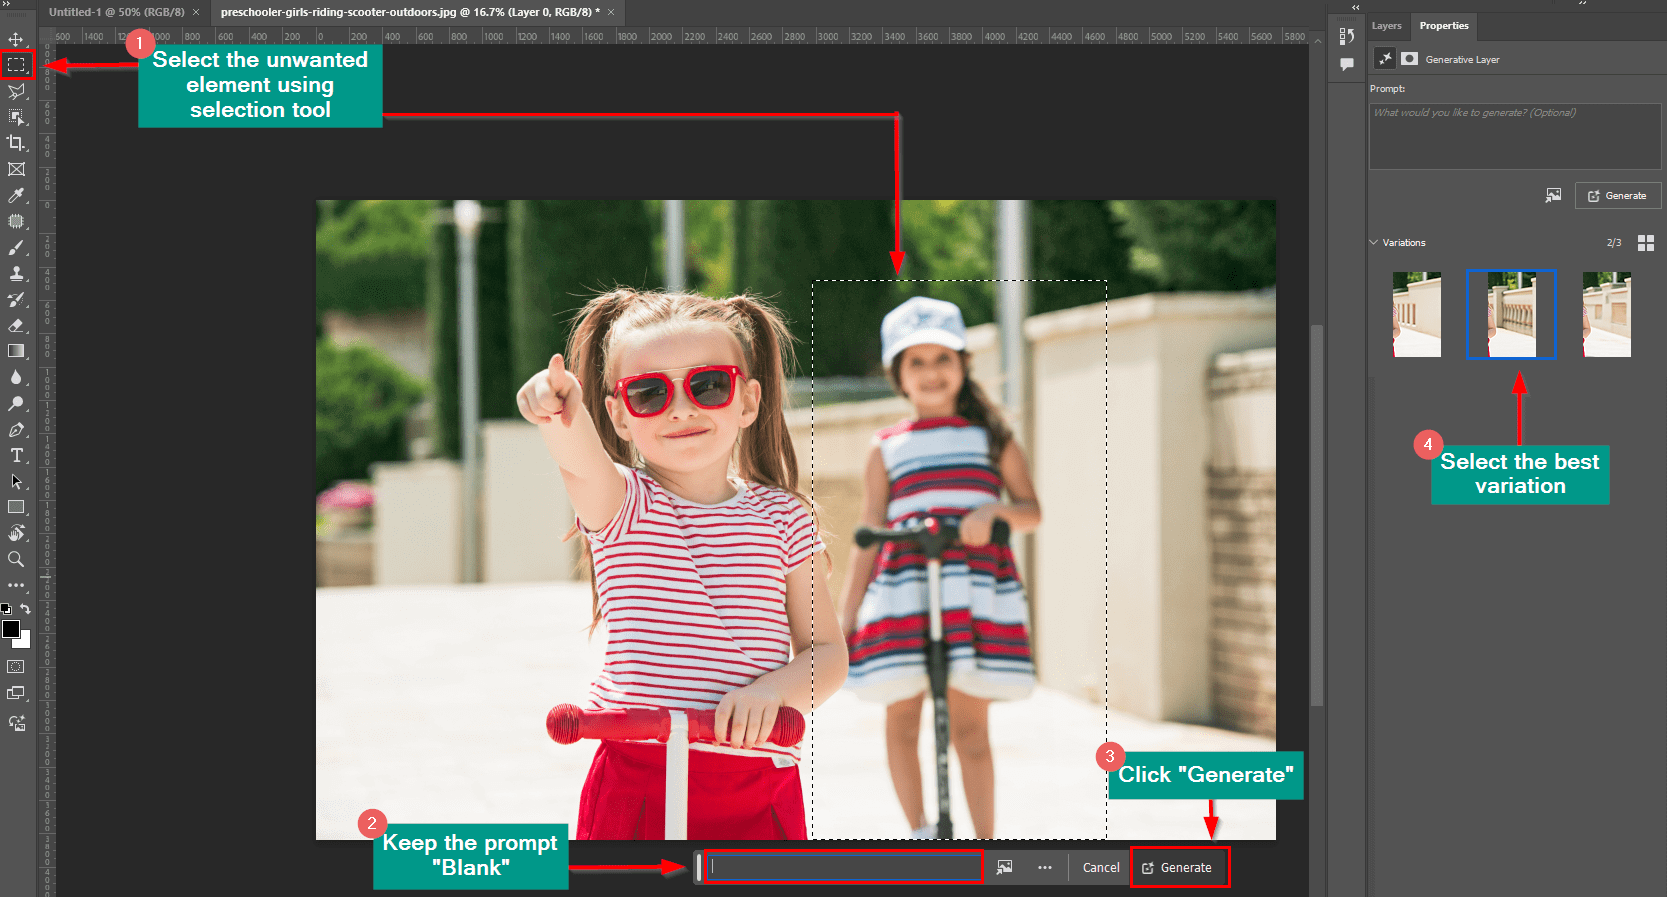
Imagine you have a picture of a young girl happily riding her scooter. However, there is another girl in the background that you don’t want in the photo. You want the main girl on the scooter to be the focus. So, you can remove the other girl by following the below steps:
Open the image where you want to remove an object and follow the below steps:
Step 1: Select the object that you don’t want to keep in the image using the lasso tool, rectangle tool, or any other selection tool.
Step 2: Click on the generative fill box and keep the field empty.
Step 3: Click “Generate.”
Step 4: Select the best variation.
Result:
The generative fill feature removes the girl in the background and keeps only the focused girl in the picture.
#3. Generate a New Object
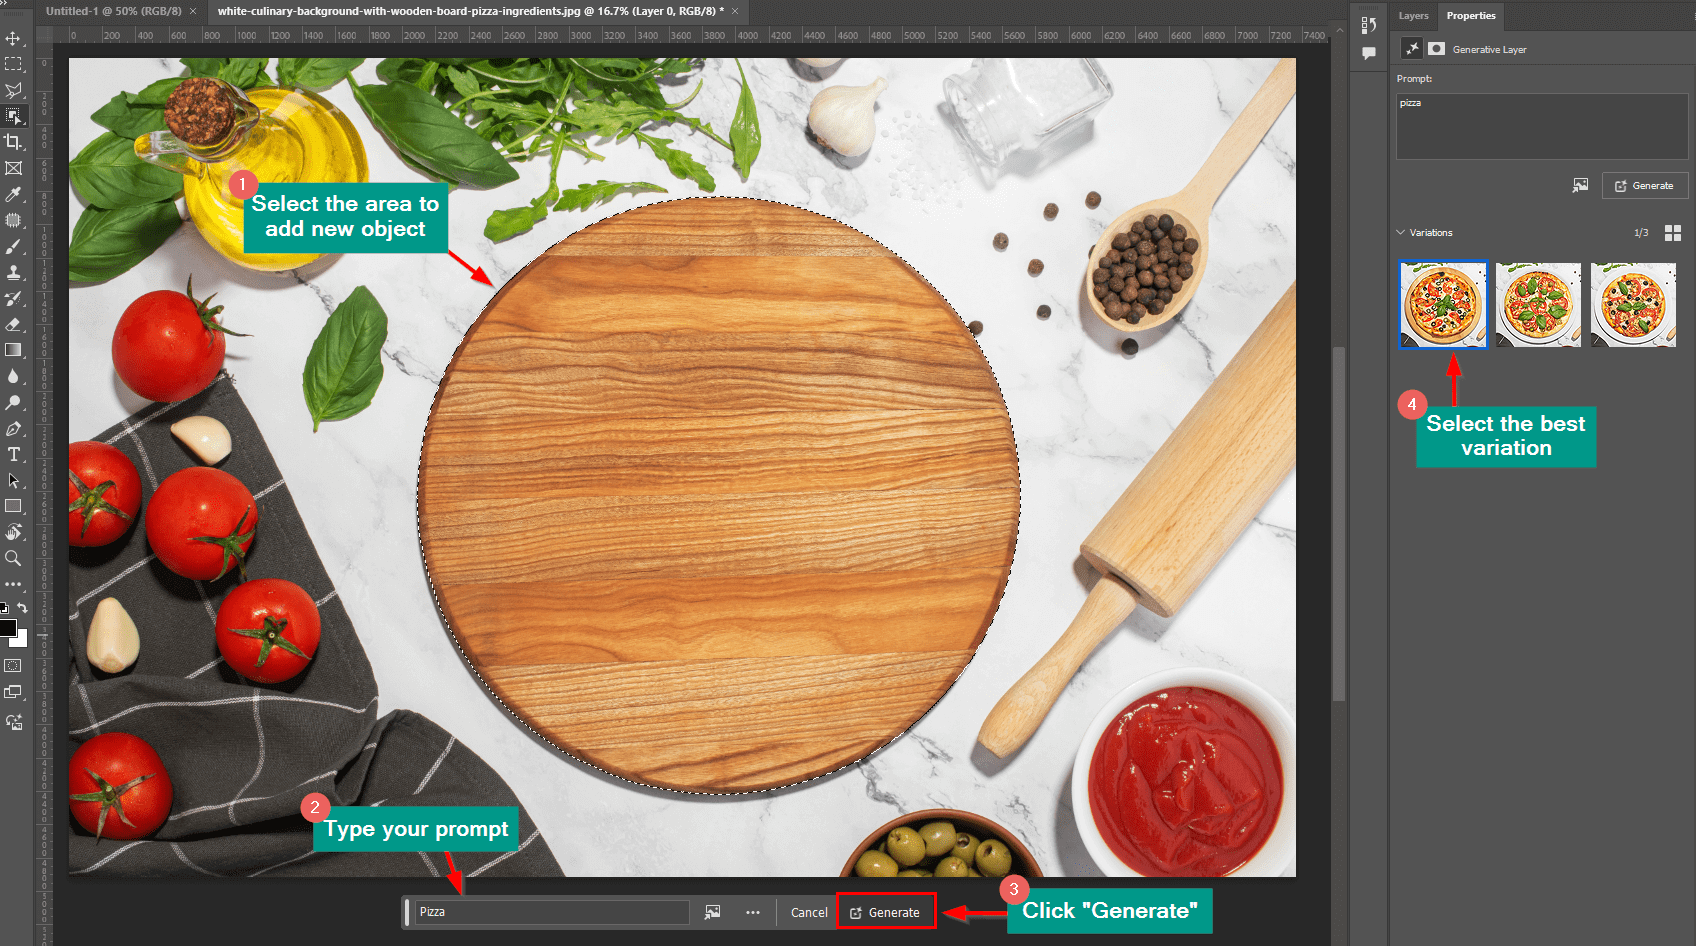
Let’s say you sell pizzas and want to spread the word about your business on social media. You are considering using pre-made templates to create eye-catching images of your pizzas. To do so, follow the below steps:
Open the image where you want to add a new object and follow the below steps:
Step 1: Select the area where you want to generate a new object.
Step 2: Click on the generative fill box and type your prompt like: “Pizza.”
Step 3: Click “Generate.”
Step 4: Select the best variation.
Result:
With the help of the generative fill feature, you get a tempting pizza within a few clicks.
#4. Extend the Canvas
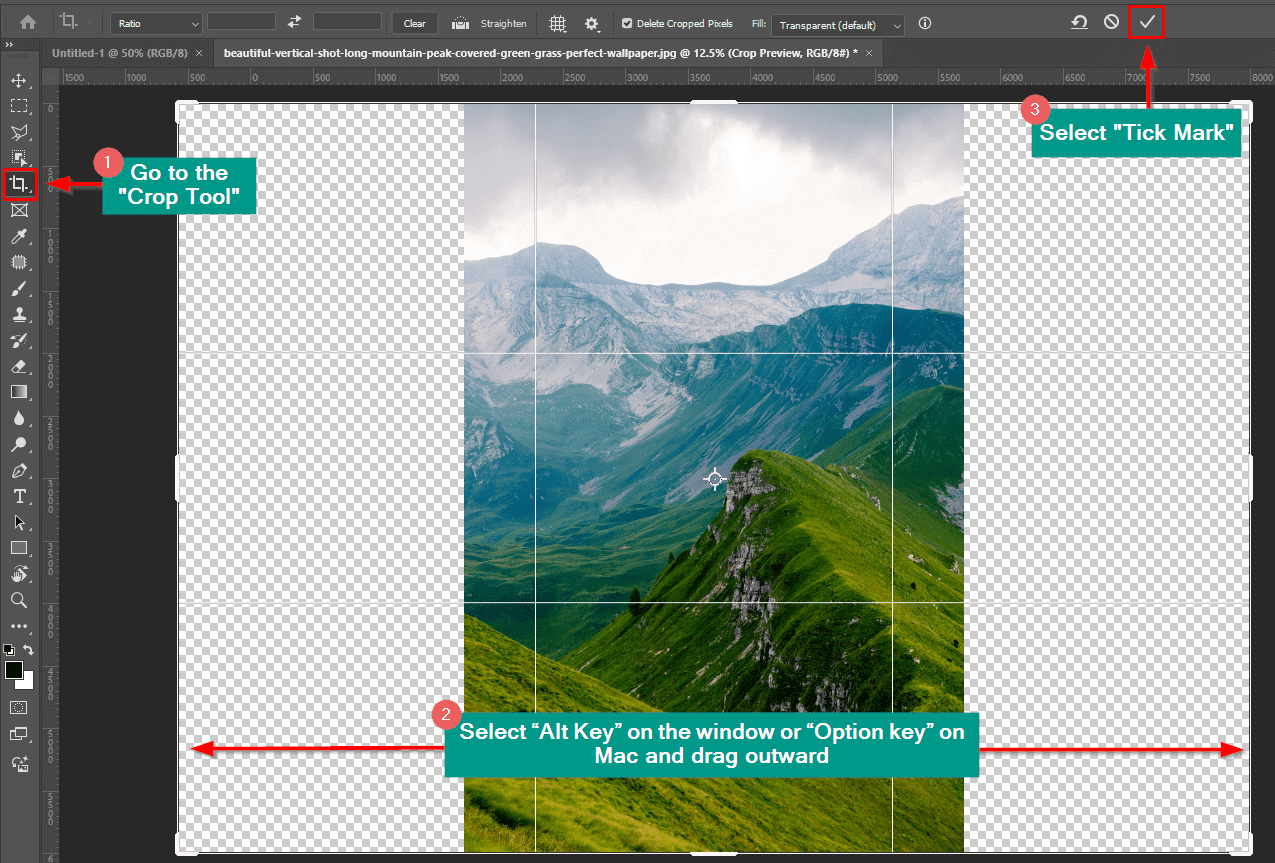
Imagine you have a vertical picture of a stunning scene but want to make it wider to fill up more space. Let’s see how to do that:
Open the image where that you want to extend and follow the below steps:
Step 1: Go to the “Crop Tool.”
Step 2: Select the “Alt Key” on the window or the “Option key” on the Mac and drag it outward until you need it.
Step 3: Select the Tick mark on the top.
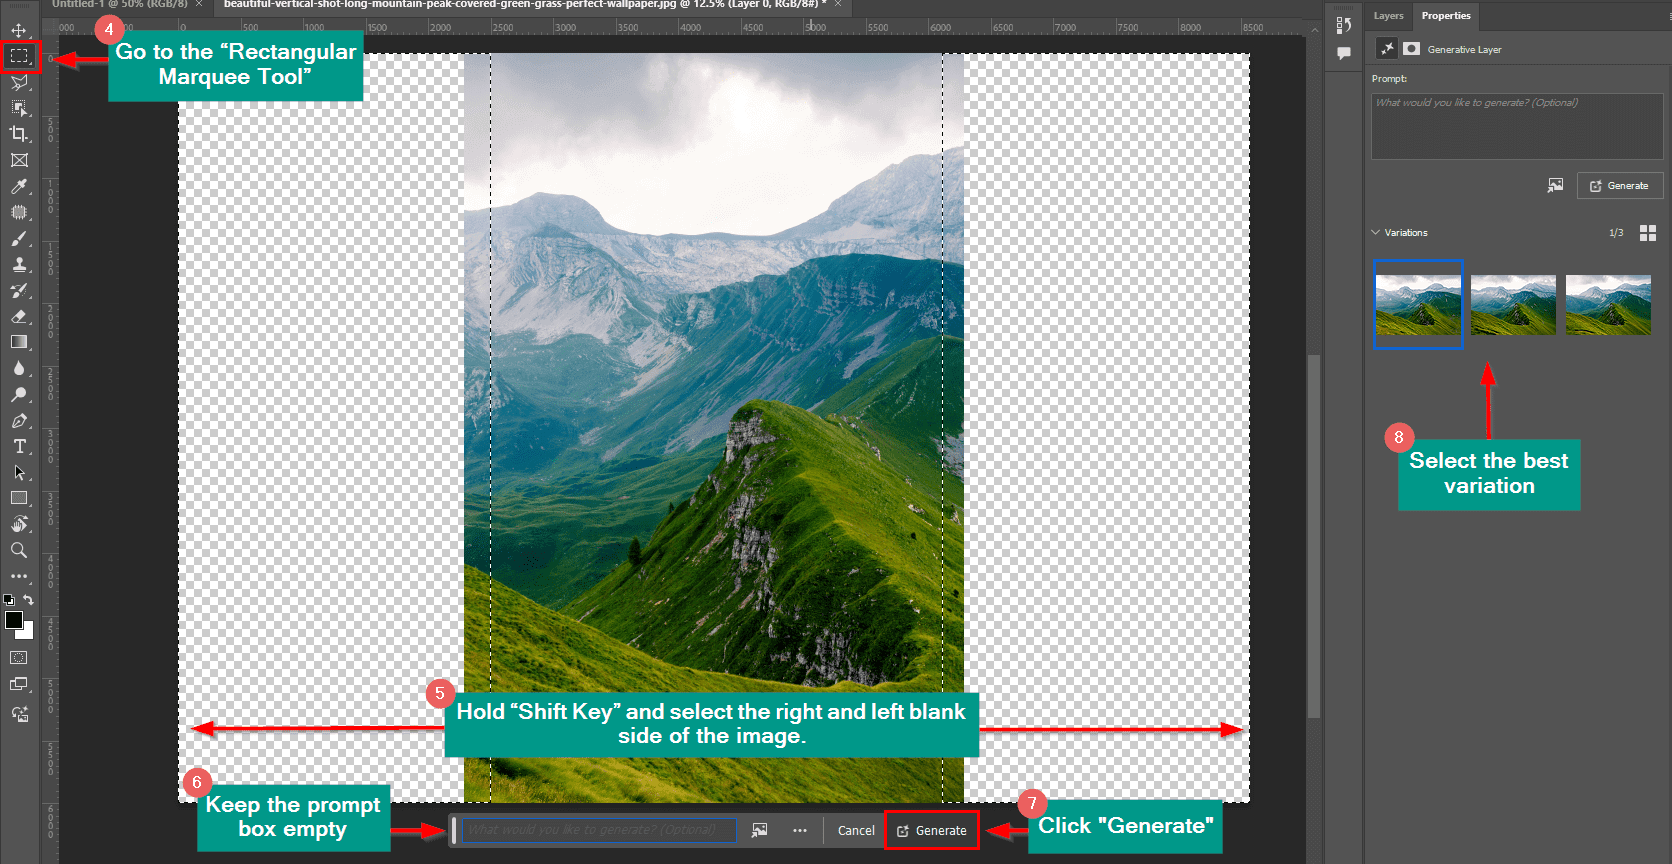
Step 4: Go to the “Rectangular Marquee Tool.”
Step 5: Hold the “Shift Key” and select the right and left blank sides of the image.
Step 6: Go to the generative fill tab and keep the prompt box empty.
Step 7: Click “Generate”
Step 8: Select the best variation.
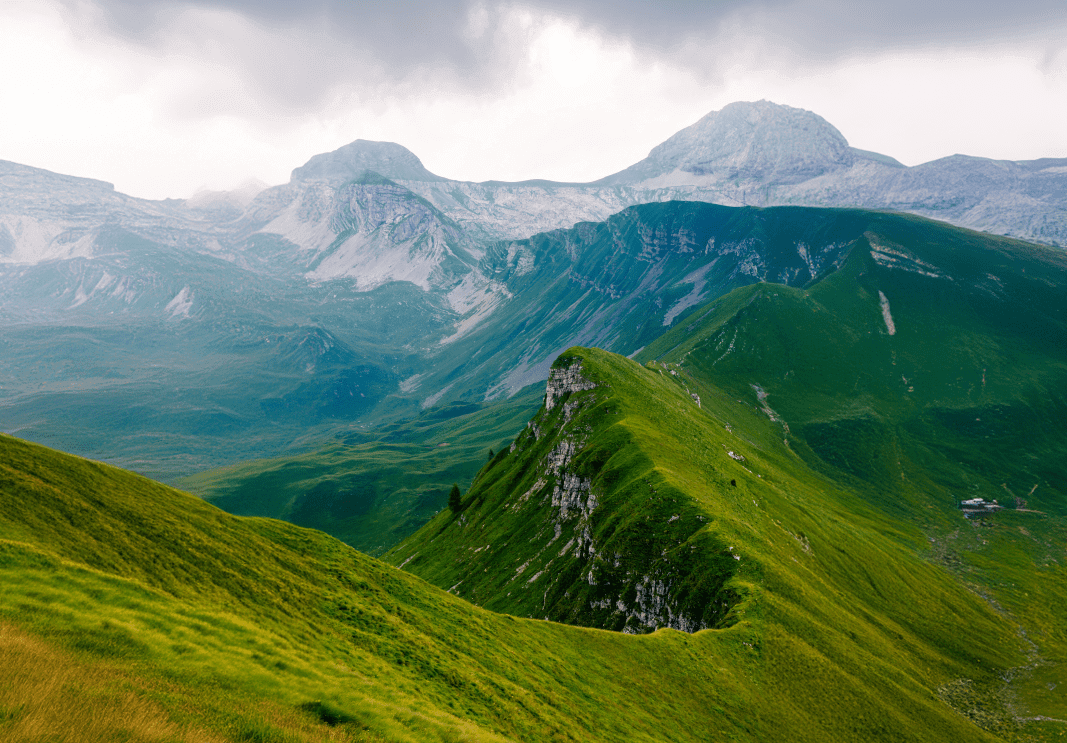
Result:
Here’s a beautiful and complete view of the scenery.
Another way to extend canvas is:
Step 1: Select “Fill= Generative Expand” on the top of the screen.
Examples of Photoshop Generative Fill
Here are some examples of using Photoshop’s generative fill feature:
1. Remove People from Background
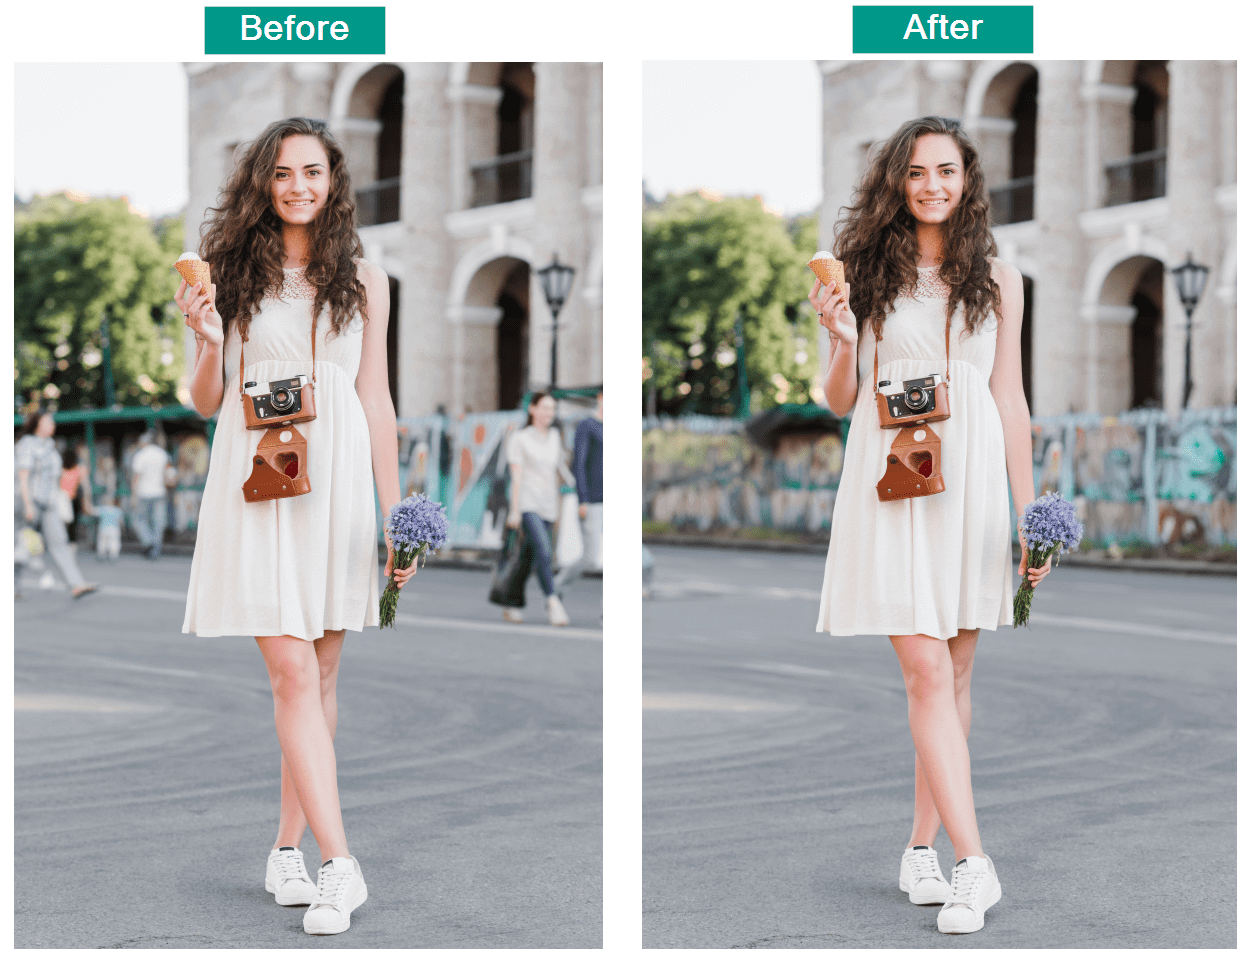
Photoshop’s generative fill feature analyzes surrounding pixels to blend and seamlessly remove people from the background.
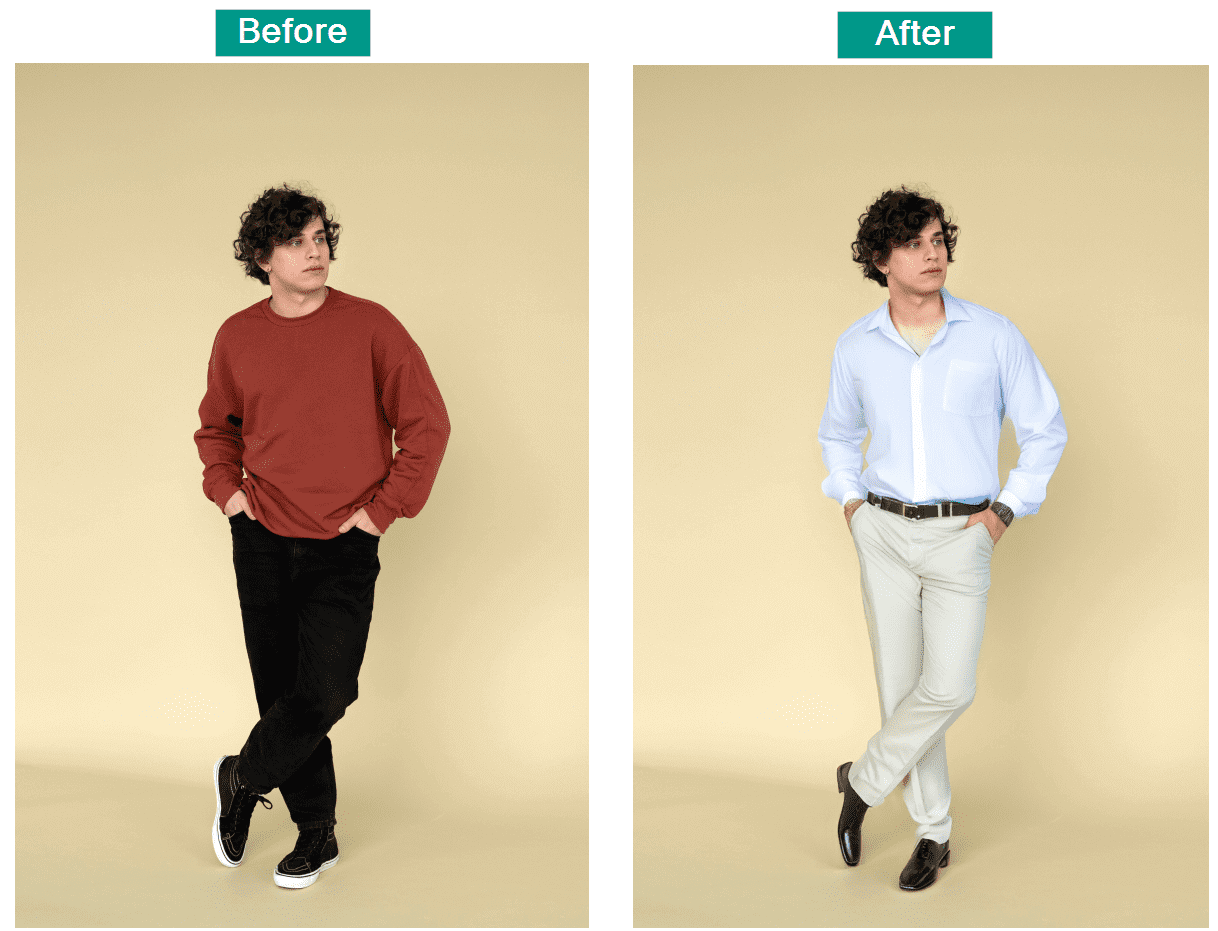
2. Change Clothing Style
The tool analyzes the selected area and generates realistic textures and patterns to match your new style. This makes it easy to visualize different looks without manually editing each detail.
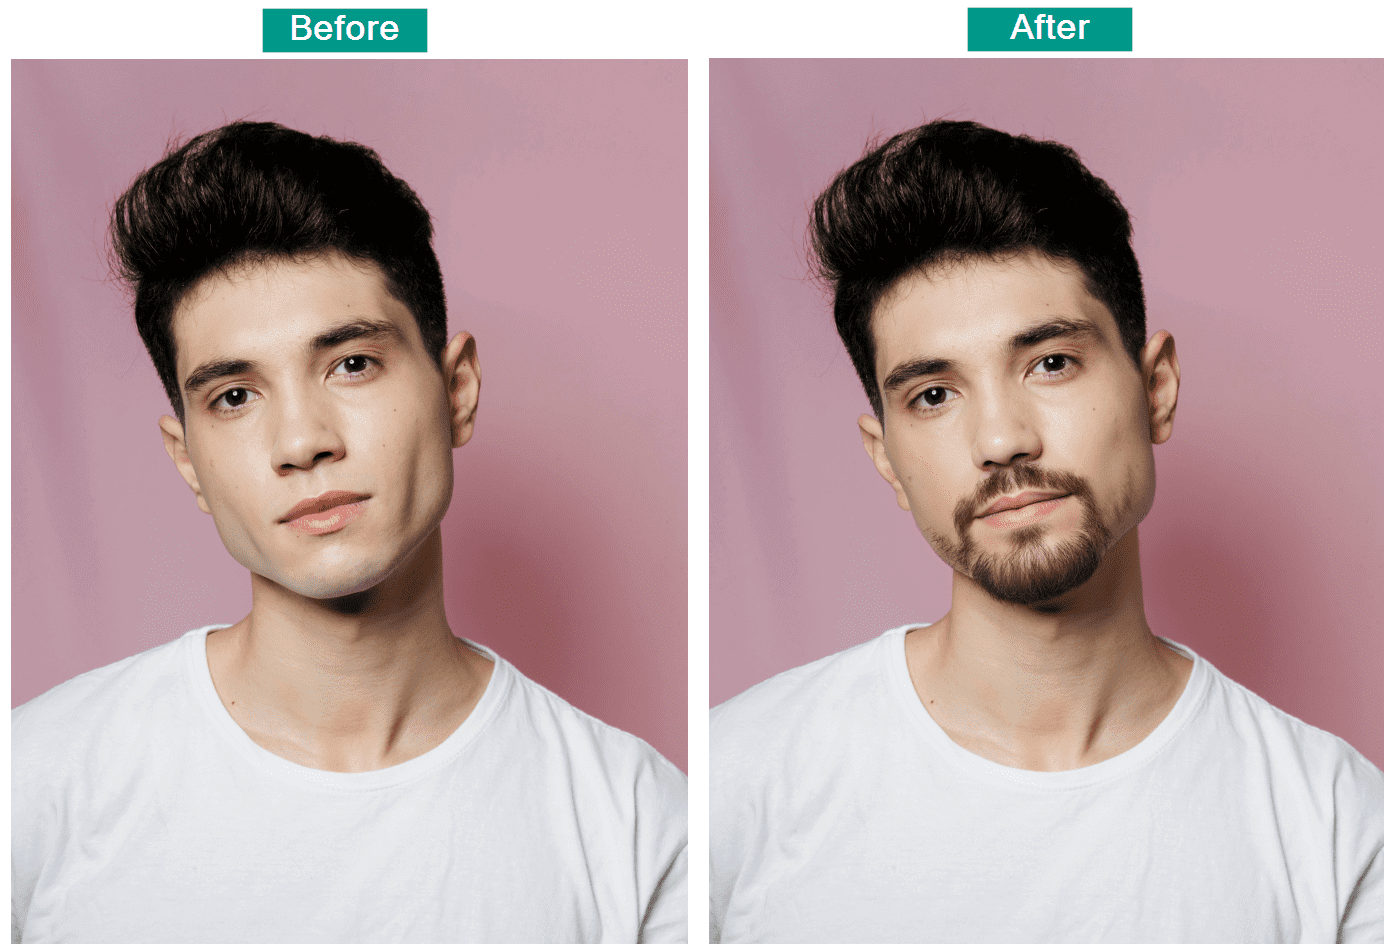
3. Add Beard and Mustache
Photoshop generates a realistic-looking beard or mustache. This allows you to experiment with different looks without the need for actual grooming or editing skills.
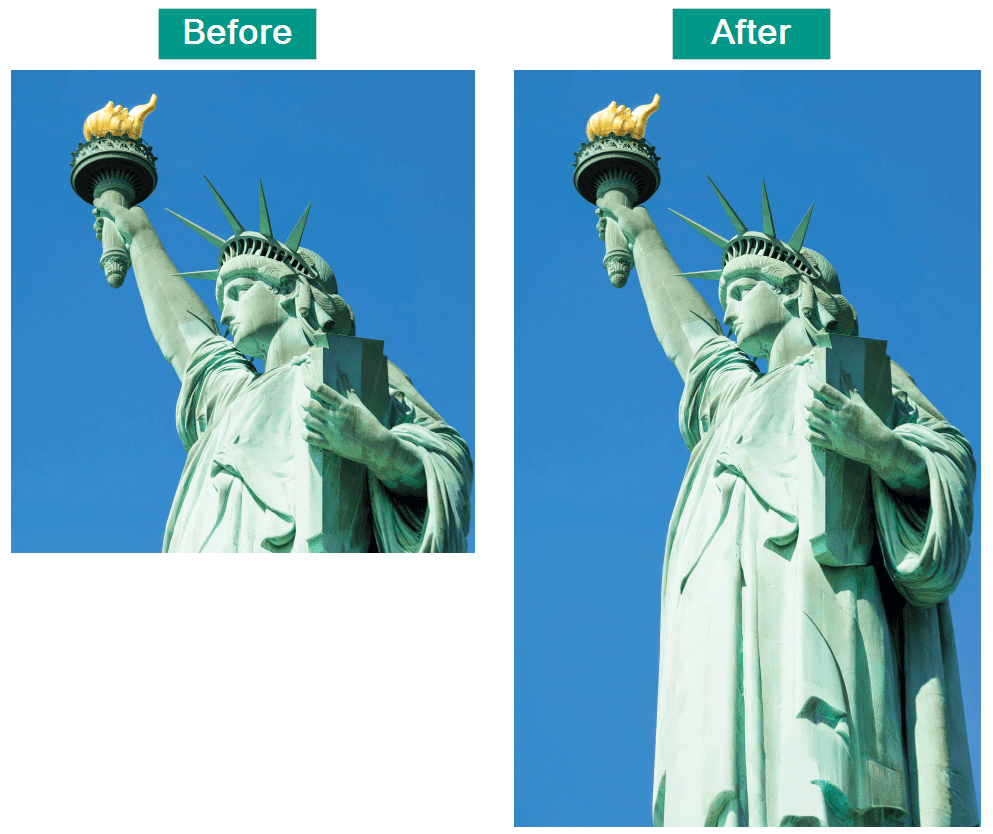
4. View Full Image
This feature intelligently analyzes the existing image and generates new pixels that match the surrounding content, creating a smooth and natural scene extension.
Tips to Write an Effective Text Prompt
Tip 1: Be Specific
Use clear language with at least three words. Avoid terms like “ add”, “fill”, “change”, “make”, “generate,” or “create.” Instead, be direct about what you want.
Tip 2: Include Detailed Description
Describe your vision vividly. The more details you provide, the more possibilities you unlock. Let your imagination soar and see what comes to life.
Tip 3: Explain Your Ideas
Challenge the AI to produce unique results. Use natural language to describe feelings, styles, lighting, and more.
Tip 4: Use Relevant Words
Use words like “love,” “gentle,” and “playful” for heartwarming images, or “powerful,” “strong,” and “uplifting” for inspiring ones.
How to Download Photoshop Generative Fill?
You can start with a free trial if you do not have an Adobe account or Photoshop subscription.
Step 1: If you already have an account, launch the Creative Cloud app.
Step 2: Find and click “Beta apps” from the app menu on the left.
Step 3: Look for “Photoshop (Beta)” and click the “Install” button next to it.
Step 4: Once installed, click “Open” to launch the beta version of Photoshop.
Step 5: When the beta version opens, a pop-up will introduce you to the new Generative Fill feature. To learn how to use it, click “Try now” to download the necessary assets.
How to Access Generative Fill?
Before using the Generative Fill feature, open an image in Photoshop. Here is how:
- Find the image you want to use on your computer.
- Click and hold on to the image file.
- Drag the image file over to Photoshop.
- Drop the image into Photoshop.
Now, you are ready to apply the Generative Fill to the image you just inserted.
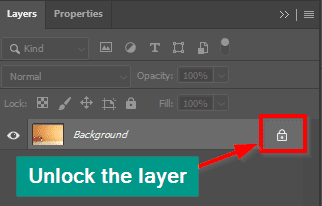
Note: Go to “Layers” and unlock the layer by clicking on the lock icon.
Start by picking the layer you want to work on, then use any selection tool to choose the part you want to edit.
There are 3 ways to access the generative fill option:
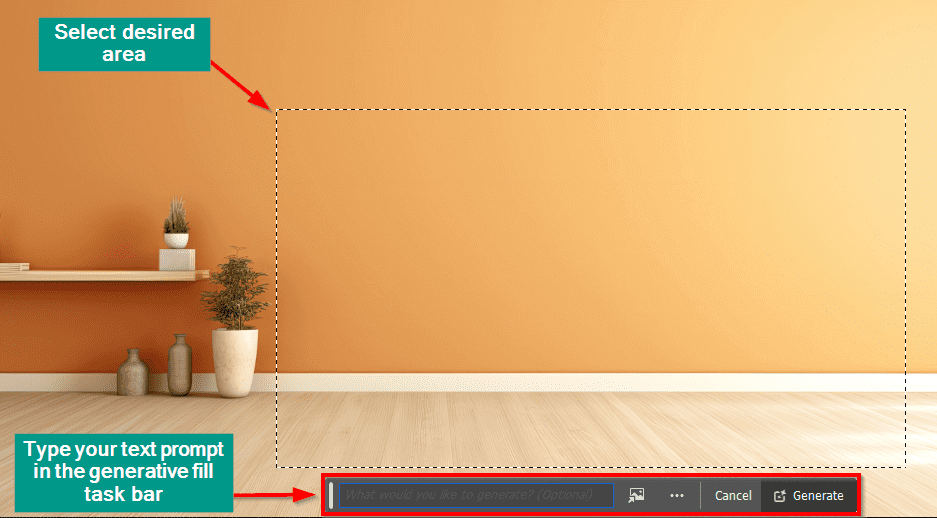
1. Task Bar
Step 1: Select the area.
Step 2: You can find a generative fill taskbar on your screen and add your text prompt.
Step 3: Click “Generate.”
2. Go to “Edit” > Generative Fill
Step 1: Select the desired area.
Step 2: Go to the “Edit” option.
Step 3: Select “Generative Fill” from the menu.
Step 4: A prompt box will appear.
Step 5: Add your prompt text to the prompt box and click on “Generate.”
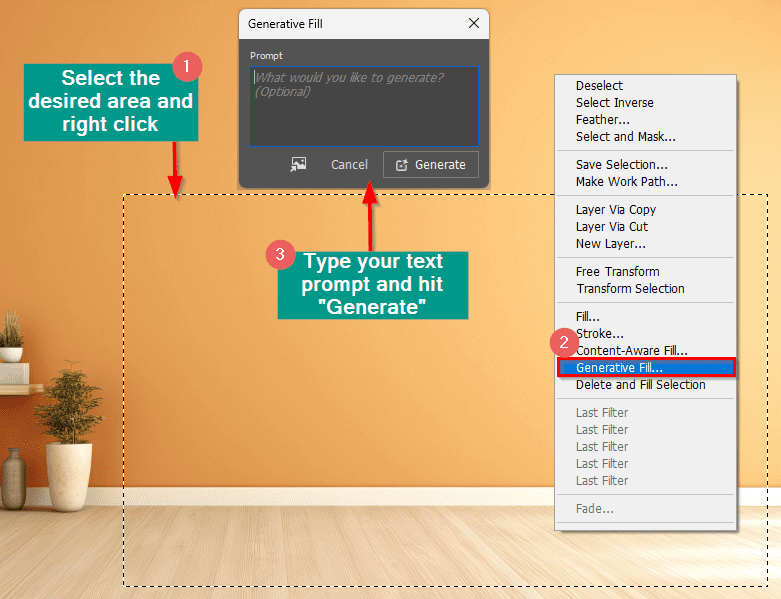
3. Right click
Step 1: Select the desired area and right-click.
Step 2: Select “Generative Fill” from the menu.
Step 3: A prompt box will appear.
Step 4: Add your prompt text to the prompt box and click “Generate.”
Drawbacks of Photoshop Generative Fill
Here are some drawbacks of Photoshop’s Generative Fill feature:
- Inaccuracy of Variations: The generated variations may not always align with the given prompt, resulting in outputs that can be inconsistent or irrelevant.
- Loading Time: The process of generating variations can be time-consuming, leading to delays in workflow.
- Quality Issues: The quality of the generated content sometimes does not meet professional standards, with noticeable artifacts or unrealistic details.
- Resolution Discrepancies: When expanding an image, the resolution of the newly generated parts can be lower than the original, leading to a mismatch in quality.
Frequently Asked Questions (FAQs)
Q1. Can I edit the content generated by Generative Fill?
Answer: Yes, you can edit the content generated by Generative Fill further using Photoshop’s other tools. You can refine the edges, blend the new content more smoothly, or make additional adjustments.
Q2. Can I use Generative Fill on multiple layers simultaneously?
Answer: Generative Fill typically works on the active layer you have selected. If you want to apply Generative Fill to multiple layers, you must merge the layers first or apply the tool individually to each layer.
Q3. What ethical considerations should you keep in mind when using Generative Fill?
Answer: Ethical considerations include:
- Avoid using Generative Fill to alter images of people without their permission, especially in a way that could misrepresent them.
- When generating content, be mindful of copyright laws and ensure that the use of generated elements does not infringe on existing works.
- Ensure that generated content does not mislead viewers about the image’s authenticity.
Q4. What are some best practices for using Generative Fill?
Answer: Some best practices for using Generative Fill are:
- Always start with a high-quality selection.
- Use multiple layers to experiment without altering the original image.
- Combine Generative Fill with other editing tools for the best results.
- Regularly save your project to avoid data loss.
- Review and refine generated content for quality assurance.
Recommended Articles
We hope you found our article on using Photoshop Generative Fill helpful. For further design guidance, explore the recommended resources below.

