Updated June 8, 2023
Excel Add Rows Shortcut (Table of Contents)
Introduction to Add Rows in Excel Shortcut
Excel is all but nothing without its cells, rows, and columns. Isn’t it right? You couldn’t do anything without these three aspects of Excel as they define the layout, structure, and whatever you call it; for Excel. One of these three major aspects is Excel Rows. We should be well aware of how to add rows in Excel in case we needed those to add. Shortcuts will reduce time and increases productivity as well. We will teach you a way through this article about how to add rows in Excel. What is the shortcut to do so as well?
How to Add Rows in Excel using Shortcut?
Adding or deleting rows and columns in Excel is a daily task for anyone who works on the tool. It would be great if we knew the shortcut to do so since having an idea of how to add rows in Excel with a shortcut, we may be able to save time, which can be utilized for any other productivity measure as well as the task will be completed quickly due to the reduced time bounds.
There are two shortcuts in Excel to add Rows in Excel. If your keyboard has a number pad on the rightmost side, you may use the Ctrl and “+” buttons to add a row/s in Excel.
If your keyboard doesn’t have that number pad and you are worried about adding a row in Excel, don’t worry; there is another shortcut key for such cases. You can simultaneously press the Shift button, Ctrl button, and “=” button to insert a row/s in the Excel worksheet.
This article will walk you through shortcut methods for adding rows in Excel.
Shortcut Methods of Adding Rows in Excel
We will discuss some shortcut methods for adding rows in Excel.
Method #1 – Insert Row in Excel
Consider the example below, where we list employees with their First Name, Last Name, and Salary details in three different columns. See the screenshot below:
To insert a row, we first need to navigate toward a cell. Suppose we wanted to add a row after the 4th cell. Move toward the 4th cell of the Excel worksheet.
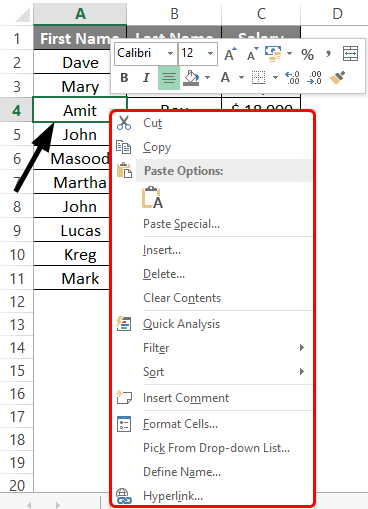
Now, right-click on the cell selected (i.e., 4th cell), and then you’ll see a series of options as shown in the screenshot below:
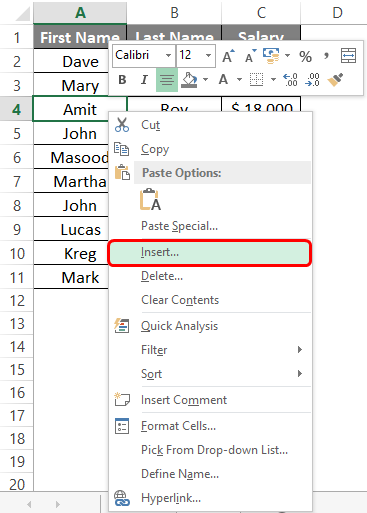
When you right-click on the selected cell, you can see a series of options under the pane. Of all those options, choose Insert… option to insert a row in the given sheet before the 4th cell.
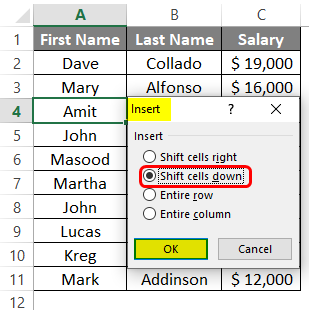
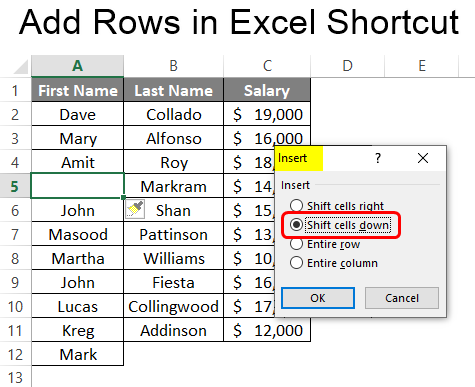
A new window named Insert will open up with a series of options, as shown in the screenshot below. Click on the OK button and see what happens.
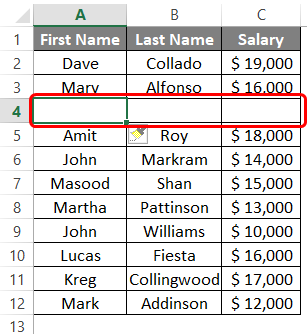
If you press the OK key with the current option “Shift cells down“, You’ll see cells 4th and below that are shifted down by one position, and a new blank cell appears as a 4th cell. See the screenshot below:
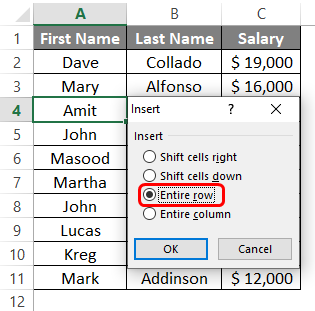
This is not the ideal way, though; we are not getting an entire blank row on the 4th position of the sheet. This is because we have chosen the option of “Shift cells down“. Instead, if you select the option “Entire row”, you can insert an entirely new row in the 4th position.
See the screenshot below, where the entire row is added to the 4th position when you choose the “Entire row” option under the Insert window.
Now, after successfully adding a row at the 4th position, what if we wanted to add multiple blank cells? Do we need to repeat the procedure again and again? Isn’t it going to be a time-consuming task?
Well, of course, it will be a time-consuming job if you repeat the procedure again and again. You, however, can eliminate this task with some single keystrokes.
Select the blank cell you just inserted and press F4 to add one more blank row above that cell. You can insert multiple rows simultaneously using a single keyboard shortcut.
Method #2 – Shortcut to Add a Row in Excel
In this example, we will look at Excel’s shortcut method of adding rows. This method saves your time, which leads to improved productivity.
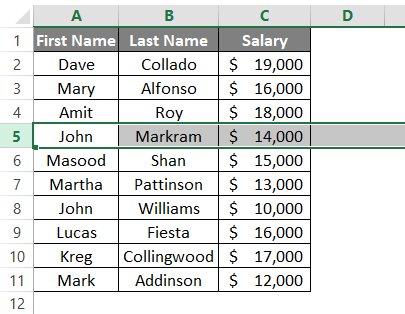
Step 1: Select the row above which you want to add a new blank row. This can be done with a keyboard shortcut Shift + Space bar. Select the fifth row by navigating towards A5 and press the Shift + Space button.
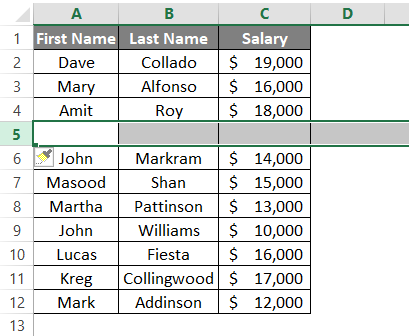
Step 2: Now, press the Shift, Ctrl, and sign keys together to add a new blank row before the 5th row is selected.
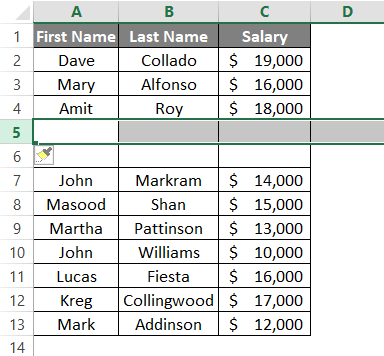
Step 3: Now, press F4 to add more blank rows. Whatever number of rows you want to add, press F4 for that much time.
Here, we tried to add one blank row using a keyboard shortcut and then using F4 to increase the number of blank rows. Is there any other way to add multiple rows in a single shot? Yes, there is a way to do so.
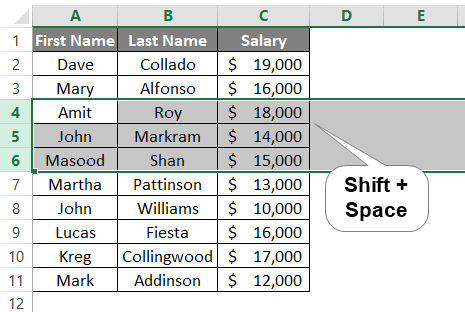
Step 4: Select the number of rows for which you want to add blank rows. Select three rows, as shown in the screenshot below. You can use the Shift + Space bar to select the number of rows.
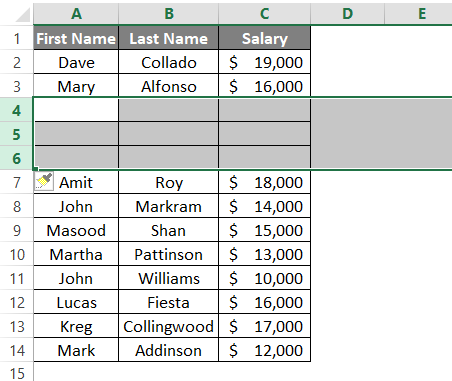
Step 5: Now, as we deed in step 3, use Shift, Ctrl, and Plus sign to add three blank rows straight in the given sheet.
These are a few shortcuts to add blank rows in Excel using keyboard keystrokes. Let’s wrap this article with some points to be remembered.
Things to Remember
- If your keyboard has a number pad on the right side, you can add the rows to Ctrl + (Plus Sign). However, if there is no number pad, you must press Shift + Ctrl + (Plus Sign) through your keyboard.
- The F4 keyboard button helps you to repeat the action of adding rows in Excel, given that a row is already added.
- Select multiple rows and press the keyboard shortcut to add multiple rows in a single shot.
Recommended Articles
This has been a guide to Add Rows in Excel Shortcut. Here we discuss How to Add Rows in Excel shortcuts, practical examples, and a downloadable Excel template. You can also go through our other suggested articles –
