Updated April 17, 2023

Introduction to Angular Material Form Validation
In Angular material we have module present already which can be used to create the form quickly, but in order to apply any kind of validation we have to follow the traditional approaches which are basically of two types. So we can combine material module to create the forms and validation by using either of the two approaches we have, material in build module will help us to build the forms quickly with all the fields with default tying and animation. We have to just simply put the components inside the inbuild material library, after any of the validation approach we can choose.
Syntax of Angular Material Form Validation
As we know that this is something which is not present inside the material library, but still we have module which helps us to create our forms easily.
<form [formGroup]="form name" (ngSubmit)="your method">
<mat-card-content>
<mat-form-field>
<input matInput type="text" formControlName="field name" id="name">
</mat-form-field>
</mat-card-content>
</form>
As you can see in the above syntax we are trying to use ‘formGroup’ with name of the form and using ‘mat-form-field’ to create our form to take the user input.
How Form Validation Works in Angular Material?
In Angular we have two different approaches which can be used to implement the form validation. Why form validation are required? Form is used to take the input from the user, but user can enter any wrong values which can impact the business logic of our application. For that we need to have form validation in place, which improves the data which needs to be entered by the user. Let’s take an example where developers have asked the user to enter his/her phone number but mistakenly they have provided few string with it. So in order to validate the user data at the client level only we require form validation.
In angular we have two different approaches that is template driven and reactive forms both of them have their own advantage and disadvantage and specific purpose when to use which one.
1. Reactive form validation: In reactive form approach we will always have the new starter of the form if any of the change made, it follows immutable and explicit approach to validate the form. To use this inside the application we have to import few modules form the angular library.
- ReactiveFormsModule: This module needs to be import and present inside the component module in which we want to implement this. If we forgot this error will occur and code will not work.
Code:
import { ReactiveFormsModule } from '@angular/forms';- Now in the component file import the blow packages.
Code:
import { FormControl, FormGroup, Validators } from '@angular/forms';2. In angular material we have different selector present which can be used to show our error messages.
- mat-error: This is used to show the error, with the message attached to it. If the form is invalid then this message will be appear on screen with red color.
Syntax:
<mat-error *ngIf="your condition">Error message</mat-error>3. In angular we can also show hint to the user using the below selector form the mat-form-field module.
- mat-hint: This is used to show the hint to the user if they are entering something wrong. With the hint message attached to it.
Syntax:
<mat-hint >Hint Message</mat-hint>Example of Angular Material Form Validation
Given below is the example mentioned:
a. index.html code:
<link href="https://fonts.googleapis.com/icon?family=Material+Icons" rel="stylesheet">
<demo-validation'>loading</demo-validation'
b. demo-validation.component.ts code:
import { Component, OnInit } from '@angular/core';
import { FormControl, FormGroup, Validators } from '@angular/forms';
@Component({
selector: 'demo-validation',
templateUrl: './demo-validation.component.html',
styleUrls: [ './demo-validation.component.css' ]
})
export class AppValidationComponent implements OnInit {
public myForm: FormGroup;
constructor() { }
ngOnInit() {
this.myForm = new FormGroup({
myName: new FormControl('', [Validators.required, Validators.maxLength(20)]),
myAddress: new FormControl('', [Validators.required, Validators.maxLength(50)]),
mycity: new FormControl('', [Validators.required, Validators.maxLength(10)])
});
}
public myError = (controlName: string, errorName: string) =>{
return this.myForm.controls[controlName].hasError(errorName);
}
}
c. demo-validation.component.html code:
<h4><u><i> Form Validation using Angular Material !!</i></u></h4>
<form [formGroup]="myForm" novalidate fxLayout="column wrap" fxLayoutAlign="center center" fxLayoutGap="10px">
<mat-card-content>
<mat-form-field>
<input matInput type="text" placeholder="Enter Name" formControlName="myName" id="myName">
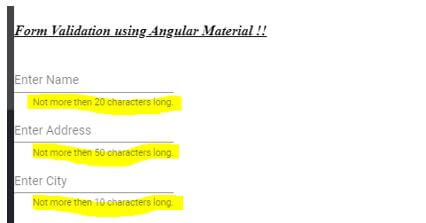
<mat-hint align="end">Not more then 20 characters long.</mat-hint>
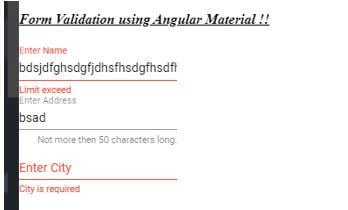
<mat-error *ngIf="myError('myName', 'required')">Name is required</mat-error>
<mat-error *ngIf="myError('myName', 'maxlength')">Limit exceed</mat-error>
</mat-form-field>
</mat-card-content>
<br />
<mat-card-content>
<mat-form-field>
<input matInput type="text" placeholder="Enter Address" formControlName="myAddress" id="myAddress">
<mat-hint align="end">Not more then 50 characters long.</mat-hint>
<mat-error *ngIf="myError('myAddress', 'required')">Address is required</mat-error>
<mat-error *ngIf="myError('myAddress', 'maxlength')">Limit exceed</mat-error>
</mat-form-field>
</mat-card-content>
<br/>
<mat-card-content>
<mat-form-field>
<input matInput type="text" placeholder="Enter City" formControlName="mycity" id="myAddress">
<mat-hint align="end">Not more then 10 characters long.</mat-hint>
<mat-error *ngIf="myError('mycity', 'required')">City is required</mat-error>
<mat-error *ngIf="myError('mycity', 'maxlength')">Limit exceed</mat-error>
</mat-form-field>
</mat-card-content>
</form>
d. module.ts code:
import {NgModule} from '@angular/core';
import {MatFormFieldModule} from '@angular/material/form-field';
@NgModule({
exports: [
MatFormFieldModule
]
})
export class MaterialValidationModule {}
e. demo-validation.module.ts code:
import { NgModule } from "@angular/core"// other importsa
import { FormsModule } from "@angular/forms";
import { ReactiveFormsModule } from '@angular/forms';
import { AppValidationComponent } from "./app.component";@NgModule({
imports: [FormsModule, ReactiveFormsModule],
declarations: [AppValidationComponent],
bootstrap: [AppValidationComponent]
})
export class AppValidationModule {}
Output:
Before click see hints:
After entering wrong input: error message:
Conclusion
As in the tutorial we have seen about the types of the form validation in detail, creating the forms using material library. Reactive and template driven forms validation are easy to implement, readable, scalable and easily maintainable by the user does not required lot of configuration in place, in order to implement it.
Recommended Articles
This is a guide to Angular Material Form Validation. Here we discuss the introduction, how form validation works in angular material? and example. You may also have a look at the following articles to learn more –


