Updated March 29, 2023

Introduction to Angular Material Input
In Angular material we can create input field normal and text type as well, material library provides us a module by which it can be created easily and also default styling and animations will be present on it. By the use of the module provided by the material, we can wrap this fields inside the mat form and be able to use them inside that also.
Once we install the material library we are ready to use the input module from the material library. Input are useful when we have to create the user form and takes the input from the user, we process this data to perform the further action. Inputs are widely used on the forms to take any kind of input from the user, make the UI user friendly as well, here we will see the practice usage of the input field inside the application.
Syntax of Angular Material Input
As we already know that material provides us a module to create the input file in angular which comes up with default styling and animations. In this, we will see the standard syntax for creating input using material modules and selectors.
<mat-form-field appearance="fill">
<mat-label> your label </mat-label>
<input matInput placeholder=" " value=" ">
</mat-form-field>
As you can see in the above syntax we are trying to use ‘matInput’ to make use of material library input which can be now directly placed inside the ‘mat-form-field’.
How Input works in Angular Material?
As of now we already know that why we use input filed, the material provides us input module which can easily be imported and start using to create the input field using the material library. Here we will see the few configurations that need to be done in order to use the input field from the material library.
1. MatInputModule: This is the module we can use to create the input, but first it has to be present inside the root module or any of the child modules in which we want to create the input inside the form field. See the below code and paste inside the root module an import using the Ngmodule tag.
Code:
import {MatInputModule} from '@angular/material/input';2. It comes up with different properties which we can use on the input field to perform some operations, a few of them are mentioned below:
- matAutosize: It is a Boolean which is used for auto-sizing for the text area.
- benabled: Used to enable the auto-sizing, taken true or false as the value.
- minRows: It is used to show the minimum number of lines used in the text area.
- maxRows: Used to set the maximum number of lines needed in the text area.
3. It also comes up with few methods which are mentioned below:
- reset: Used to reset the text area to the original size.
- resizeToFitContent: Resize to fit the content.
Now we will see the steps which is needed to create the angular application, with the material library added to it at the end. We want to create the angular project from scratch then use the above steps else if you already have the angular project then just add the material library to it using the last command on the CLI.
1. First we will install the angular Ci using the below command, it will help us to make our angular application.
Code:
npm install -g @angular/cli2. By using the angular cli create the angular project by executing the below command with the project name.
Code:
ng new your project nameng new my-first-projectas per your choice ‘my-first-project’
3. Install the dependency just by running the below command on the prompt.
Code:
npm install4. Start the server just by rung the below command.
Code:
ng serve5. Now we can test our application in the below URL, it runs on the default port of 4200, which can be changed as per the need as have or if required to be changed.
http://localhps:4200
6. Now the very last step is to install the material dependency inside our angular project and start using the input module from it.
Code:
ng add @angular/materialExamples of Angular Material Input
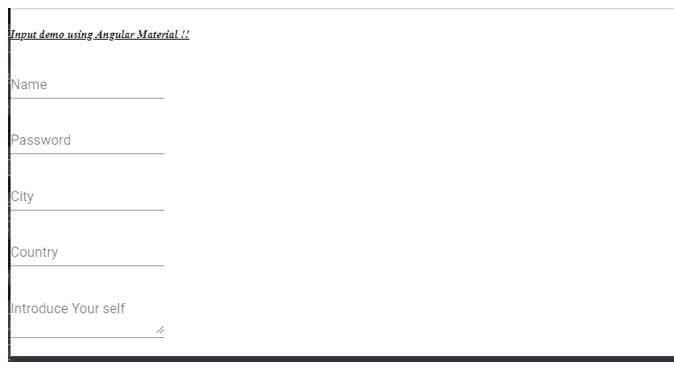
Given below is the example to create the input field using the material library, we have now configured the module as well inside the root file and also, just create the project and start using it.
We have created the different files and place code inside it, just copy the HTML code and ts file just copy the code run it using an online editor.
a. index.html code:
<link href="https://fonts.googleapis.com/icon?family=Material+Icons" rel="stylesheet">
<demo-input>loading</demo-input>
b. demo-input.component.ts code:
import { Component } from '@angular/core';
@Component({
selector: 'demo-input',
templateUrl: './demo-input.component.html',
styleUrls: [ './demo-input.component.css' ]
})
export class AppInputComponent {
}
c. demo-input.component.html code:
<h5><u><i>Input demo using Angular Material !!</i></u></h5>
<form>
<mat-form-field appearance="">
<mat-label>Name</mat-label>
<input matInput placeholder="Ex. Pizza" value="">
</mat-form-field>
<br/>
<mat-form-field appearance="">
<mat-label>Password</mat-label>
<input matInput placeholder="Ex. Pizza" value="">
</mat-form-field>
<br/>
<mat-form-field appearance="">
<mat-label>City </mat-label>
<input matInput placeholder="Ex. Pizza" value="">
</mat-form-field>
<br/>
<mat-form-field appearance="">
<mat-label>Country</mat-label>
<input matInput placeholder="Ex. Pizza" value="">
</mat-form-field>
<br/>
<mat-form-field appearance="">
<mat-label>Introduce Your self</mat-label>
<textarea matInput placeholder="Write something"></textarea>
</mat-form-field>
</form>
d. module.ts code:
import { NgModule } from "@angular/core";
import { AppInputComponent } from "./app.component";
@NgModule({
imports: [MatInputModule],
declarations: [AppInputComponent],
bootstrap: [AppInputComponent]
})
export class AppModule {}
Output:
Conclusion
Using material library is easy to use, also provide us input module by which we can easily implement the filed inside the form with default styling and animations. Also, the minimal configuration is needed to implement this properly, which readable, maintainable and easy to use by the developers as well.
Recommended Articles
This is a guide to Angular Material Input. Here we discuss the introduction, how input works in angular material? and example respectively. You may also have a look at the following articles to learn more –


