Updated March 30, 2023

Introduction to Angular Material Overlay
Angular material provides us with one more thing that can be used to create the floating panel on the screen; this is known as ‘overlay’. In order to use this, we have to do a few more configurations than usual, it is present inside the cdk, so we need to setup for style and other things. We can create an overlay in our application when we have to show something on the floating panel; also, we can use them to select from the list of options we have. It can have used for many other purposes in angular applications. Also, by the help of material, we can easily implement this in our application by doing a small setup and application-level configuration.
Syntax of Angular Material Overlay
As we have seen, we have to make few configurations related to cdk, but here we will see the standard way defined by Angular to use overlay inside the application,
< ng-template cdkConnectedOverlay [cdkConnectedOverlayOrigin]="val" [cdkConnectedOverlayOpen]="val" >We are trying to use and create the overlay using the different property provided by cdk, that is, ‘cdkConnectedOverlay’, ‘cdkConnectedOverlayOrigin’ and ‘cdkConnectedOverlayOpen’, also the whole step process step by step for a better idea about the implementation.
How Does Overlay Work in Angular Material?
Overlay helps us to show our floating panel on the screen; we can attach them with a button or anything. But it is not straight forward to use; we have to make extra configurations and setup for this.
1. OverlayModule: This is the model that is resent inside the cdk and helps us care the overlay in angular material; this module needs to be present inside the root module or any of the child modules in which we want to use and create it. After this, import this in the ng modumoduleles tag.
Code:
import {OverlayModule} from '@angular/cdk/overlay';2. It also has various methods, which can be used to perform different operations.
A few of the methods are mentioned below:
- create: This method id used to create the overlay.
- position: This method is used to configure and construct the position for overlay.
- getContainerElement: This method is used to get the container element of the overlay.
- getFullscreenElement: Open element and its child element into the Fullscreen mode.
- global: This method is used to create the global position for overlay.
- add: This method is used to add a new overlay on the list of the available overlay.
Necessary steps which are required to setup the angular project from scratch also material library added and cdk overlay.
1. First and foremost, we have to install the Angular CLI; this will help us to mage and build our angular application.
We can execute the below command to install the CLI globally.
Code:
npm install -g @angular/cli2. Now, we can create the angular project by running the below command; this command will help us create the project with the specified name.
Code:
ng new your project name
>> ng new my-first-project
As per your choice ‘my-first-project’.
3. Now, initially, we have to run the npm install command to install the required dependency for out project. This command create few folders inside our application which contain the dependency.
Code:
npm install4. After this, we can start the server and see the changes just by executing the below command. After the successful installation, we can now run the server just by executing.
Code:
ng serve5. Run the project on the below URL, which will be local and running on the port 4200.
http://localhps:4200
6. Now, we can install the material library using the below command; after this, we will be able to use the overlay in our project, execute it.
Code:
ng add @angular/materialExample of Angular Material Overlay
Given below is the example of Angular Material Overlay:
a. index.html code:
<!DOCTYPE html>
<html lang="en">
<head>
<meta charset="utf-8">
<meta name="viewport" content="width=device-width, initial-scale=1.0">
<link href="https://fonts.googleapis.com/icon?family=Material+Icons&display=block" rel="stylesheet">
<title>Demo Overlay</title>
</head>
<body class="mat-app-background">
<demo-overlay>Loading..</demo-overlay>
</body>
</html>
b. demo.overlay.component.ts code:
import {Overlay, OverlayOrigin, OverlayConfig, OverlayRef} from '@angular/cdk/overlay';
@Component({
selector: 'demo-overlay',
templateUrl: 'demo.overlay.component.html',
styleUrls: ['demo.overlay.component.css'],
})
export class AppOverlayComponent {
isOverlayOpen = false;
}
c. demo.overlay.component.html code:
<h5><u><i>Demo Overlay using Material !</i></u></h5>
<button (click)="isOverlayOpen = !isOverlayOpen" type="button" cdkOverlayOrigin #demotrigger="cdkOverlayOrigin">
{{isOverlayOpen ? "Close Me" : "Open Me"}}
</button>
<ng-template
cdkConnectedOverlay
[cdkConnectedOverlayOrigin]="demotrigger"
[cdkConnectedOverlayOpen]="isOverlayOpen">
<ul class="demo-list">
<li>Option 1 </li>
<li>Option 2</li>
<li>Option 3</li>
<li>Option 4</li>
<li>Option 5</li>
<li>Option 6</li>
</ul>
</ng-template>
d. module.ts code:
import {NgModule} from '@angular/core';
import {OverlayModule} from '@angular/cdk/overlay';
@NgModule({
exports: [
OverlayModule,
]
})
export class DemoOverlayMaterialModule {}
e. demo.overlay.component.css code:
.demo-list > li {
list-style-type: none;
border-bottom: solid 2px #529e0a;
padding: 10px 0;
}
.demo-list {
width: 200px;
border: solid 1px rgb(134, 19, 19);
border-radius: 5px;
background: rgb(59, 18, 124);
text-align: center;
padding: 20px;
margin: 0;
}
.demo-list > li:last-child {
border-bottom: none;
}
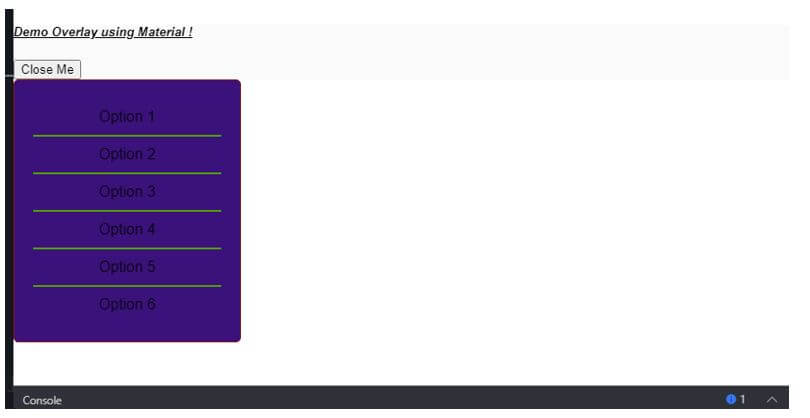
Output:
Click to open:
Conclusion
Follow the whole article; it will help you to create, understand the overlay; after following the whole steps, you will eb able to create it without any error. It is not straightforward to use and implement; we have to make an extra effort to make this; an extra setup is required for this but is easy, readable, and maintainable.
Recommended Articles
We hope that this EDUCBA information on “Angular Material Overlay” was beneficial to you. You can view EDUCBA’s recommended articles for more information.


