Updated April 5, 2023

Introduction to Ansible lineinfile
Ansible Lineinfile is a module of Ansible that is used to modify the particular line in a file. It is useful to add a new line, modify a line, replace a line, and remove an existing line in a file if it finds a specific text. We can use a regular expression to apply search conditions while working with the Lineinfile module. It has cool options that make our job easier. For example, if we have to insert a line in a file on multiple hosts and we are not sure that file is present on the hosts or not, we can use ‘create’ options and make it ‘yes’ to avoid errors that we are going to encounter if the file does not exist on the destination.
How lineinfile Works in Ansible?
Basically, Lineinfile module takes the file name using the ‘path’ parameter as it is the required option for this module and makes the changes in a file as per other given parameters like what action we want to perform on that file. The module can take a backup before making any changes if we have specified the ‘backup’ option to yes as it is an optional parameter, however, it is recommended to take a backup of the file using ‘backup’ so that we can get the original file back if the changes made to the file are incorrect.
Let’s learn about various operations we can perform using ‘Lineinfile’ module and how:
1. Inserting a lineinfile
We can insert a line in a file using the ‘lineinfile’ module. By default, It adds the line at the end of the file if does not exist. Here is a playbook for the same:
Code:
---

- name: Testing lineinfile module

hosts: test_group

tasks:

- name: "Insert a line in a file and if create the file if does not exist"

become: yes

lineinfile:

path: /root/testing/test_file2

line: "ansible_master"

state: present

backup: yes
ansible test_group -m shell -a “ls /root/testing”
Explanation: In the above example, we got an error because the file does not exist at the destination and we have not specified the ‘create’ option. Let’s add the ‘create’ option and make it to yes.
Code:
---

- name: Testing lineinfile module

hosts: test_group

tasks:

- name: "Insert a line in a file and if create the file if does not exist"

become: yes

lineinfile:

path: /root/testing/test_file2

line: "ansible_master"

state: present

create: yes

backup: yes
cat lineinfile_insert.yml
Output:
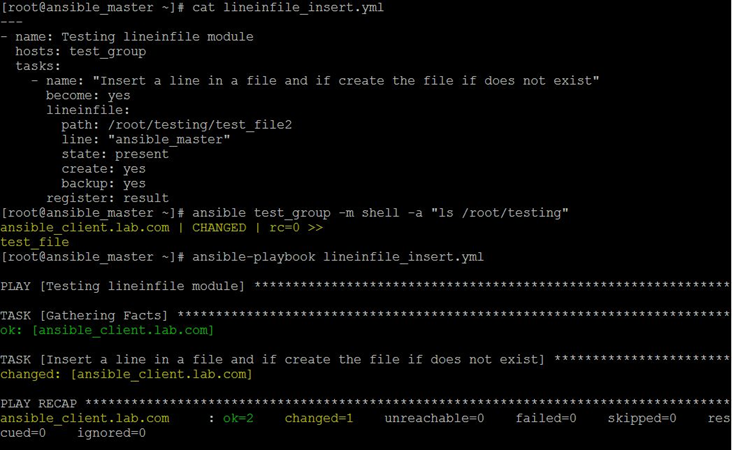
Explanation: In the above example, we have added the ‘create’ option and re-ran the playbook and it ran without any error. Below command is used to verify that there was no file present named ‘test_file2’ before running the playbook:
ansible test_group -m shell -a "ls /root/testing"
As mentioned above, the ‘lineinfile’ module only adds the line at the end of the file by default, however, we can add line after and before a specific line using the ‘insertafter’ and ‘insertbefore’ options respectively. Here is the snapshot of the file test file that we are going to edit.
cat test_file
Output:
Below is the playbook to insert line after a specific line: –
Code:
---

- name: Testing lineinfile module

hosts: test_group

tasks:

- name: "Check existence of a String in a file and add the line after it"

become: yes

lineinfile:

path: /root/test_file

insertafter: "ServerName"

line: "ansible_client"

firstmatch: yes

state: present

backup: yes
ansible test_group -m shell -a "cat /root/testing"
Output:
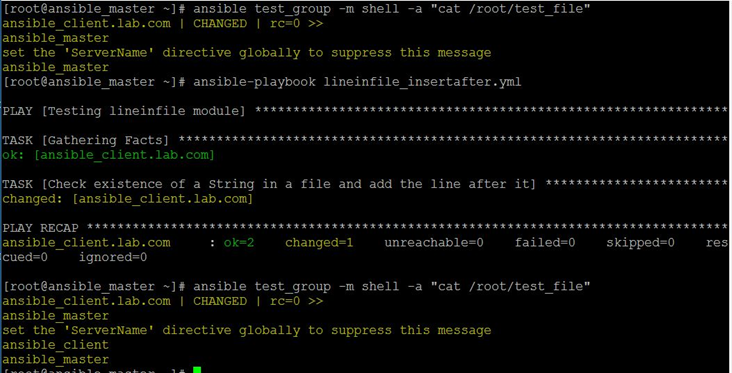
Explanation: In the above example, we have added ‘ansible_client’ line after the line that matches ‘ServerName’. In the same way, we can use the ‘insertbefore’ option in place of the ‘insertafter’ option to add the line before the specific line if it finds the match. Example will be shown when we modify the line in the file.
2. Replacing the lineinfile
We can replace a line using the ‘lineinfile’ module however it will only replace one line in a file if there are multiple lines match the specified regular expression. ‘lineinfile’ module uses the ‘regexp’ option to match the criteria. It replaces the last line that matches the criteria by default. We can control it using the ‘firstmatch’ option to replace the first line that matches the criteria. Ansible has ‘replace’ module to replace all the occurrences in the file. We are going to use the same test file that is mentioned above to see it in action and if you have remembered we have added ‘ansible_client’ after the line that has ‘ServerName’ text in it.
Here is the playbook to replace the line in a file:
Code:
---

- name: Testing lineinfile module

hosts: test_group

tasks:

- name: "Check existence of a String in a file and replace if it finds the match"

become: yes

lineinfile:

path: /root/test_file

regexp: "ansible_client"

line: "ansible_master"

state: present

backup: yes
ansible-playbook lineinfile_replace.yml
Output:
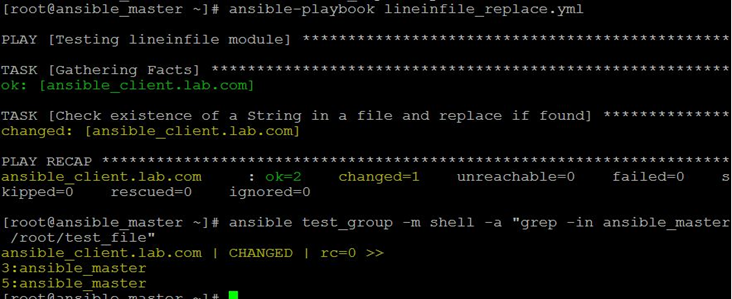
Explanation: In the above example, we have replaced the line that matches ‘ansible_client’ text in it with ‘ansible_master’. We can see the difference if we compare the above snapshot with the last snapshot. In the last snapshot, the third line was ‘ansible_client’ that is replaced with ‘ansible_master’ as we see in the above snapshot.
Below command is used to search for ‘ansible_master’ in the ‘test_file’:
ansibletest_group -m shell -a "grep -in ansible_master /root/test_file"
3. Removing all Lines from a File that Matches the Criteria
We can search for the lines that match specific criteria using the ‘regexp’ option and remove those lines by changing the ‘state’ option to absent. Here is the playbook for the same:
Code:
---

- name: Testing lineinfile module

hosts: test_group

tasks:

- name: "Check existence of a String in a file and remove it"

become: yes

lineinfile:

path: /root/test_file

regexp: "ansible_client"

state: absent

backup: yes
ansible-playbook lineinfile_remove.yml
Output:
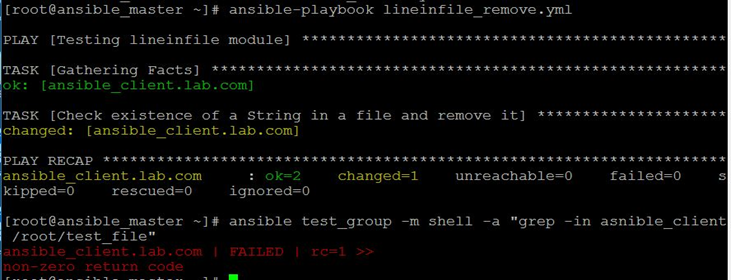
Explanation: In the above example, playbook searched for ‘ansible_client’ and removed those lines so when we ran the below command to check the ‘ansible_client’ text in the file, we got non-zero return code as it does not find any text ‘ansible_client’ in the file.
ansible test_group -m shell -a “grep -in asnible_client /root/test_file”
4. Modifying a lineinfile
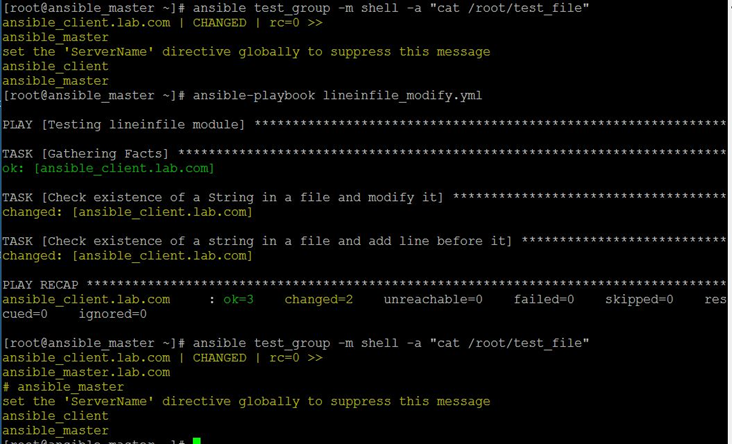
We can search a line using ‘regexp’ option and make use of ‘backrefs’ option to hold that lines in a default placeholder ‘\1’ and use this variable in ‘line’ option of the module to modify the existing line. One use case is to comment a line in a configuration file. Here is the playbook for the same, we are using ‘insertbefore’ option to insert a line before the modified line. The Scenario is we want to add ‘#’ in front of the line that contains ‘ansible_master’ in it and adds ‘ansible_master.lab.com’ before this line. Here is the playbook for the same:
Code:
---

- name: Testing lineinfile module

hosts: test_group

tasks:

- name: "Check existence of a String in a file and modify it"

become: yes

lineinfile:

path: /root/test_file

regexp: '(ansible_master)'

line: '# \1'

backrefs: yes

firstmatch: yes

state: present

backup: yes

- name: "Check existence of a string in a file and add line before it"

become: yes

lineinfile:

path: /root/test_file

insertbefore: '# ansible_master'

line: "ansible_master.lab.com"

state: present

backup: yes
ansible test_group -m shell -a "cat /root/test_file"
Output:
Explanation: In the above example, we have searched for the line that contains ‘ansible_master’. We have used the ‘backrefs’ option to hold that line in the ‘\1’ placeholder and used the ‘line’ option to add ‘#’ in the front of that line. In the second task of the playbook, task added a new line ‘ansible_master.lab.com’ before the line, we just modified. In the above snapshot, we can see the difference before the modification of the file and after the modification of the file.
Conclusion
The ‘lineinfile’ module is very useful if we have to make changes to a configuration file on multiple hosts. It saves our time when we need to insert, modify, replace, or remove a line in a file on different machines. It has a limitation as it only works on a single line.
Recommended Article
This is a guide to Ansible lineinfile. Here we discuss Introduction and how lineinfile Works in Ansible along with its different examples and Code Implementation. You can also go through our other suggested articles to learn more –

