Updated March 31, 2023

What is Ansible Roles?
Ansible roles are used to simplify Ansible playbook which means we can break a complex Ansible playbook in independent and reusable roles that are used to automatically load certain var_files, tasks, and handlers as per pre-defined file structure. We can call the roles in any Ansible playbook as it is reusable and independent of each other. We can also share the configuration template using roles easily. As mentioned roles need a standardized file structure that means at least one of the directories exists and must have a main.yml however we can remove other directories if not in use. The default location of roles is “/etc/ansible/roles”.
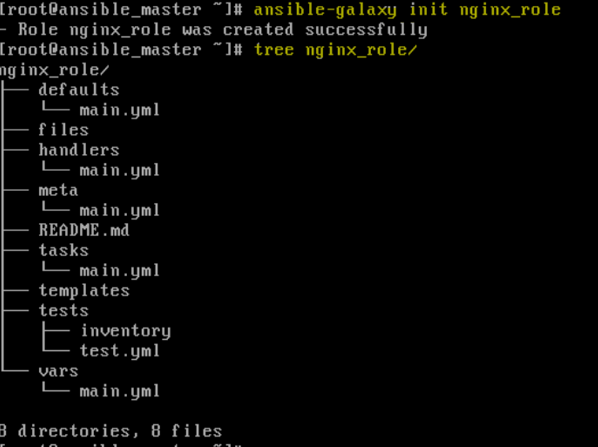
We have a command ‘ansible-galaxy init <ROLE_NAME>’ to create a role skeleton for us. It creates pre-defined directories structure and files as below: –
Syntax:
$ansible-galaxy init nginx_role
Explanation: In the above example, we have created a role called ‘nginx_role’ and used tree command to see the directories structure of the newly created role. Most of the directories have main.yml file that works as the entry point for correspondence directories of the role.
Functions of Ansible Roles
Let’s understand the functionality of each folder: –
- Tasks: We keep our tasks or the plays that will be performed by the roles however we can keep tasks in other folders separately as well for readability and better manageability and can be added to the roles using include if required. If this directory is being used in the role then it must contain main.yml.
- Vars: It stores variables that are used within the roles. It has the highest level of precedence and we can only override by passing variables via the command line (CLI). It also has a main.yml file.
- Defaults: It also stores the variables but default variables that mean it supposed to be changed while running the play however role is going to use the default variable if it is not defined or passed. It has the lowest level of precedence.
- Handlers: It contains handlers that may be flagged to run using the notify keyword, notify keyword-only flags the handler if a task makes changes and handler will be triggered only once besides notified by multiple tasks. It is not only used by the same roles in which it defined but anywhere outside that role.
- Files: The file directory contains static files that can be deployed via this role. It does not contain var files or templates as it is for simple ordinary files. We can reference the files within this directory without the path. It does not have the main.yml file in it.
- Templates: It contains templates that we can deploy via this role. It does not have the main.yml file as well.
- Meta: We can configure role dependencies and other configurations such as allow_duplicates etc.
Examples to Implement Ansible Roles
Let’s understand it with an example. We are going to install nginx on one of the CentOS client machines and replace the default index.html page and also make sure that service is enabled and it is running. We are going to edit these files as below: –
1. nginx_role/tasks/main.yml
Syntax:
# tasks file for nginx_role

- name: install nginx

yum: name=nginx state=latest

- name: copy index.html template

template:

src: index.html

dest: /usr/share/nginx/html

notify: restart nginx

- name: enable and start service

service:

name: nginx

enabled: yes

state: started
Explanation: In the above file, we have 3 tasks and the task ‘copy index.html template’ will trigger a handler ‘restart nginx’ if this task makes any changes to the hosts.
2. nginx_role/template/index.html
Syntax:
<!DOCTYPE html>

<html>

<head>

<title>My Nginx web server</title>

</head>

<body><h1>Welcome to my {{ type_of_webserver }} webpage </h1></body>

</html>
Explanation: In the above index.html file, we have some html code and a variable called ‘type_of_webserver’ that we are going to define in main.yml resides in the default directory.
3. nginx_role/handlers/main.yml
Syntax:
# handlers file for nginx_role

- name: restart nginx service

service: name=nginx state=restarted

listen: “restart nginx”
Explanation: In the above file, we have a handler that listens on “restart nginx” this is the same values mentioned in tasks/main.yml under task ‘copy index.html template’ with notifying key.
4. Nginx_role/defaults/main.yml
Syntax:
# defaults file for nginx_role

type_of _webserver: Nginx
Explanation: In the above file, we have defined the value of variable ‘type_of_webserver’ that will be replaced in index.html when the role will be executed by an Ansible playbook. We can define this variable in vars/main.yml as well. It depends upon the variable behavior like it is good to define the variable in vars/main.yml if the value of the variable is least likely to change.
5. Ansible Playbook
After making the changes to the above file, let’s create our Ansible playbook. Role folder and playbook must be in the same folder or role must be in the default directory that is /etc/ansible/roles otherwise we have to mention the full path of the role.
Syntax:
# Install nginx Playbook

- hosts: ansible_client

become: yes

roles:

- nginx_role
6. Run the Ansible playbook
Code:
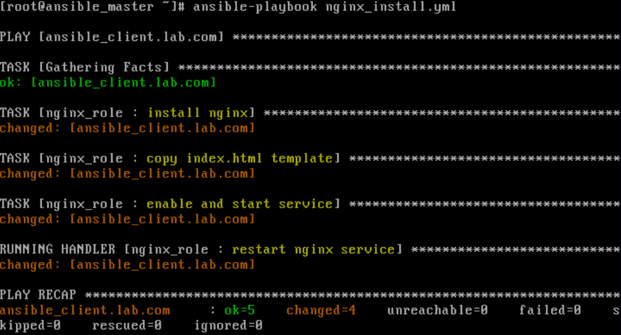
$ansible-playbook nginx_install.yml
Output:
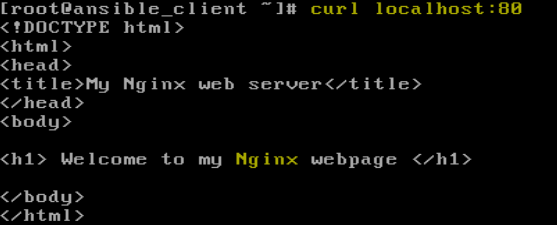
Explanation: In the above example, the first playbook installed the nginx, then copied the index.html file to the destination and enabled the nginx service and started it. It also triggered the handler as well. After successful completion of the above Ansible playbook, if we try to connect the localhost on port 80 on a client machine, we get the below output that confirms we have successfully installed nginx service on the client machine. Also if we notice that it has replaced the variable ‘type_of_webserver’ with its value that is mentioned in the defaults/main.yml file.
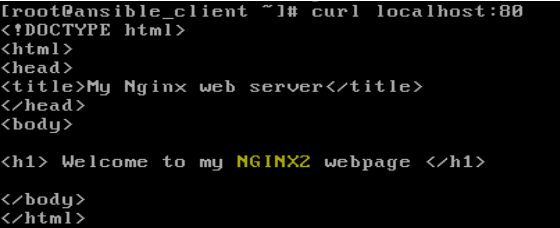
We can override the default variable in the playbook as below:
Code:
# Install nginx Playbook

- hosts: ansible_client

become: yes

roles:

- nginx_role

vars:

type_of_webserver: “NGINX2”
Output:
Explanation: In the above example, changing the value of the default variable and after running the playbook successfully, we got the above output when tried to connect to the Nginx server.
Important of Ansible Roles
Below are some important points:
1. We can also use roles inline to import roles in the playbook using ‘include_role’ or ‘import_role’. The main difference between classic manner and roles inline is roles are loaded during playbook parsing in a classic manner whereas roles can be loaded during runtime as per condition mentioned in the playbook when we use roles inline as below: –
Code:
# Install nginx Playbook

- hosts: ansible_client

become: yes

tasks:

- include_role:

name: nginx_role

when: “ansible_facts[‘os_family’] == ‘RedHat’”
Output:
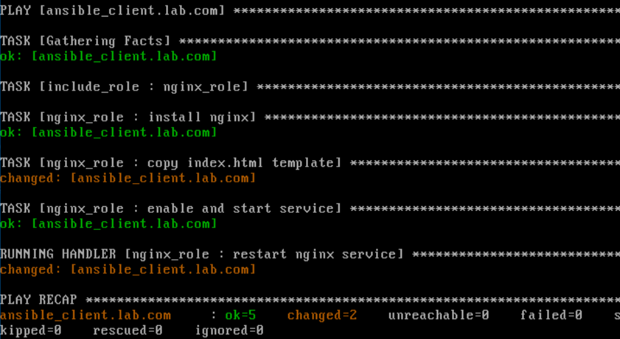
Explanation: In the above example, the playbook ran successfully as a client has CentOS operating system. In the below snapshot, the playbook skipped the role after changing the values of os_family to ‘Debian’ in the playbook.
Output:
2. We can assign tags to the roles as well.
Code:
# Install nginx Playbook

- hosts: ansible_client

become: yes

roles:

- role: nginx_role

tags:

- nginx_installation
Output:
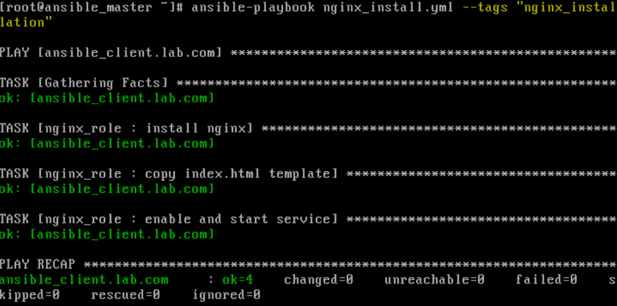
Explanation: In the above example, we have passed the ‘–tags’ option while executing the ansible-playbook and it ran all the tasks defined in that roles. It is called the Ansible tag inheritance.
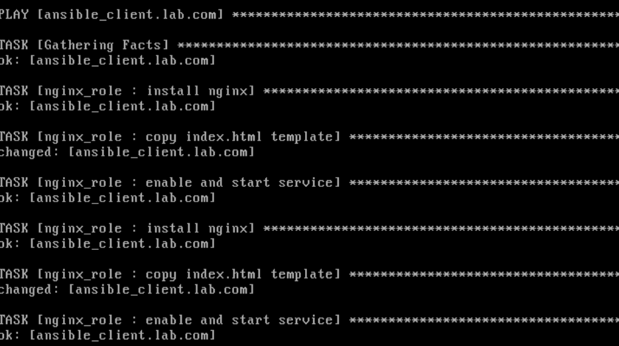
3. Role Duplication. Roles can be executed only once, even it is defined multiple times in a playbook unless different parameters have been passed in each definition.
Code:
# Install nginx Playbook

- hosts: ansible_client

become: yes

roles:

- nginx_role

- nginx_role
Output:
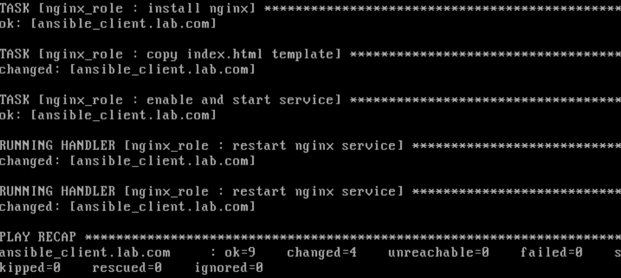
It can be only run twice we pass different parameter in each role definition or we update the meta/main.yml with ‘allow_duplicates: true’ for that role as below:
Code:
# Install nginx Playbook

- hosts: ansible_client

become: yes

roles:

- role: nginx_role

vars:

type_of_webserver: “NGINX2”

- role: nginx_role

vars:
Output:
Explanation: In the above example, you can see it ran twice and if we connect to the nginx server it has the value of the variable that is passed next time as we can see in the below snapshot: –
Output:
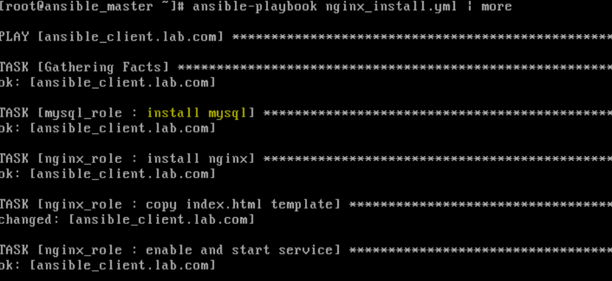
4. Role dependencies. We can define role dependencies in meta/main.yml file which means if we run a playbook that includes a role and this role has a role dependency mentioned in its meta/main.yml then role mentioned under dependencies will be executed first. Here, we will create a new role ‘mysql_role’ and make it dependent role for ‘nginx_role’, for that, we need to update the meta/main.yml of ‘nginx_role’ as below: –
Code: mysql_role/tasks/main.yml
# tasks file for mysql_role

- name: install mysql

yum: name=mysql state=latest

notify: restart nginx
Code: nginx_role/meta/main.yml
dependencies:

- role: mysql_role
Output:
Explanation: In the above example, we can see it first ran the ‘mysql_role’ and then ‘nginx_role’. There is no change as MySQL was already installed on the client.
5. We can also include custom modules and plugins in the role. We need to create a library folder inside our role directories structure and put the modules in that folder.
Conclusion
Ansible roles are simple but robust features of Ansible that organize a group of variables, tasks, files, handlers, dependencies in a standardized file structure. We can create a skeleton of any role using ‘ansible-galaxy’. We can search and download roles from Ansible Galaxy as there are many pre-built roles uploaded by community members.
Recommended Articles
This is a guide to Ansible Roles. Here we discuss what is Ansible Roles, the function of, important, and examples to implement with sample codes. You can also go through our other related articles to learn more –
