Introduction to Ansible Yum Module
In Ansible, we have many modules that can make your life as an administrator easy by providing you such features that you would have been doing by complex scripts or a bunch of commands. One such module is the Ansible yum module. This module can remove, install, upgrade, downgrade, list packages, or packages groups with the help of YUM package manager on the target remote machines. The execution will be done by YUM package manager but rather than doing it manually we save our day by doing it by Ansible. All you need to do is, gain knowledge about it and how to use it. In this article, we will try to achieve it.
What is Ansible Yum Module?
Ansible yum module is a module that enables you to do yum package manager tasks from the Ansible controller node. Operations tasks like upgrade, downgrade, install, remove and list packages can be easily done by this module. There are a few points which one must remember while working with Ansible yum module.
- Yum is dependent on python 2. If you have only python 3, then DNF module should be referred.
- This module does not support clearing the yum cache idempotently, if you need to do it then you must invoke the command “yum clean all” by using either shell or command module.
- On remote target machines, you must have a yum package manager available. Else this module cannot work. If the remote target machines are based on some other package manager like apt then use Ansible package module to upgrade, downgrade, install, remove packages,
- This module support listing of package names under the name section of it. So, you do not have to put them in a loop. Listing packages like this is more efficient.
How Does it Work?
To work with the Ansible module, we should know about the available parameters and acceptable as well as default options with them relatively.
Below is a list of all mostly used parameters:
1. name: This is a package name or package specifier with version, for example, ABC-1.2, etc. Below are the acceptable values:
- URL of the package or local path of the package file.
- This also accepts ‘*’, which means to update all.
- Comma-separated strings of packages.
- List of packages.
2. state: This is to tell the state of the package, below are the acceptable states:
- present
- installed
- latest
- absent
- removed
3. validate_certs: This is to verify the SSL certificates of URL paths from where RPM will be installed. This is applicable only in the case where the source of RPM is a URL.
4. update_only: When the state is set to the latest. Then using this parameter will ensure only installed packages will be updated and no package will be installed. The default is no.
5. skip_broken: default is no. This is to set to skip packages with broken dependencies. Because they will be causing problems.
6. security: default is no. This is to install only security marked updates. This is used with state=latest.
7. releasever: This is to specify an alternative release that will be used as a source of packages for installation.
8. lock_timeout: default is 30. This is used to set the amount of time to wait for the yum lock file to be free.
9. list: This is equivalent to use the “yum list”. It will show the package installed or available.
Acceptable values are package name, installed, available, repos, updates.
10. exclude: This is the list of packages to be excluded when the state is installed/latest.
11. enablerepo: This is to set the repoid, which will be used to install/update operation. After the transaction, repos will not persist. In the case of multiple repos, separate them with comma.
12. download_only: This is to set only downloading of the mentioned packages and not install. The default is no.
13. download_dir: This is useful when download_only is set. This sets the alternative directory to store packages.
14. disablerepo: This is to disable the repoid, which will not be used to install/update operation.
After the transaction, repos will not persist. In the case of multiple repos, separate them with comma.
15. disable_gpg_check: Default is no. when the state is set to installed or the latest. Then this parameter is set to not checking the signature of packages to be installed.
16. bugfix: default is no. when setting to yes with state=latest. Then it makes to install only bugfix marked updates
Below is a sample syntax of having it used in a playbook.
-	name: Install packages mentioned under name section. yum:

name:

-	package_1

-	package_2

-	package_13

state: <absent/installed/latest/present/removed>
We get more clarity by doing some practical through some examples in the next section.
Example of Ansible Yum Module
In this section, we will learn by doing looking at some examples where we tried to test the functionality of Ansible Block. Also, we shall know about the lab environment before moving ahead in this section.
Here we have one Ansible controller node named as ansible-controller. As target nodes, we have one remote machine. This machine is a Red Hat Enterprise Linux machine named as host-one We will run our playbooks on Ansible controller machine and make changes on the remote target machines.
Below is an example of a playbook where we are first checking/listing the Nginx package, install it and then remove it. Though it is not useful, at least gives a clear representation of how the yum module works.
We have a sample playbook, which has contents like below:
Code:
---

-	hosts: host-one gather_facts: no tasks:

-	name: Here we are using YUM module with list to check nginx packages yum:

list: nginx

register: var_output

-	debug:

var: var_output

-	name: Here we are using YUM module to install nginx package yum:

name: nginx state: installed

-	name: Here we are using YUM module to remove nginx package yum:

name: nginx state: removed
Now run this playbook like below:
ansible-playbook ansible_yum.yaml
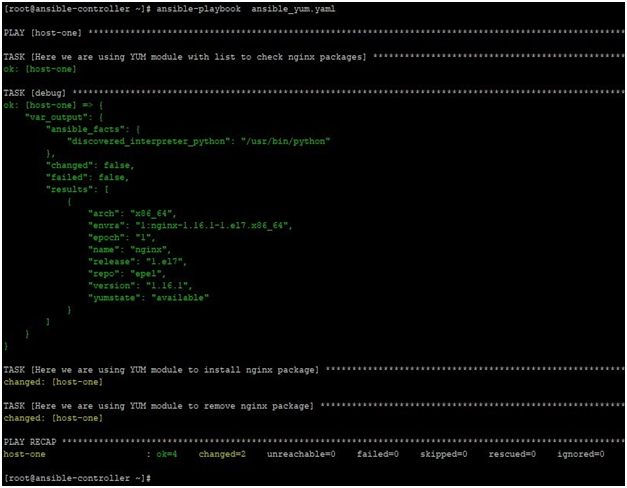
We will get the below output, where we can see that the first package was listed and it was mentioned under yum state that its available, then it was installed and then removed. State changed can be recognized by the yellow color of output text. More verbose output can be displayed by using providing verbosity parameters.
ansible-playbook ansible_yum.yaml
Output:
Conclusion
As we saw in this article, Ansible provides this strong ability to manage software packages on remote machines. Adding to that this module is managed by Ansible core team which also ensures to have backward compatibility in the latest version. This much is enough to make it eligible to put it in your Ansible skill set. So learn it first and then use it.
Recommended Article
This is a guide to Ansible Yum Module. Here we discuss What is Ansible Yum Module and its syntax along with examples as well as Code Implementation. You can also go through our other suggested articles to learn more –


