Updated May 23, 2023

Introduction to ASP.NET Core Session
ASP.NET Core Session is responsible for storing user data when browsing a web app. In general, web applications operate on the stateless HTTP Protocol, where each HTTP request is independent. Consequently, the server lacks the ability to retain variable values used in previous requests. To address this, ASP.NET Core provides the Session feature, which enables the storage and retrieval of user data.
The Session stores data in the server’s dictionary, utilizing the SessionId as the key. The SessionId is stored as a cookie on the client-side, and these sessionId cookies are sent with every request.
What is ASP.NET Core Session?
- ASP.NET Core Session stores user data while browsing the web app. The session state leverages the app-maintained store to retain data across client requests. The cache backs up the session data, which is considered temporary. The server’s dictionary stores the data using the SessionId as the key. The client-side stores the SessionId as a cookie and includes these sessionId cookies in every request.
- The default session timeout is 20 minutes but can be configured per requirements. Two sessions are available: In-Memory or In-Proc and Distributed or Out-Proc session. In the case of In-Memory sessions, when hosting the application on a web farm, it necessitates linking each session to a specific server. On the other hand, applications often prefer the Out-Proc session, which does not require linked sessions.
- To configure the session, you need to call two methods in the startup class: the AddSession method and the ConfigureServices method. These methods enable the setup and management of session-related functionalities within the ASP.NET Core application.
How To Use Session?
- The app stores user data in the session state, utilizing the store maintained by the app to retain the data across client requests. The server’s dictionary stores the session data using the SessionId as the key. The client-side stores the SessionId as a cookie, including this sessionId cookie with each request. The app sets a default session timeout of 20 minutes but allows for configuration. Each browser has its unique SessionId and does not share the SessionId with other browsers. The SessionId is deleted once the browser session ends.
- The package Microsoft.AspNetCore.session offers middleware for managing the Session in ASP.NET Core. For using the session in our project application, we need to include the package dependency in the project.json.file. To configure the session in the class Startup, you need to call two methods in the startup class: the AddSession method and the ConfigureServices method. The first method AddSession, contains the overload method, which accepts various session options like cookie name, Timeout, cookie domain, and so on. The system automatically takes the default options if we don’t pass the session options.
Example:
Code:
Public class Startup
{
Public void Configure(IApplicationBuilder app)
{
App.UseSession();
App.Run(context=>
{
Return context.Response.WriteAsync("Welcome")
});;
}
Public void ConfigureService(IServiceCollection services)
{
Services.AddSession(options=> {
Options.IdleTimeout= TimeSpan.FromMinutes(60);
});
}
}
To make use of those stored session follow the steps,
Public class SampleController:Controller
{
Public ActionResult Index()
{
HttpContext.Session.SetString("product","Pen-Drive");
Return View();
}
Public ActionResult Get_SessionValue()
{
ViewBag.data=HttpContext.Session.GetString("product");
Return View();
}
}
Create Core Application ASP.NET Core Session & Example of ASP.NET Core Session
Let’s create a new application.
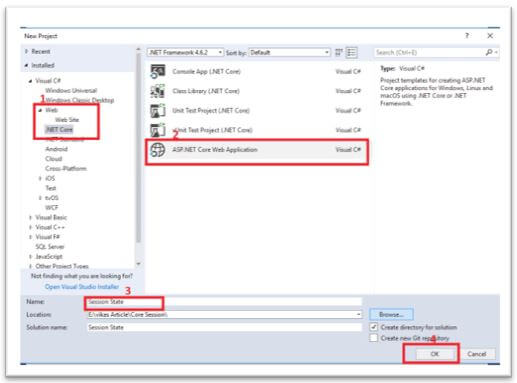
Initially, open Visual Studio and choose File – New Project. Then, in the “New Project” window, it pop-ups with another dialog there Select .Net Core and select ASP.NET Core Web Application and name the project as your wish and click Ok.
The ”New Project” window will pop up. Select .NET Core and select “ASP.NET Core Web Application.” Name your project and click “Ok.”
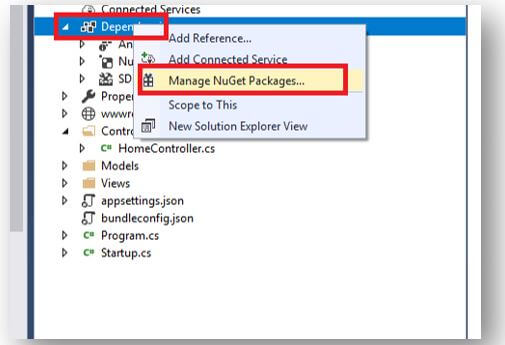
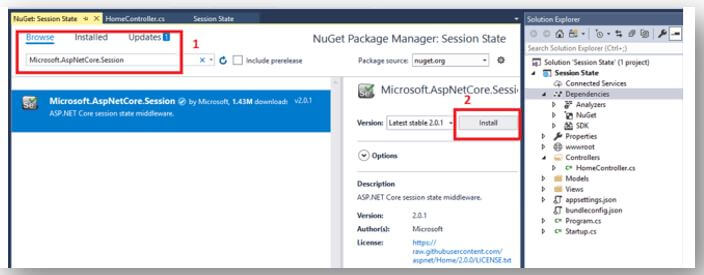
Once the project gets ready, just look at the Solution Explorer, right-click the dependencies, and click on the Manage NuGet Packages. Installing the appropriate version of Microsoft is necessary to access the session state in ASP.NET Core.AspNetCore.Session from the NuGet Packages. Once installed, the session state can be accessed and utilized within the ASP.NET Core application.
In the HomeControllers.cs, add the session variables in ASP.NET Core.
Code:
using System;
using System.Collections.Generic;
using System.Diagnostics;
using System.Linq;
using System.Threading.Tasks;
using Microsoft.AspNetCore.Http;
using Microsoft.AspNetCore.Mvc;
using Session_State.Models;
namespace Session_State.Controllers
{
public class HomeController : Controller
{
const string SessionName = "_Name";
const string SessionAge = "_Age";
public IActionResult Index()
{
HttpContext.Session.SetString(SessionName, "Peter");
HttpContext.Session.SetInt32(SessionAge, 27);
return View();
}
public IActionResult About()
{
ViewBag.Name = HttpContext.Session.GetString(SessionName);
ViewBag.Age = HttpContext.Session.GetInt32(SessionAge);
ViewData["Message"] = "Asp.Net Core !!!.";
return View();
}
public IActionResult Contact()
{
ViewData["Message"] = "Your contact page.";
return View();
}
public IActionResult Error()
{
return View(new ErrorViewModel { RequestId = Activity.Current?.Id ?? HttpContext.TraceIdentifier });
}
}
}
Once finished, click on the Startup.cs to configure the services; we need to include the session service to the container to add services in the ConfigureServices method.
Code:
public void ConfigureServices(IServiceCollection services)
{
services.AddDistributedMemoryCache();
services.AddSession(options => {
options.IdleTimeout = TimeSpan.FromMinutes(1);// here you can mention the timings
});
services.AddMvc();
}
This is to configure the HTTP request pipeline to include the app.UserSession() in the configure function so that it will be called during the runtime.
Code:
public void Configure(IApplicationBuilder app, IHostingEnvironment env)
{
if (env.IsDevelopment())
{
app.UseDeveloperExceptionPage();
app.UseBrowserLink();
}
else
{
app.UseExceptionHandler("/Home/Error");
}
app.UseStaticFiles();
app.UseSession();
app.UseMvc(routes =>
{
routes.MapRoute(
name: "default",
template: "{controller=Home}/{action=Index}/{id?}");
});
}
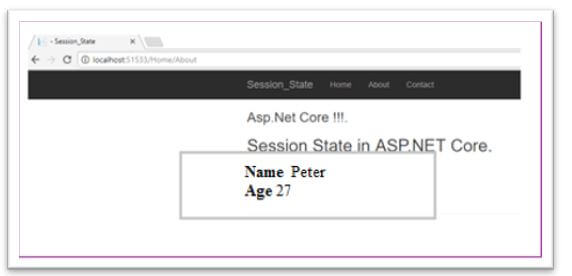
Finally, execute the project and see the results of active sessions as shown below.
Output:
Storing Data in ASP.NET Core Session
The user-session information is stored in the key-value pairs. We will get the session objects by using the HttpContext.Session here, the HttpContext symbolizes the current context.
We can store and retrieve the data by using two methods they are:
- HttpContext.Session.SetString(): Which is used to store the string.
- HttpContext.Session.GetString(): Which is used to retrieve the string by using the key for the session.
Conclusion
The app maintains the store to enable the session state to keep the data across client requests.
Recommended Articles
We hope that this EDUCBA information on “ASP.NET Core Session” was beneficial to you. You can view EDUCBA’s recommended articles for more information.


