Updated March 29, 2023
Introduction to ASP.NET Core Web Application
ASP.NET Core Application is the Cloud-Optimized Open-Source Web Framework used to build up the modern Web Application, which can be executed and developed on Cross-Platform Windows, Mac, and Linux. The ASP.NET Core Application which executes on completely .NET Framework and .NET Core. Generally, it is designed for flexibility and to work across various platforms.
What is ASP.NET Core Application?
ASP.NET Core is the Open Source Framework for creating the latest applications and with high-performance, Cloud-Enabled, Internet-Connected, Cross-Platform support applications. By using the ASP.NET Core, we can develop Mobile Backend, Web App’s and Services, and Internet of Things (IoT). The Core is redesigned to work across a variety of platforms which will be flexible, fast, and modern. For example, we can write to create, view, and edit the data from the database using the application.
Create ASP.NET Core Application
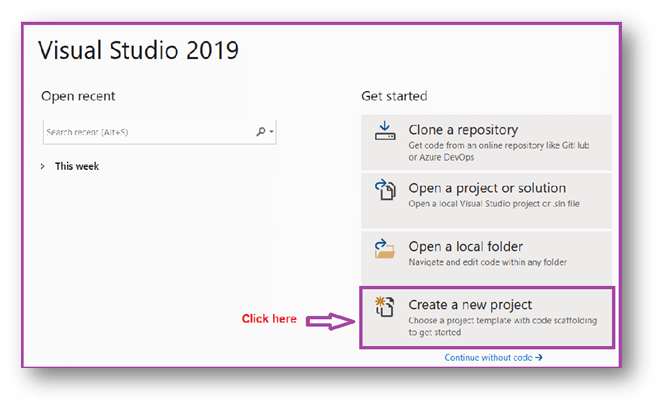
To build a new project ASP.NET Core Application, to open the Visual Studio and then select to create the new project as shown below,
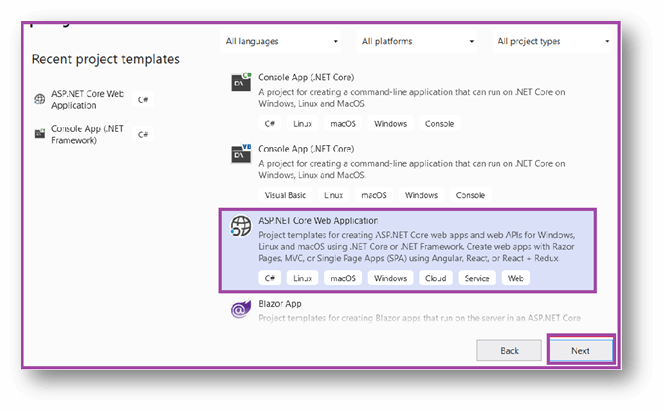
While selecting on Create a New Project it opens the “Create a new project” window. It includes the various .NET Core template applications. Here we are creating the simple Web Application, so we need to select the ASP.NET Core Web Application template and click on the Next button as shown below image.
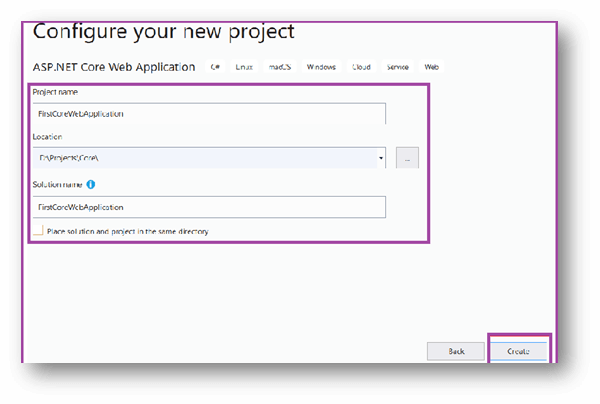
Then select the Next button, which opens the Configure Your New Project window. Now we require to set a suitable name for the project and set the location where we need to develop this project, like the solution name for the application of ASP.NET Core Web. In this example, we give the name “FirstCoreWebApplication” and select Create button as shown below,
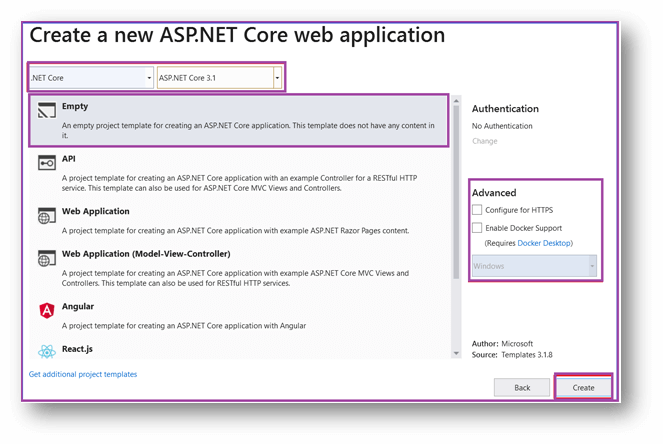
Once you click on the create button, it will open the Create a new ASP.NET Core Web Application as shown below. Here, you need to select the appropriate ASP.NET Core Web application template such as Empty, API, Web Application, Web Application (MVC), Angular, etc. Here in this demo, we are going to use the Empty template so that you will understand how the different components fit together to develop an ASP.NET Core application. Also, make sure that you have selected the appropriate .NET Core and ASP.NET Core versions (latest 3.1). Next, make sure to uncheck all the checkboxes from the Advanced section and finally click on the Create button as shown in the below image.
Once selecting the create button, it is just the window like Create a new ASP.NET Core Web Application. In this, we need to choose a suitable template for ASP.NET Core Web Application like Empty, Web Application(MVC), Web Application, Angular, and so on. In this below-shown demo project, we choose the Empty Template, so it is easy to understand how the various components work well together to build the application of ASP.NET Core. Assure that whether uncheck the entire checkboxes from advanced section and also assure that selecting only the .NET Core and ASP.NET Core versions, at last, choose on Create button as shown below,
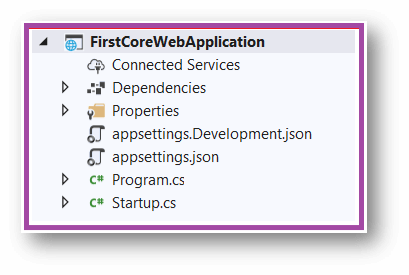
While choosing on create button, it automatically creates a new ASP.NET Core Web Project in VS, and it restores the packages in this project. It means it automatically includes dependencies of add, deletes, or updates configured from NuGet Packages in the project. Let’s see the below following project folder structure and files in VS Solution Explorer,
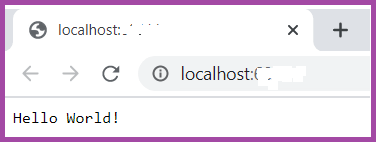
For executing the Web Application, just select on IIS Express of press F5 debug or Ctr+F5 it’s without debug; finally, it displays the following below as shown,
The output was “Hello World,” which comes from the method Configure of Startup class that appears in Startup.cs file, just open the Startup.cs file then alter it to Hello World string to whatever else you required and return the application, which returns the result in view of that.
ASP.NET Core Application Configuring Settings
The Core ASP.NET application supports for various configuration methods. Those Configurations are stored in the name-value pair, and it reads during the runtime from different parts of the application. Name-Value pairs grouped into a multi-level hierarchy, those application configuration data are from various things they are as follows,
- Environment Variables
- Custom Providers
- Files like XML, JSON, and INI
- In memory collection
- Command Line arguments
The Configuration System in ASP.NET Core was reorganized from the past edition of ASP.NET. System.Configuration namespace was used in the old version; it reads XML configuration files like Web.Config. The latest model accessed through Key-Value format it retrieves different sources like XML, JSON, and INI ASP.NET Core supports.
Let’s see the example for reading configuration using the JSON provider,
In general, the configuration remains like Key-Value format or in the structure of Hierarchical for the purpose of external files; let’s see the appsetting.json file
appsetting.json
{
"status" : "Status from appSettings.json file",
"ConnectionStrings": {
"DefaultConnection": "Server=.\\sqlexpress;Database=Test;Trusted_Connection=True;MultipleActiveResultSets=true"
}
}
It reads the JSON configuration file, which includes “Microsoft.Extensions.Configuration” and “Microsoft Extension.Configuration file” as dependency libraries. There are two package.json lines required for the dependency section,
- “Microsoft.Extensions.Configiration”: 1.0.0
- “Microsoft.Extensions.Configuration.Json”: 1.0.0
To read the JSON configuration file, we need to add “Microsoft.Extensions.Configuration” and “Microsoft.Extensions.Configuration.Json” libraries as a dependency. In addition, the following two lines need to be added in the package.json file in the dependency section.
- “Microsoft.Extensions.Configuration”:”1.0.0″,
- “Microsoft.Extensions.Configuration.Json”:”1.0.0″
Startup.cs
using Microsoft.AspNetCore.Builder;
using Microsoft.AspNetCore.Http;
using Microsoft.Extensions.Configuration;
using Microsoft.Extensions.DependencyInjection;
namespace Sample_WebApplication
{
public class Startup {
public IConfiguration Configuration { get; set; }
public Startup() {
var_builder = new ConfigurationBuilder()
.AddJsonFile("appSettings.json");
Configuration = _builder.Build();
}
public void ConfigureServices(IServiceCollection services)
{
services.AddMvc();
}
public void Configure(IApplicationBuilder app){
app.UseMvc();
app.Run(context => {
var get_status = Configuration["status"];
var get_connectionString = Configuration["ConnectionStrings:DefaultConnection"];
context.Response.WriteAsync("Default Connection" + get_connectionString);
context.Response.WriteAsync("<br/>");
return context.Response.WriteAsync("Status " + get_status);
});
}
}
}
Output
Run the ASP.NET Core Application
Let’s see the various methods to run the ASP.NET Core Web Application is as follows,
- Visual Studio F5 method
This method is by pressing F5 in your developing project of VS for the purpose of debugging.
- CommandLine “dotnet run”
To execute this method from the console by calling the dotnet run from folder this contains the project.json file.
- Dotnet publish method
àCd bin{....}\publishàdotnet YourProject.dll- IIS
Conclusion
In this article, we learned about the Core ASP.NET Application, which gives the different flexible configuration methods supports in various ways to work with like environment variable, file-based, and so on. I hope the article helps you understand the configurations and the creation of new ASP.NET Core applications.
Recommended Articles
We hope that this EDUCBA information on “ASP.NET Core Web Application” was beneficial to you. You can view EDUCBA’s recommended articles for more information.

