Updated March 15, 2023

Introduction to ASP.NET MVC GridView
ASP.NET MVC GridView is a well-organized engine for displaying data in tabular form. The table data are retrieved from data sources like Collection of List Items, DataManager, or OData Web Services; it binds the data fields to the column and displays the column’s header, which is used to identify the field. GridView helps build complex grid-based reports with good support for Formatting.
Overview of ASP.NET MVC GridView
The GridView Control in ASP.NET MVC is a resourceful engine for displaying data in a tabular structure. It obtains the data from a data source like DataManager, Collection of List Items, OData Web Services, and so on, and it binds the data field to the column. It displays the header name of the column for easy identification. Moreover, GridView is rich in customization options; it provides widespread support for displaying customization preferences with good help in grouping records. The essential features of GridView in ASP.NET MVC are Searching, Editing, Sorting, Paging, Filtering, and Grouping. In addition, grid view helps build complex types of grid-based reports with good support for Formatting.
There are some essential features for Grid Control; let’s see some important features as follows,
- DataSources – DataSources is used to bind the grid control with the collection of list items, for example, obj.DataManager.
- Filtering – it helps to filter the data.
- Sorting and Grouping – sorting and grouping support infinity levels like n level.
- Paging– paging allows switching between various pages using the paging bar; GridView control enables paging support.
- Resize column– the grid Control offers an option for resizing the columns.
- Editing – gridview editing supports two editing modes for inserting, deleting, and editing the records in the grid.
- Reordering – gridview allows for drag-and-drop support at any position in the grid, which enables the column to be repositioned at the desired place.
- Detail Template – the detail template offers the detailed rendering row for desired enlarged master row.
- Summary Support – it supports options for summarizing specific columns and rows.
- Unbound Columns – it supports unbound columns in a specific manner.
- Localization– it offers the inherent support to localize the UI.
- RTL Support– it offers the full-fledged right-to-left mode aligning the content in Grid Control from right to left.
Create ASP.NET MVC GridView
The GridView Control in ASP.NET MVC is a resourceful engine for displaying data in a tabular structure. GridView is rich in customization options; it provides widespread support for displaying customization preferences with good help in grouping records. Let’s see the creation of ASP.NET MVC GridView,
Open the VS and go to the New Project Choose Visual C# Web , then choose the ASP.NET MVC Web Application and select OK.
Once clicking on the OK button, a new window will open the ASP.NET MVC project; you have to select MVC and select OK.
The Project Solution will be opened; let’s see the Solution Explorer as shown in the image; it contains Model, Controller, and View Folders; there are the essential fields in MVC,
Right Click on your Project – Add New Item, then SQL Server Database and Add it. Go to your Database that resides in Server Explorer – [Database.mdf], We will create a table – tbl_data; go to the Database.mdf, table, and Add New table. Design your table like the following:
Database Content
For adding the Database, right clicks on the project and add a new item, then add the SQL Server Database. Go to the Database which resides in the Server Explorer-like Database.mdf and create the table data and design the table as follows,
WebConfig File
The WebConfig contains the Connection path or database-oriented connection string details, it available inside the ConnectionString; let’s see the following Connection string below,
<connectionStrings>
<add name="DefaultConnection" connectionString="your connnnection string;Integrated Security=True"="" providerName="System.Data.SqlClient" />
<add name="StudentContext" connectionString="Data Source=connecting string ;Initial Catalog=aa;Integrated Security=True" providerName="System.Data.SqlClient"></add>
</connectionStrings>
Let’s consider student detail for student application; the StudentContext contains as follows below,
StudentContext
using System;
using System.Collections.Generic;
using System.Linq;
using System.Web;
using System.Data.Entity;
namespace MVCBindGridView.Models
{
public class StudentContext : DbContext
{
public DbSet<Student> student { get; set; }
}
}
Model
To add the model, right-click on the Models folder and add New Item and then add the class File (.cs ) file and give the suitable name and write the following code as follows,
Student.cs
using System;
using System.Collections.Generic;
using System.Linq;
using System.Web;
using System.ComponentModel.DataAnnotations;
using System.ComponentModel.DataAnnotations.Schema;
namespace MVCBindGridView.Models
{
[Table("tbl_data")]
public class Student
{
[Key]
public int id { get; set; }
public string name { get; set; }
public string city { get; set; }
}
}
Controller
To add the Controller, right-click the Controller and add the empty Controller and give the name as StudentController.cs and include the following codes and also include the model in the namespace as follows,
using System;
using System.Collections.Generic;
using System.Linq;
using System.Web;
using System.Web.Mvc;
using MVCBindGridView.Models;
namespace MVCBindGridView.Controllers
{
public class StudentController : Controller
{
// to get the student details
public ActionResult Index()
{
StudentContext stdntcntxt = new StudentContext();
var data = stdntcntxt.student;
return View(data.ToList());
}
}
}
View
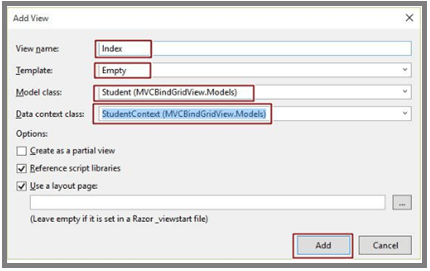
To add the View, right-click on the Index () method and include the View as follows,
In that Index.cshtml, code the following lines as follows,
Index.cshtml
@model IEnumerable<MVCBindGridView.Models.Student>
@{
ViewBag.Title = "Bind Gridview with Database";
WebGrid grid = new WebGrid(Model);
}
<h2>Bind GridView in MVC5 with Database</h2>
@grid.GetHtml(columns: new[]
{
grid.Column("id"),
grid.Column("name"),
grid.Column("city")
}
)
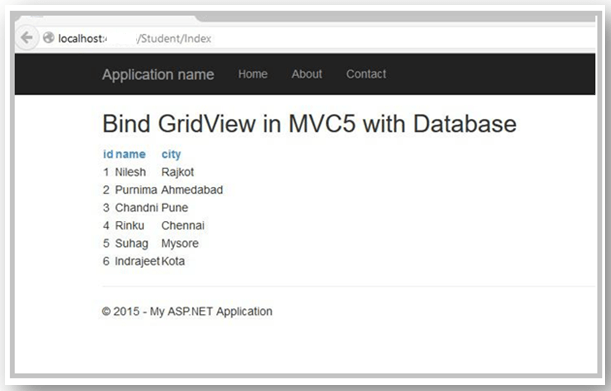
Output:
Configuring ASP.NET MVC GridView
Configuring the ASP.NET MVC GridView contains various ways to do customization. The drag-and-drop option enables the end-user to hide and display the column from the GridView during the runtime. Drag the column header and drop it onto the configuring window, which hides the column. Drag the header from the customization window to the grid’s column header panel to display the column. Let us see some customization window functionality,
The end-user can drag the column headers, move the custom window, and place the column header in the Customization window to enable the column-like true or false. In Columns WebColumnBase.Visible Property to false.
To use and customize the setting by using the properties like ASPxGridViewPopupControlSettings.CustomizationWindow (through the GridViewSettings.SettingsPopus.CustomizationWindow ) property. That setting enables you to mark the Customization Windows position.
ASP.NET MVC GridView Model
To add the model, right-click on the Models folder and add New Item and then add the class File (.cs ) file and give the suitable name and write the following code as follows,
Student.cs
using System;
using System.Collections.Generic;
using System.Linq;
using System.Web;
using System.ComponentModel.DataAnnotations;
using System.ComponentModel.DataAnnotations.Schema;
namespace MVCBindGridView.Models
{
[Table("tbl_data")]
public class Student
{
[Key]
public int id { get; set; }
public string name { get; set; }
public string city { get; set; }
}
}
Conclusion
In this article, we have seen the creation of ASP.NET MVC GridView in the application, and it is a well-ordered engine for displaying data in tabular form. Moreover, gridView helps build complex grid-based reports with good support for Formatting. I hope the article helps you to understand MVC GridView.
Recommended Articles
We hope that this EDUCBA information on “ASP.NET MVC GridView” was beneficial to you. You can view EDUCBA’s recommended articles for more information.


