Updated March 15, 2023
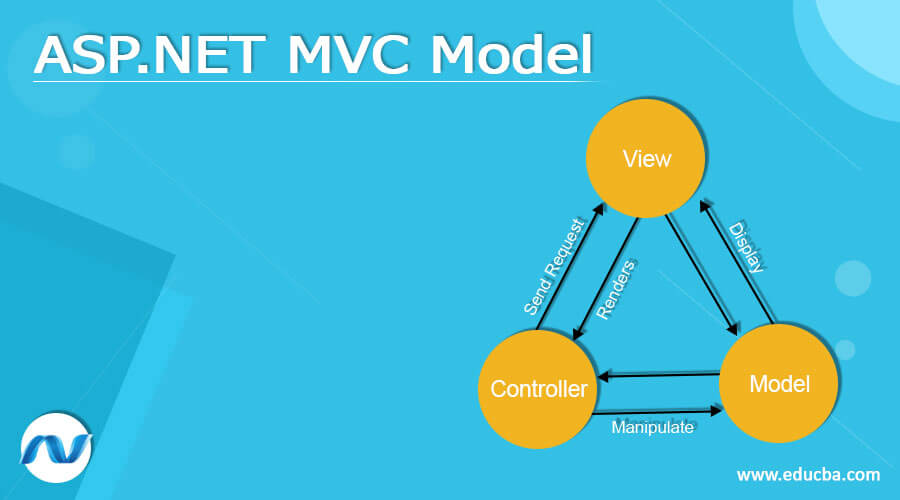
Introduction to ASP.NET MVC Model
ASP.NET MVC Model is the class that includes the application’s business logic. The model represents the shape of the data and is also called an object used to implement the application’s logic. The Controller interacts with the model, accesses the data which performs the logic, and passes the data to the view.
ASP.NET MVC Model Overviews
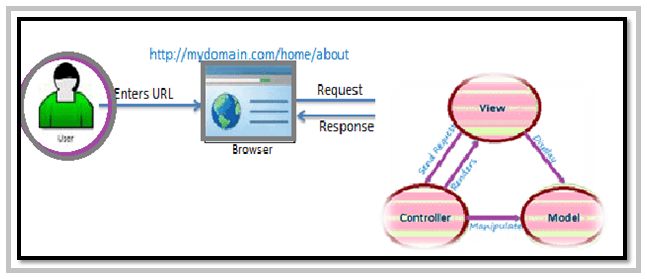
ASP.NET MVC is the light weighted and highly testable framework which integrated with features of ASP.NET like membership-based authentication, master pages, and so on. The ASP.NET MVC stands for the Model, View, and Controller. The MVC separates the application into three components: Model, View, and Controller. The ASP.NET MVC Model represents the shape of the data; it refers to the objects used to implement a logical application. The class defines and describes the model and object used to store the data retrieved from the database. The essential thing in the Model is it represents the data.
ASP.NET Model is the application entity, and it normally contains the properties that correspond to the database fields, validation attributes, and other logic.
How to Create ASP.NET MVC Model Class?
ASP.NET MVC Model is the class that includes the application’s business logic. It represents the shape of the data and is also called an object used to implement the logic of an application. Let’s create the Model class as follows,
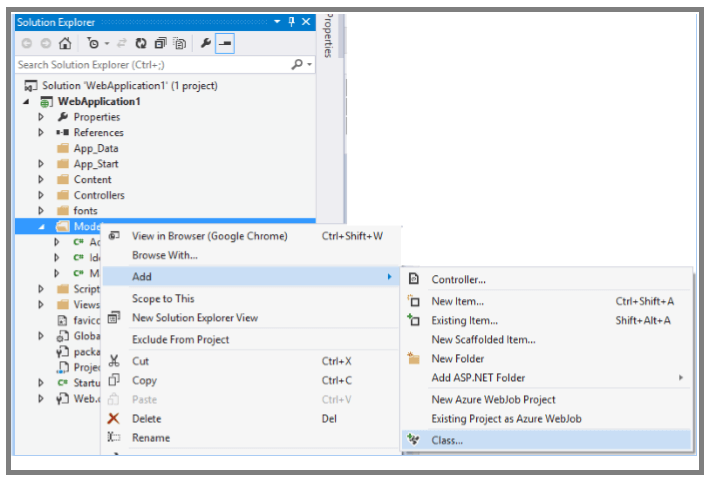
Once creating the new MVC Project Solution, right-click on the Model folder and add a new class Addà Class as shown below,
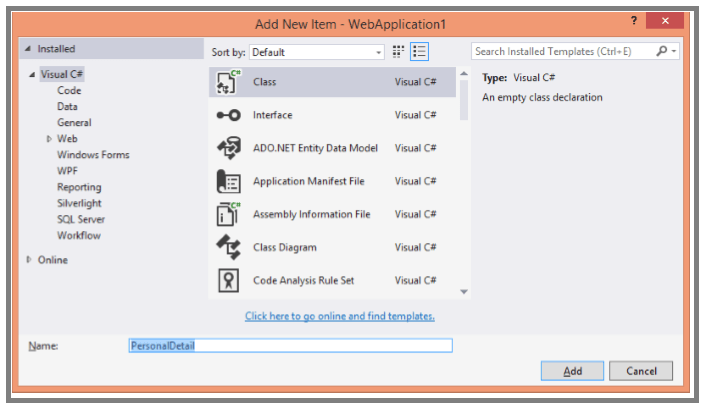
Once adding the new class, give the proper name to the Model and click add.
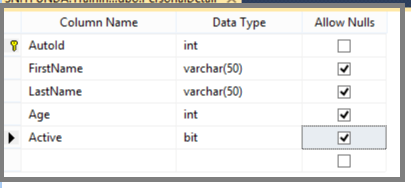
To create the model, this corresponds to the database table,
The model name PersonDetails.cs and the database table name is PersonalDetail; let’s see the following database table as shown,
The Model class looks as follows,
using System;
using System.Collections.Generic;
using System.Linq;
using System.Web;
using System.ComponentModel.DataAnnotations;
using System.ComponentModel.DataAnnotations.Schema;
namespace SampleApp.Models
{
public class PersonalDetailModel
{
[Key] [DatabaseGenerated(System.ComponentModel.DataAnnotations.Schema.DatabaseGeneratedOption.Identity)]
public int AutoId { get; set; }
[StringLength(20, MinimumLength = 4, ErrorMessage = "It should be 4-Character Long")]
public string FirstName { get; set; }
[Required(ErrorMessage = "Required Last-Name")]
public string LastName { get; set; }
public int Age { get; set; }
[Display(Name = "Is Active?")]
public bool Active { get; set; }
}
}
Customize ASP.NET MVC Model
In the customization model, let’s see the easy way how the information of the model passes to the controller by binding the model from the view in MVC. See below the Action Method as follows,
Let us see a simple action.
public ActionResult Index()
{
return View();
}
For customizing the Model, we have a sample model class for students_ given below,
public class Student_ViewModel
{
public int Student_Id { get; set; }
public string Name { get; set; }
public string Address { get; set; }
public string City { get; set; }
public string State { get; set; }
public string Country { get; set; }
public string Department { get; set; }
public int Marks { get; set; }
}
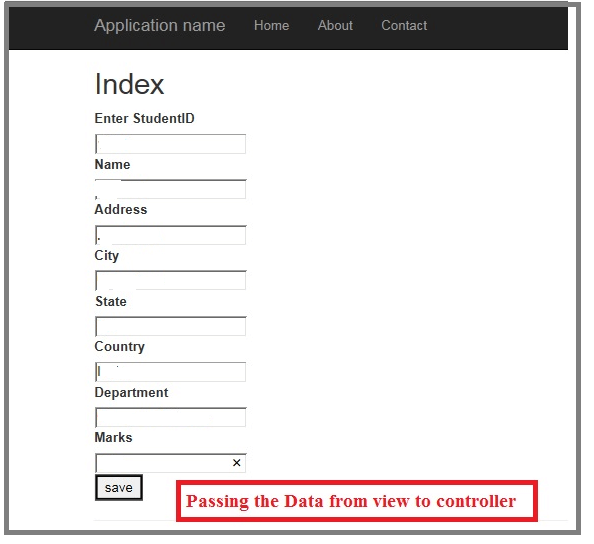
The index view is like Index.cshtml binds the Model class and contains the user interface view with the submit button, which stores the data in the databases.
@model CustomModelBinding.Models.Student_ViewModel
@{
ViewBag.Title = "Index";
}
<h2>Index</h2>
@using (Html.BeginForm())
{
@Html.EditorForModel("Student_ViewModel")
<input type="submit" value="save" />
}
@section Scripts {
@Scripts.Render("~/bundles/jqueryval")
}
In this form, we can pass the data in various methods; once submitting the button, we call the index action. Let’s see the various ways in the customization of Models as follows,
FormCollection
By using the Form Collection, we can pass the Model data directly by using this method,
[HttpPost]
public ActionResult Index(FormCollection frm)
{
Var Student_Id = studentformcollection["Student_Id"].ToString();
var student_Name = studentformcollection["Name"].ToString();
var student_Address = studentformcollection["Address"].ToString();
var student_City = studentformcollection["City"].ToString();
var student_State = studentformcollection["State"].ToString();
var student_Country = studentformcollection["Country"].ToString();
var student_Department = studentformcollection["Department"].ToString();
var student_Marks = studentformcollection["Marks"].ToString();
return View();
}
QueryString
The query string is nothing but passing the data into the URL; it is the one more method to get the data by requesting the data by querystring like Request.querystring as shown below,
var student_Name = Request.QueryString["StudentName"].ToString();Passing the Parameter Directly
In this method, we pass the parameter directly to the method; we directly pass the data by giving the parameter directly,
[HttpPost]
public ActionResult Index(int Student_Id, string Name, string Address, string City, string State, string Country, string Department, int Marks)
{
return View();
}
Attributes of ASP.NET MVC Model
In this attribute MVC Model, there are various attributes available they are,
- Key – This is used to mark the property as the key of primary.
- DatabaseGenerated – It is used to mark the value of a property as generated from the database.
- ScaffoldColumn – It is used to set the view whether to view as a Scaffold
E.g.:
[ScaffoldColumn(false)]
public int User_ID { get; set; }- Display(Name) – Used to render user-friendly labels for the property.·
- Column(Name) – Used to specify the various field in the database table to map this property. ·
- NotMapped- It is used to set the property as Mapped Eg:
[NotMapped]
public DateTime? JoinDate { get; set; }- Table(Name) – It is used to apply the class level, which to map the model to various database table names ·
- ForeignKey(PropertyName) – It specifies the foreign key property name, which links the one table of primary to the foreign key. Another validation attribute is built to validate itself in the view at the client-side; let’s see the following ASP.NET MVC Model validation attributes applied to property mode.
- Required – Used to set mandatory field.
[Required(ErrorMessage = "Required Last-Name")]·- StringLength – Used to set the limitation in character.
[StringLength(20, MinimumLength = 4, ErrorMessage = "It should be 4-Character Long")]·- DataType – Used to set the type of the data ·
- Range(min, max) – Used to set the minimum and maximum number ·
- Compare – it is used to compare the two properties of the same name, mainly used to confirm passwords. E.g.:
[Compare("ConfirmPassword", ErrorMessage = "must be same")]
public string Password { get; set; }- ReqularExpression – It is used to specify the pattern, mainly used for mail addresses.
E.g.:
[RegularExpression(@"\w+([-+.']\w+)*@\w+([-.]\w+)*\.\w+([-.]\w+)*")]
public string Email_Address { get; set; }- Custom Validation – It is used to code the custom logical validation to the model property.
Conclusion
In this article, I have explained the ASP.NET MVC Model explained the various attributes used in the application. Hope the article helps you to understand.
Recommended Articles
We hope that this EDUCBA information on “ASP.NET MVC Model” was beneficial to you. You can view EDUCBA’s recommended articles for more information.
