Updated April 11, 2023
Introduction to ASP.NET RadioButtonList
RadioButton List class is derived from the Web Control class which groups the radio button controls. This immensely helps programmers by providing a single selection radio button group. This group can also be generated dynamically with the help of data binding. In this topic, we are going to learn about ASP.NET RadioButtonList.
Syntax
<asp:RadioButtonList  AppendDataBoundItems="True|False" AutoPostBack="True|False"  CssClass="string"  DataMember="string"  DataSource="string" DataSourceID="string"  DataTextField="string"   DataTextFormatString="string"  DataValueField="string"  ID="string"  OnDataBinding="Databinding event handler" OnDataBound="Data Bound event handler"  OnSelectedIndexChanged="SelectedIndexChanged event handler"  OnTextChanged="Text Changed event handler"  RepeatColumns="integer"  RepeatDirection="Horizontal|Vertical"  RepeatLayout="Table|Flow|OrderedList|UnorderedList"  runat="server"  SelectedIndex="integer"  SelectedValue="string"   Visible="True|False"  Width="size" >
<asp:ListItem Enabled="True|False" Selected="True|False" Text="string" Value="string" />
</asp: RadioButtonList>
A typical radio button list would look as below
<asp:RadioButtonList  ID="rblRadioButtonListExample"  AppendDataBoundItems="True" AutoPostBack="True" DataMember="ABC"  DataSource="test" DataSourceID="dbTest"  DataTextField="Name"   DataTextFormatString="Bold"  DataValueField="txtName"  OnDataBinding=" BtnSubmit_Click" OnDataBound=" BtnSubmit_Click"  OnSelectedIndexChanged="TxtID_LostFocus"  OnTextChanged="txtID_TextChanged"  RepeatColumns="1"  RepeatDirection="Horizontal "  RepeatLayout="Table "  runat="server" Visible="true"  Width="30" >
<asp:ListItem Enabled="True" Selected="True" Text="Name" Value="CBA" />
</asp:RadioButtonList>
The asp.net radio button list is written in the tag <asp: RadioButtonList></asp. RadioButtonList>. The ID property in the radio button list is important as the control is accessed using this property through the program, here the value of the ID property is “rblRadioButtonListExample”, hence the radio button list will be accessed in the source as well as in code behind using this value. The AutoPostBack property is set to true in the above code, it suggests the page will be posted back as soon as any item in the list is selected. For binding the data to the list from the database, the properties starting with the word ‘Data…’ are used. The data-bound procedure can be bound to an event handler using the OnDataBinding event, here the BtnSubmit_Click event is used, which means on click of Submit button the data source specified in DataSourceID property will be bound to the radio button list and appropriately mapped to the fields using the DataMember, DataTextField, DataValueField properties. The repeat direction property aligns the items in the list in the either vertical or horizontal format.
The item in the radio button list is added using the tag <asp: ListItem/>. The value property of the list item will contain the actual value that will be displayed on the web page. The selected property, if set to true will show the item selected by default on rendering of the page. This selection can be changed by clicking on any other item in the list.
Properties of ASP.NET RadioButtonList
Here are the properties of ASP.NET RadioButtonList mention below
-
AppendDataBoundItems
Represents the value that shows if the items in the radio button should be cleared before data binding.
-
AutoPostBack
Represents whether a postback to the server occurs when the selection is changed in the list.
-
CssClass
The cascading style sheet can be specified here that is rendered by web server control on the client.
-
DataSource
This property specifies the ID of the control from which the RadioButton list will receive data once bound to each other.
-
DataTextField
Text Field property specifies the text of the field that will bound to the RadioButton in the list.
-
DataTextFormatString
Specifies the format of how the data bound to the radio button control will be displayed.
-
DataValueField
Specifies the actual value of the field that is bound using the binding properties.
-
OnSelectedIndexChanged
This method is inherited from the List control, it raises the SelectedIndexChanged event of the radio button control.
-
RepeatLayout
The repeat layout helps us to specify how the list will be rendered that is either by using the <table> element or <ul> element or <span> element.
-
Visible
It is the Boolean property, if set to true the radio button list is displayed on the client-side, if set to false, the control is hidden.
-
RepeatColumns
Specifies the number of columns to be displayed in the list when the control is rendered.
-
RepeatDirection
Specifies if the control will be displayed horizontally or vertically.
-
Items
Returns the collection of items present in the list.
Examples of ASP.NET RadioButtonList
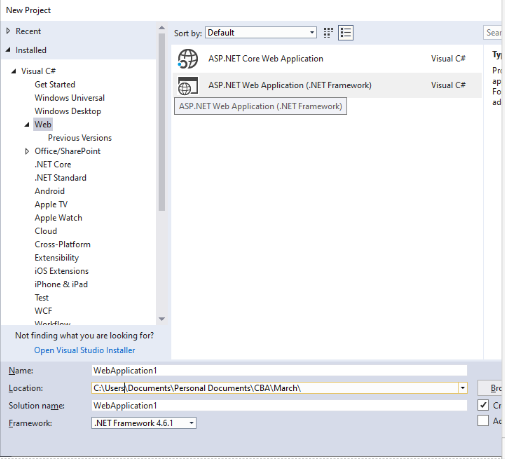
1. Open Visual Studio 2017 -> File -> New -> Project ->Select ASP.NET Web Application
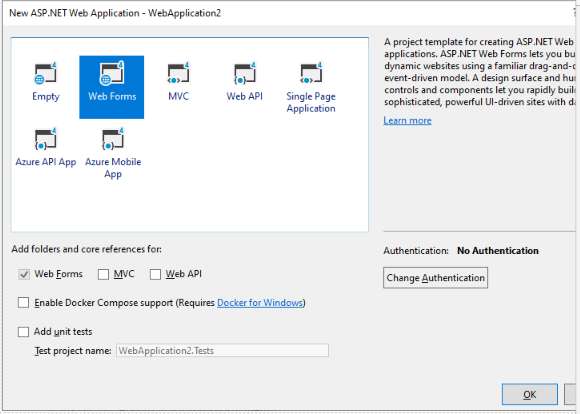
2. Select Web Forms as we are demonstrating a simple radio button list example
3. The RadioButton list can be added in the .aspx part of the web page using following code
<%@ Page Language="C#" AutoEventWireup="true" CodeBehind="WebForm1.aspx.cs" Inherits="WebApplication2.WebForm1" %>
<!DOCTYPE html>
<html xmlns="http://www.w3.org/1999/xhtml">
<head runat="server">
<title></title>
</head>
<body>
<form id="form1" runat="server">
<div>
<asp: Label ID="lblResult" runat="server" Font-Size="Large" ForeColor="Crimson"></asp: Label>
<asp: RadioButtonList ID="rblLocations" runat="server" RepeatDirection="Horizontal">
<asp: ListItem>DC</asp: ListItem>
<asp: ListItem>Atlanta</asp: ListItem>
<asp: ListItem>Austin</asp: ListItem>
<asp: ListItem>Nevada</asp: ListItem>
<asp: ListItem>Pasadena</asp: ListItem>
<asp: ListItem>Houston</asp: ListItem>
</asp: RadioButtonList>
<div>
</form>
</body>
</html>
The Repeat Direction property is set to Horizontal, the elements in the list will be displayed in the horizontal fashion.
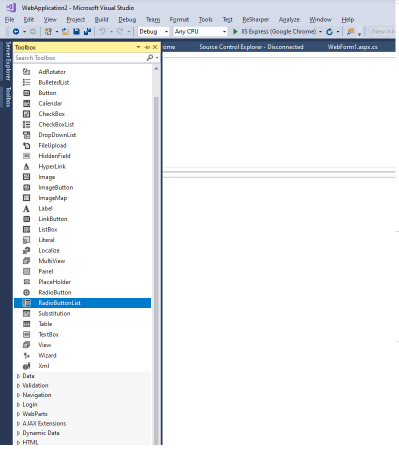
4. The RadioButton list can also be added from the designer section of the .aspx page by dragging and dropping the RadioButton list option from the Toolbox
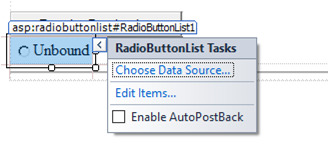
5. On drag and drop of the control, asp.net provides the option to bind the data source at the first step itself.
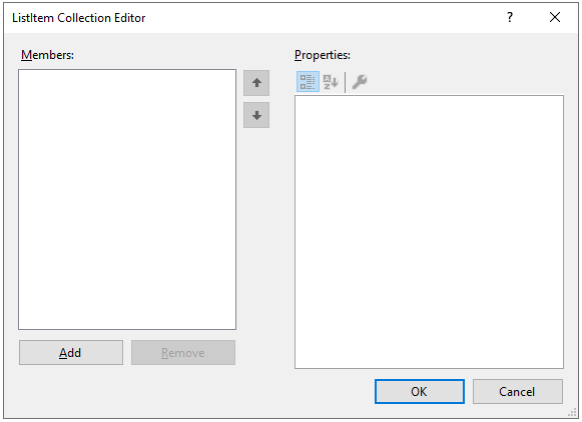
This steps also provides the option to insert the list items in the radio button list
On clicking, Choose Data Source option, it displays an interactive window that provides the option of connecting to the database by creating a data source and also provides options to select the data fields that will be displayed as text and value fields in the items collection of radio button list.
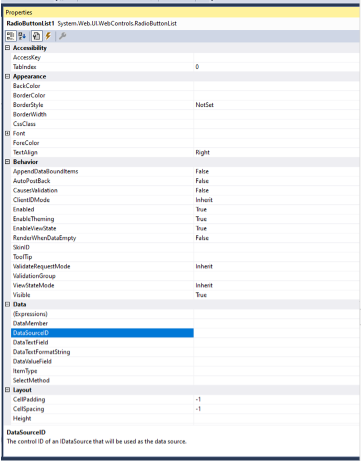
6. The properties of the radio button list can also be added in a declarative way from the Properties window in the designer section of the page.
7. Once the list and its items are added, add a button to display the selected item.
<br />
<asp:Button ID="BtnSubmit" runat="server" Text="Favorite Destination" OnClick="BtnSubmit_Click" />
<hr />
8. The button click event can be written in .cs section as follows.
protected void BtnSubmit_Click (object sender, EventArgs e)
{
lblResult.Text = "Your favorite destination is " + rblLocations.SelectedItem.ToString();
}
}
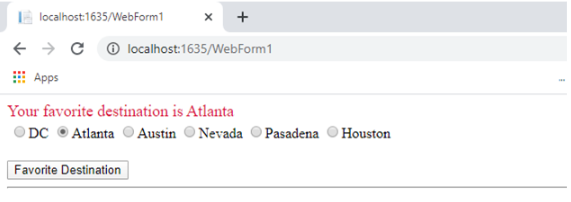
9. The final output would look like
Conclusion
The AutoPostBack property of the radio button is standard as other controls, but the SelectedIndexChanged is the most property in the control which causes an immediate post back as soon as the item in the list is selected. Apart from the binding properties of the radio button lists, it also supports themes and skins. The radio button list can also have CSS styling for which it has a CssClass property defined which can be mentioned while creating a RadioButton list. The value can point to any external CSS file from which the styling needs to be done.
Recommended Articles
We hope that this EDUCBA information on “ASP.NET RadioButtonList” was beneficial to you. You can view EDUCBA’s recommended articles for more information.
