Updated March 24, 2023
Introduction to ASP.NET TextBox
A TextBox server control is a simple box that accepts some input text from the user. Why did I use the term server? Well, because like all other server controls, ASP.NET provides its own tag for the textbox control which is run at the server and the generated HTML code is returned as a response to the browser.
So, thinking from HTML perspective, the TextBox control generates the HTML text input element. It lets the users type in some text and perform required operations on it.
Syntax:
The TextBox control can be coded using ASP.Net provided tags or dragged and dropped using Visual Studio IDE. The drag and drop feature ultimately generates the same code. The syntax of ASP.Net TextBox in its simplest form is:
<asp:TextBox ID="<textBoxId>" runat="server" ></asp:TextBox>Behind the Scenes
What happens behind the scenes? When you send a request from your browser for an ASP.Net page, the server locates the appropriate code and the ASP.Net engine starts compiling it. When the ASP.Net compiler encounters any ASP tag which is marked to be run at the server, it converts the tag into native HTML code. The generated HTML code is then sent to the browser in the response.
For example, the ASP.Net TextBox control is coded as:
<asp:TextBox ID="myTextBox" runat="server" ></asp:TextBox>Server renders it to the browser in the following HTML control:
<input name="myTextBox" id="myTextBox" type="text">Properties of ASP.NET TextBox
The ASP.Net TextBox control comes with many pre-defined properties. These properties are converted to attributes in the native HTML code. They help define additional behavior for the TextBox control. Let’s discuss some of the frequently used ones in detail:
1. BackColor, ForeColor
This property gets or sets the background and the foreground color of the text box.
<asp:TextBox ID="myTextBox" BackColor="DarkBlue" ForeColor="White" runat="server" ></asp:TextBox>2. BorderColor, BorderStyle and BorderWidth
These properties get or set the border styling for the text box control.
<asp:TextBox ID="myTextBox" BorderWidth="5" BorderColor="Blue" BorderStyle="dashed" runat="server" ></asp:TextBox>3. BindingContainer
This control gets the reference to the binding control for the text box. This binding control holds the information for data-binding to the control.
4. Rows, Columns
These properties get or set the height and width of the text box in the number of characters.
<asp:TextBox ID="myTextBox" Rows="5" Columns="20" runat="server" ></asp:TextBox>5. CssClass
This property gets or sets the CSS class to be applied to the control.
<asp:TextBox ID="myTextBox" CssClass="txtBxClass" runat="server" ></asp:TextBox>6. Enabled
This property gets or sets the value indicating whether the text box control is enabled or disabled. The default value is true.
<asp:TextBox ID="myTextBox" Enabled="false" runat="server" ></asp:TextBox>7. Height, Width
These properties get or set the height and width of the text box in the number of pixels.
<asp:TextBox ID="myTextBox" Height="100" Width="500" runat="server" ></asp:TextBox>8. ID
This property gets or sets the unique identifier attribute to the text box.
<asp:TextBox ID="myTextBox" runat="server" ></asp:TextBox>9. MaxLength
This property gets or sets a value indicating the maximum allowed characters in the text box.
<asp:TextBox ID="myTextBox" MaxLength="10" runat="server" ></asp:TextBox>10. ReadOnly
This property indicates whether a text box control value can be changed by the user or not. The default value is false.
<asp:TextBox ID="myTextBox" ReadOnly="true" runat="server" ></asp:TextBox>11. Text
This property gets or sets the text content (the value) of the text box.
<asp:TextBox ID="myTextBox" Text="Enter text here.." runat="server" ></asp:TextBox>12. TextMode
This property gets or sets the mode of the text to be entered, such as multiline, password etc.
<asp:TextBox ID="myTextBox" TextMode="MultiLine" runat="server" ></asp:TextBox>13. ToolTip
This property gets or sets the tooltip value to be displayed when the mouse pointer is hovered over the text box.
<asp:TextBox ID="myTextBox" TextMode="Password" ToolTip="Password should be minimum 8 characters long." runat="server" ></asp:TextBox>14. Visible
This property determines whether the text box control will be displayed on the UI or hidden.
<asp:TextBox ID="myTextBox" Visible="false" runat="server" ></asp:TextBox>Example of ASP.NET TextBox
Let us create an ASP.Net webform with various text boxes to demonstrate the working of ASP.Net TextBox and its properties.
Step 1 – Create a new ASP.Net web application project. This will create a shell template with a working application and a default aspx page.
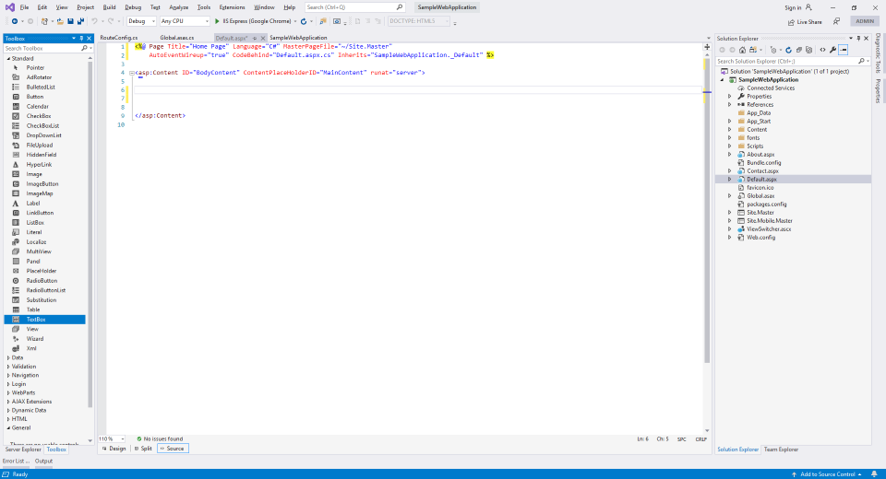
Step 2 – Go to the Default.aspx file and remove the contents of the shell template to look like below:
Step 3 – In the Toolbox pane of Visual Studio IDE, you would notice a set of Web controls ready to drag and drop in your project. Find the TextBox control and drag it in the Default.aspx page.
Step 4 – Once you drop the TextBox control, you would notice an auto-generated ASP.Net TextBox tag in your Default.aspx file. Modify the code to look like below.
Alternatively, you can skip the drag and drop part and write the above code yourself.
Step 5 – Copy the below code in your Default.aspx file.
<%@ Page Title="Home Page" Language="C#" MasterPageFile="~/Site.Master"
AutoEventWireup="true" CodeBehind="Default.aspx.cs" Inherits="SampleWebApplication._Default" %>
<asp:Content ID="BodyContent" ContentPlaceHolderID="MainContent" runat="server">
<br /><br /><br /><br />
<asp:TextBox ID="UserName" placeholder="Create a unique username" BackColor="LightBlue"
ForeColor="DarkBlue" Width="200" runat="server"></asp:TextBox>
<asp:TextBox BackColor="LightGray" ReadOnly="true" Columns="15"
Text="@myWebsite.com" runat="server"></asp:TextBox>
<br /><br />
<asp:TextBox ID="Email" placeholder="Enter Email here.." Width="200" TextMode="Email" runat="server"></asp:TextBox>
<br /><br />
<asp:TextBox ID="Password" placeholder="Enter Password here.." Width="200" TextMode="Password" MaxLength="20"
ToolTip="Password should be minimum 8 and maximum 20 characters long." runat="server"></asp:TextBox>
<br /><br />
<asp:TextBox ID="Address" placeholder="Enter Postal Address here.." TextMode="MultiLine"
Rows="5" Columns="50" runat="server"></asp:TextBox>
<br /><br />
<asp:Button ID="Submit" runat="server" Text="Submit" />
</asp:Content>
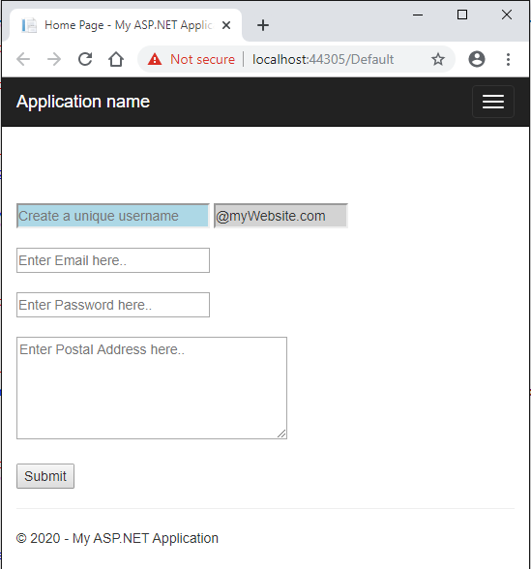
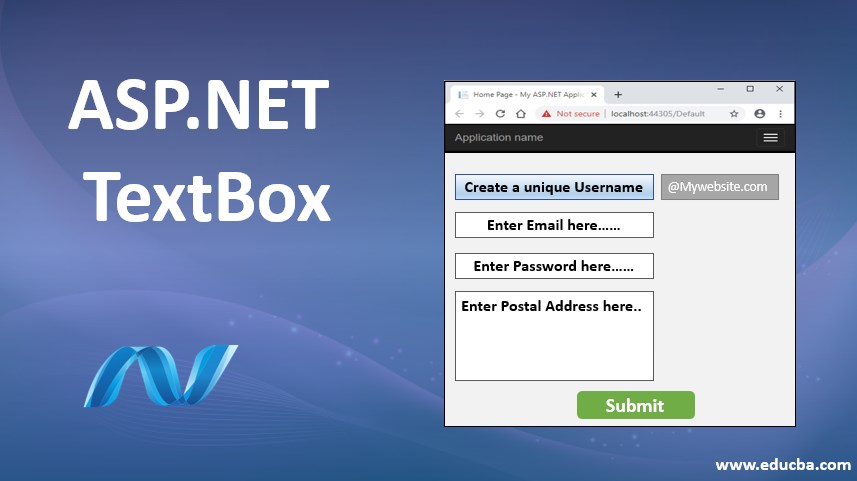
Step 6 – Run the application. Below is the output of your code. It has 5 textboxes and a button. Various text boxes use various properties to modify behavior.
The Username text box has a background and foreground color. Next to it is a read-only textbox.
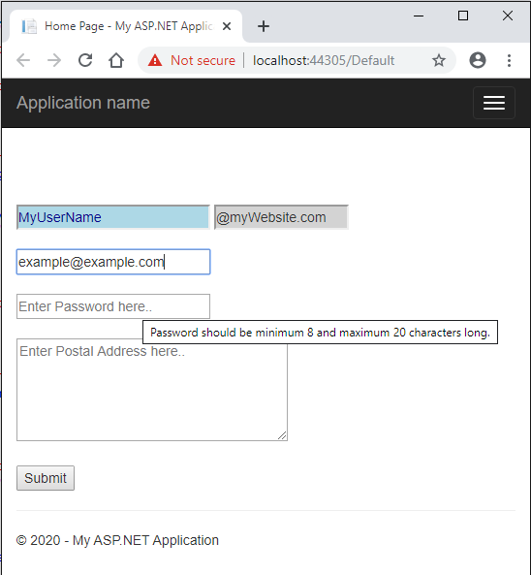
The password text box has text mode property set to password and a tooltip describing the expected value from the user. It also has the max length set to 20, thereby limiting the user input to 20 characters only.
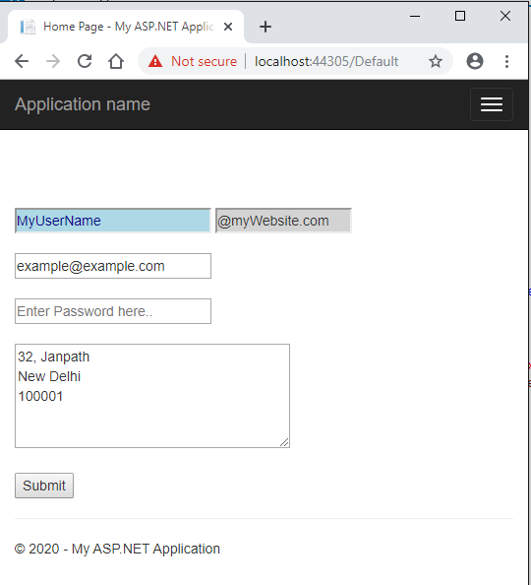
The address text box is a multi-line text box with rows and columns property set.
Recommended Articles
This is a guide to ASP.NET TextBox. Here we discuss the Introduction and the properties of asp.net textbox along with syntax and example. You may also look at the following articles to learn more –
