Updated October 9, 2023
Introduction to AutoCAD Tools
AutoCAD allows us to create drawings in 2D as well as in 3D. There is a wide range of AutoCAD tools that help us make accurate and detailed technical designs. These AutoCAD tools allow users to create, edit, and manage their drawings.
List of 16 Important AutoCAD Tools:
- Line
- Circle
- Rectangle
- Polyline
- Copy
- Rotate
- Erase
- Trim
- Extend
- Move
- Scale
- Mirror
- Offset
- Array
- Fillet
- Explode
AutoCAD Tools – Detailed Overview
Let us look at the various AutoCAD tools in detail.
1. Line
A line tool lets you create a straight path between two points in a CAD drawing.
How to open it?
Click the Line tool in the Draw panel.

Command Prompt: Type “LINE” or “L” in the command prompt and press Enter.

How to Use it?
- Pick a starting point: Click your mouse to tell AutoCAD where to begin the line.
- Choose the ending point: AutoCAD will then ask you to pick a second point, indicating where the line should end. Click again to set this point.
- Finish the command: You can end the LINE command by hitting Enter, Escape (ESC), or the Spacebar.
When to Use it?
- Creating walls and partitions in architectural drawings.
- Drawing electrical wiring diagrams with straight wire segments.
- Sketching basic geometric shapes (square, rectangle, triangle, etc.).
Output:

2. Circle
The circle tool generates a round shape with a constant radius in CAD designs.
How to open it?
Look for an icon that resembles a circle or the letter “C” in the Draw panel of the Home tab.
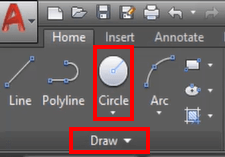
Command Prompt: Type “CIRCLE” or “C” > Press Enter.
How to use it?
- Specify the center point: Choose the circle’s center by clicking at any point in the open window or by entering coordinates.
- Specify radius or diameter: Specify circle size as radius or diameter.
- Adjust properties: Modify attributes (e.g., layer, color) through the Properties palette or right-click menu.
When to use it?
- Drawing wheels, gears, and other circular objects.
- Marking locations of circular objects in a site plan.
- Representing holes and openings in engineering drawings.
Output:

3. Rectangle
The rectangle tool constructs a four-sided shape with equal-length sides and right angles.
How to open it?
It often appears as a rectangle-shaped icon under the Draw or Create panel.
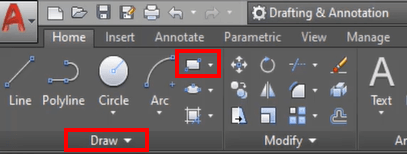
Command Prompt: Type “RECTANGLE” or “REC” > Press Enter.
How to use it?
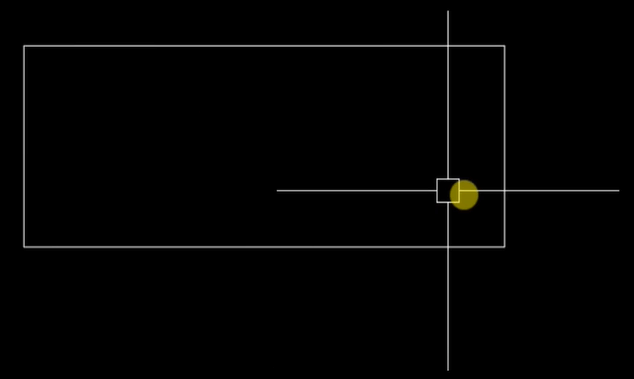
- First corner: Click to mark one corner of the rectangle.
- Second corner: Click again to mark the diagonally opposite corner. AutoCAD creates the rectangle between these two points.
- Adjust properties: You can change attributes like color or layer using the Properties palette or by right-clicking on the rectangle.
When to use it?
- Designing rooms and spaces in architectural drawings.
- Creating frames for illustrations and diagrams.
- Drafting floor plans and site layouts.
Output:
4. Polyline
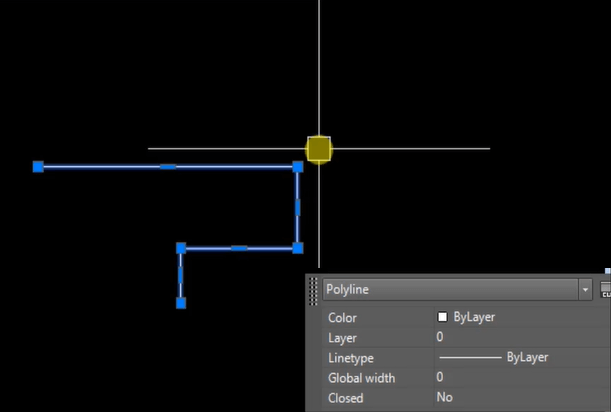
The polyline tool connects multiple line segments or curves in CAD to form complex shapes.
How to open it?
Search for the Polyline tool in the Ribbon. It typically looks like a series of connected line segments.
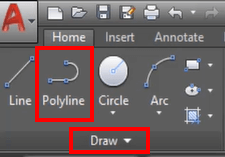
Command Prompt: Type “PLINE” or “PL” > Press Enter.
How to use it?
- Start: Click to begin the polyline at a point.
- Add segments: Click more points to create connected lines; AutoCAD joins them into one polyline.
- End: Double-click the last point or press Enter to finish creating the polyline. Also, AutoCAD closes the polyline only if the start and end points match; otherwise, you may have an open polyline.
- Adjust properties: You can change line attributes (like color) using the Properties palette or right-click menu.
When to use it?
- Creating complex outlines and shapes like building footprints.
- Designing piping and ductwork layouts.
- Tracing irregular boundaries in land surveys.
Output:
5. Copy
The copy tool duplicates selected objects within a CAD drawing.
How to open it?
The Copy tool is present in the Modify group. The icon has one small circle and two overlapping circles.

Command Prompt: Type “COPY” > press Enter.
How to use it?
- Select what to duplicate: Click on the objects you want to copy. Hold Shift for multiple items or draw a box around them.
- Choose a starting point: Click where you want the copying to begin. Objects will be pasted in relation to this point.
- Pick the new spot: Click where you want to paste the copied objects (The objects will be positioned based on the starting point).
- Keep going: Repeat by selecting, choosing a start, and picking new spots. Finish with Enter or right-click and “Enter.”
When to use it?
- Replicating furniture or fixtures in an interior design layout.
- Placing multiple instances of the same detail in a drawing.
- Creating symmetrical patterns and layouts.
Output:

6. Rotate
The rotate tool changes the orientation/direction of the selected object within a CAD design.
How to open it?
Go to the Modify panel and select the tool that looks like a circular arrow or a rotation symbol.
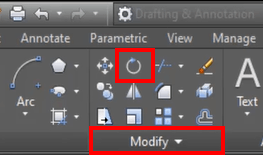
Command Prompt: Type “ROTATE” > press Enter.
How to use it?
- Choose what to rotate: Click on the objects you want to turn. To pick multiple items, hold Shift or draw a box around them.
- Set the center point: Click on the screen to select the point from which you want the object to rotate. For example, it can be the top, bottom, or center of the object.
- Pick the angle: Type the rotation angle in degrees or use your mouse to set it visually. You can also specify angles in the command prompt.
- Keep rotating: Do more rotations by selecting, setting the center, and choosing angles. To finish, press Enter or right-click and “Enter.”
When to use it?
- Aligning objects at specific angles in architectural drawings.
- Positioning components in mechanical assemblies.
- Adjusting the orientation of text or labels.
Output:

7. Erase
The erase tool deletes unnecessary elements from a CAD drawing.
How to open it?
Find the Erase command under the Modify panel. It looks like a pencil that has a back eraser.
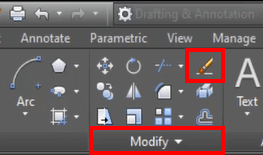
Command Prompt: Type “ERASE” or “E” > press Enter.
How to use it?
- Pick what to delete: Click on the things you want to eliminate. You can choose many by clicking on each or dragging a box around them.
- Finish deleting: After you have selected the objects to delete, press Enter or right-click and pick “Enter.” The selected objects vanish from your drawing.
When to use it?
- Deleting unnecessary or unwanted elements from a cloth design.
- Cleaning up draft sketches before finalizing a design.
Output:

8. Trim
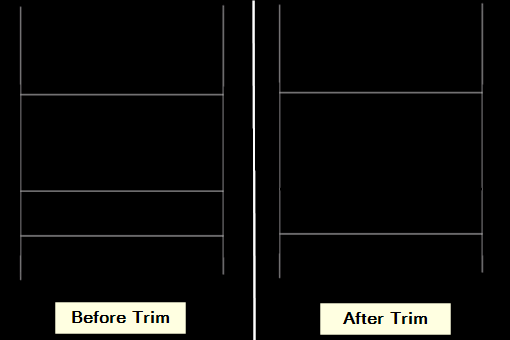
The trim tool removes unwanted portions of objects in a CAD drawing.
How to open it?
Under the Modify panel, you will see a tool booking like scissors or a knife. Open the dropdown menu for that tool and then select the first option (Trim).
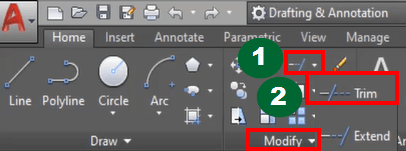
Command Prompt: Type “TRIM” > press Enter.
How to use it?
- Select the cutting edge: Click the line or object you want to use for cutting.
- Select what to trim: Click the parts of other objects you want to remove. AutoCAD erases what you choose up to the cutting line.
- Repeat if necessary: Keep selecting cutting lines and portions to trim as needed. To complete, press Enter or right-click and choose “Enter.”
When to use it?
- Trimming excess lines to create clean intersections.
- Creating doors and windows in walls.
- Removing overlapping geometry.
Output:
9. Extend
The extend tool increases an object’s length so it can join with a boundary or another object.
How to open it?
In the Modify group, open the dropdown menu for a tool booking like a knife and then select the second option (Extend).
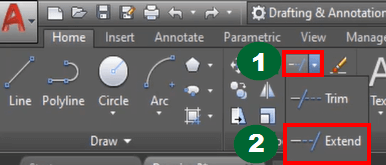
Command Prompt: Type “EXTEND” > press Enter.
How to use it?
- Select boundary: Click on the point (line or object) where you want to set the boundary.
- Select what to extend: Click on the lines or objects you want to make longer until they touch the boundary.
- Keep going: You can pick more boundaries and objects to extend. To finish, press Enter or right-click and choose “Enter.”
When to use it?
- Extending walls to meet at a common intersection.
- Lengthening objects to match other features in a design.
- Connecting lines to form a continuous boundary.
Output:

10. Move
The move tool relocates the selected objects to new positions in a CAD drawing.
How to open it?
The move command’s icon resembles a four-direction arrow or a crosshair.
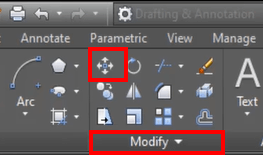
Command Prompt: Type “MOVE” or “M” > press Enter.
How to use it?
- Choose what to move: Click on what you want to move. Hold shift to choose many items.
- Set the anchor point: Click to choose a point on the selected objects that will act as the center during the move. (Keep holding the mouse key; Do not leave your mouse key yet).
- Pick the new spot: Click where the objects should go. They move with the anchor point.
- Keep moving: Do more moves by selecting, setting the anchor, and choosing new spots. To finish, press Enter or right-click and “Enter.”
When to use it?
- Adjusting the position of furniture in an interior design layout.
- Shifting components within a mechanical assembly.
- Rearranging elements in a drawing to improve clarity.
Output:

11. Scale
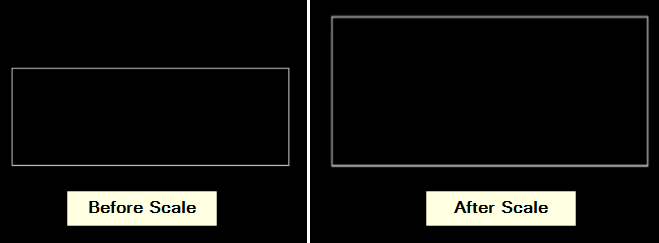
The scale tool resizes selected objects proportionally or non-proportionally.
How to open it?
You can find the Scale command in the Ribbon on the Home tab under the Modify panel. The icon has two boxes, a smaller box inside the bigger one.
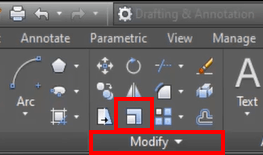
Command Prompt: Type “SCALE” > press Enter.
How to use it?
- Pick what to resize: Click on the object you want to make bigger or smaller. You can pick lots by holding Shift or drawing a box around them.
- Set a starting point: Click to choose a point that stays still during the resizing. Everything resizes around this point.
- Choose how much to resize: Type in how much bigger or smaller you want the object to be and press Enter or type the scale factor.
- Preview and adjust: AutoCAD shows you what the resized object will look like. Make changes if needed.
- Finish resizing: Press Enter or right-click and select “Enter.” AutoCAD resizes the selected object based on your instructions.
When to use it?
- Adjusting the size of furniture or fixtures in architectural layouts.
- Scaling mechanical components to fit a specific size.
- Resizing text or labels for different drawing scales.
Output:
12. Mirror
The mirror tool creates an exact same (symmetrical) copy of selected objects.
How to open it?
The Mirror tool comes under the Modify panel and looks like a mirrored triangle (reflection or mirror image).

Command Prompt: Type “MIRROR” > press Enter.
How to use it?
- Select what to mirror: Click on the objects you want to mirror. You can pick multiple objects by holding Shift or drawing a box around them.
- Pick the mirror line’s start: Click at a point where you want the mirror line to start.
- Choose the mirror line’s end: Click where the mirror line ends. It decides which way the mirroring happens. For instance, if the endpoint is at the left side of the start point, AutoCAD will create the mirror image to the left and vice versa.
- Keep going: Continue by selecting, setting start and end points, and placing mirrored copies. Finish with Enter or right-click and “Enter.”
When to use it?
- Designing symmetrical parts in mechanical drawings.
- Creating symmetrical floor plans for buildings.
- Mirroring text or labels for readability.
Output:

13. Offset
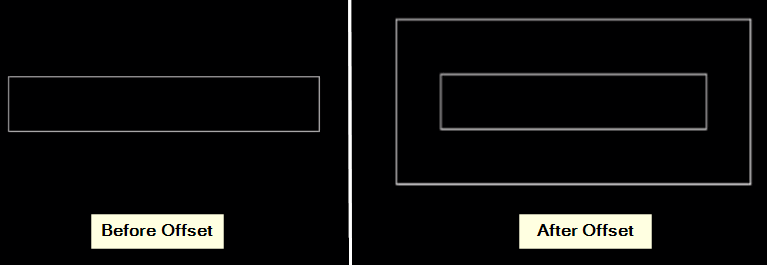
The offset tool generates parallel copies of lines or curves at a specified distance.
How to open it?
Represented by an icon resembling parallel or perpendicular lines, you can find the Offset command in the Modify panel.
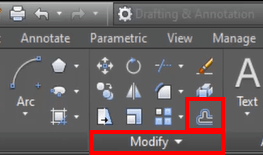
Command Prompt: Type “OFFSET” or simply “O” > press Enter.
How to use it?
- Specify offset distance: When you start Offset, tell AutoCAD how far you want to offset:
- Type the distance and press Enter.
- Click on the shape you want to create in the offset.
- Select objects to offset: Click the objects you want to offset. Use a selection window to choose many items by dragging a box around them.
- Specify offset side: To choose the direction:
- Click inside the objects to offset inward.
- Click outside the objects to offset outward.
- Finish offsetting: Press Enter or right-click and select “Enter” to finish. AutoCAD makes copies of the objects using the specified distance and direction.
When to use it?
- Adding offsets to represent walls or partitions in architectural plans.
- Designing concentric shapes or patterns.
- Creating clearance gaps in mechanical drawings.
Output:
14. Array
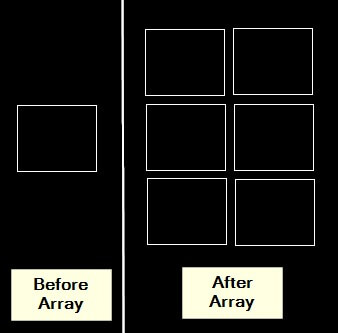
The array tool produces multiple copies of objects in a pattern that you define.
How to open it?
You can find the Array command in the Modify panel with an icon resembling a grid or pattern.
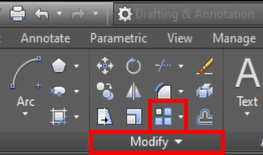
Command Prompt: Type “ARRAY” > press Enter.
How to use it?
1. Choose what to multiply: Click on the objects you want to create copies of. Hold Shift for many items or draw a box around them.
2. Pick the Array type: AutoCAD asks how you want to arrange the copies:
- Rectangular: Like rows and columns.
- Polar: Like a circle around a point.
3. Set up the array:
- For rectangular:
- Say how many rows and columns you want.
- Set the space between rows and columns.
- For polar:
- Select the point where you want the center to be.
- Mention the number of copies to create.
- Set the angle between each copy.
4. See how it looks: AutoCAD shows you a preview. You can then adjust as needed.
5. Finish making the array: Press Enter or right-click and pick “Enter.”
When to use it?
- Replicating objects in a grid pattern, like windows on a building façade.
- Creating circular arrays for features like bolts on a wheel rim.
- Distributing elements along a specified path.
Output:
15. Fillet
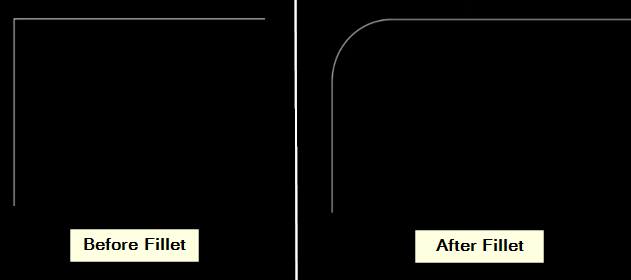
The fillet tool converts the corners of intersecting lines or objects into a rounded shape.
How to open it?
Look for this tool in the Modify panel. The fillet tool looks like a quarter circle with an arc above it.
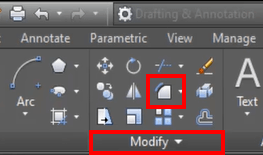
Command Prompt: Type “FILLET” > press Enter.
How to use it?
- Pick fillet size: After you start Fillet, tell AutoCAD how big you want the rounded corner to be. Type the size or click a point to set it.
- Choose the first thing: Click on the first line or object where you want the rounded corner.
- Select the second thing: Click on the second line or object that meets the first one at the corner you want to round.
- Keep going if needed: You can make more rounded corners by selecting the first and second things for each one.
- Finish filleting: When you are done, press Enter or right-click and pick “Enter” to exit the Fillet tool.
When to use it?
- Adding rounded corners to architectural elements like door frames.
- Smoothing sharp edges in mechanical parts.
- Creating aesthetically pleasing curves in drawings.
Output:
16. Explode
The explode tool breaks down complex objects into individual components so the user can easily edit those.
How to open it?
Find the Explode tool in the Modify panel. It looks like a broken-apart cube with four sides showing.
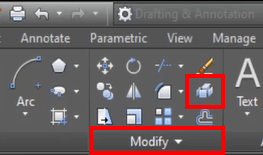
Command Prompt: Type “EXPLODE” > press Enter.
How to use it?
- Choose what to break: Click on the thing or group of things you want to break into pieces. It could be a block, a drawing, or some other complex object.
- Make it happen: After that, press Enter or right-click and pick “Enter.” AutoCAD takes apart the chosen object into its basic parts, like lines, curves, and text.
- Check what you got: Now, you can easily edit, move, delete, or change each separate piece.
- Finish breaking: When done, press Enter or right-click and pick “Enter” to exit the Explode tool.
When to use it?
- Converting blocks or groups into individual elements for editing.
- Decomposing complex shapes into basic lines and arcs.
- Separating overlapping or grouped elements.
Output:
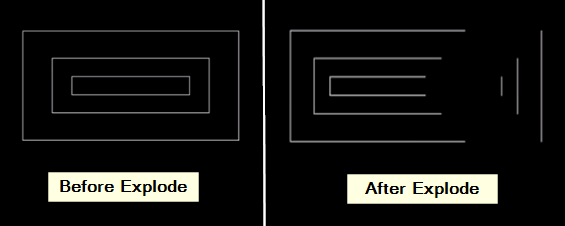
These are the top 16 AutoCAD tools commonly used by professionals.
Recommended Articles
This is a comprehensive guide to the top 16 AutoCAD Tools. You may also look at the following article to learn more –

