Updated March 16, 2023
Introduction to Azure Hyper-V
Azure provides different kinds of features to the user; hyper-v is one of the features offered by azure. Hyper – V is the one type of infrastructure that provides the different hosting azure services. Hyper –V provides a secure virtualization platform for operating systems such as Windows and Linux, as well as up-to-date security and better performance.
Key Takeaways
- It provides flexibility to the user, which means hyper- V we can move between the different physical hosts as per requirement.
- Redundancy is one of the key benefits of Hyper- V that means it manages all failover clusters.
- Azure Hyper –V allows us to scale the system per our requirements.
What is Azure Hyper-V?
Microsoft’s hardware virtualization platform is known as Hyper-V. It allows you to make and run any application version of a PC, known as a virtual machine. Each virtual machine functions similarly to a computer, allowing us to install all necessary operating systems and various applications or programs. When we require different computer resources, virtual machines provide a better approach to tackle this situation, assist with setting aside time and cash and are a more productive method for utilizing equipment than simply running one working framework on actual equipment.
Hyper-V runs each virtual machine in its separate space, which implies you can simultaneously run more than one virtual machine on similar equipment. It would help if you did this to keep away from issues. For example, an accident influencing different jobs or giving various individuals, gatherings, or administrations admittance to multiple frameworks.
How to Setup Azure Hyper-V on Windows?
Let’s see how we can set up azure hyper- V on windows:
1. First, we need to execute the following command and restart the system as below.
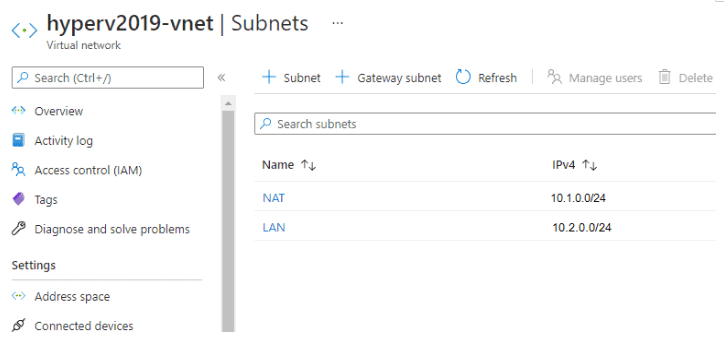
Install-WindowsFeature -Name Hyper-V -IncludeManagementTools –Restart2. In the next step, we need to add the Nic for IP enabling; let’s consider we have a new Hyper-V switch as well, as we created two subnets on azure. The IP range for azure is 10.0.0.0/18.
On the other hand, we need to configure the NAT and LAN subnet with the 10.1.0.0/24 and 10.2.0.0/24 address range, as shown in the screenshot below.
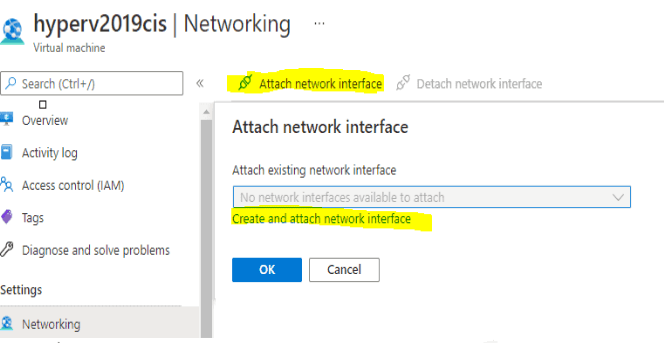
3. After that, if we want to add some additional IP addresses first, we need to power Hyper –V, click on Attach network interface, and select Create and attach network interface as shown below screenshot.
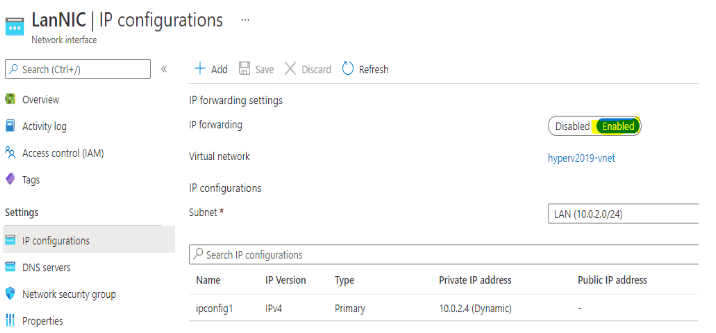
After completion of NIC, enable IP forwarding on NIC, so click on LanNIC, select IP configuration, select enable IP forwarding button, save, and restart VM as shown below screenshot.
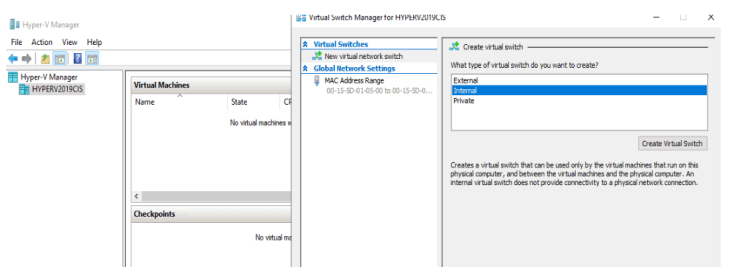
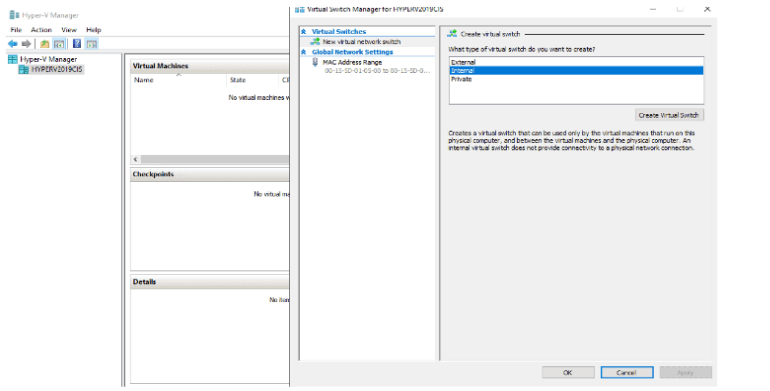
4. Now, we need to create a Virtual Switch, so first open Hyper-V manager, right-click on our server from the left panel, and select Virtual Switch Manager, as shown in the screenshot below.
Here we need to assign a name for the switch and then click on the ok button, as shown in the below screenshot.
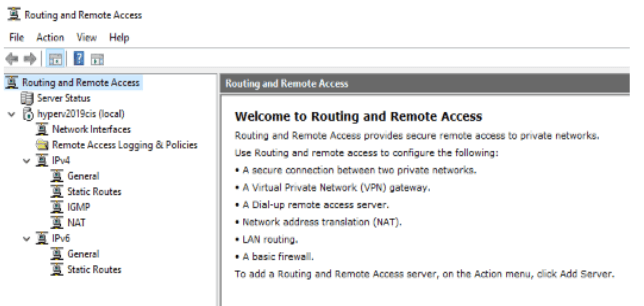
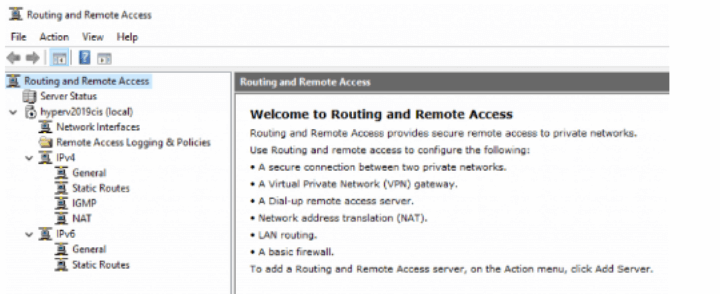
Now we need to set RRAS for Hyper- V NAT. When RRAS is introduced, open your Hyper-V host’s new Directing and Remote Access console from Windows Regulatory Instruments. Your administration hasn’t been designed or begun, so you’ll see a red down bolt by your server name. Click on your server name on the money and pick Design and Empower Directing and Remote Access. In the Steering and Remote Access Server Arrangement Wizard, select Custom design and afterward NAT and LAN directing, and finish the wizard, the RRAS, as shown in the below screenshot. With the help of the below command.
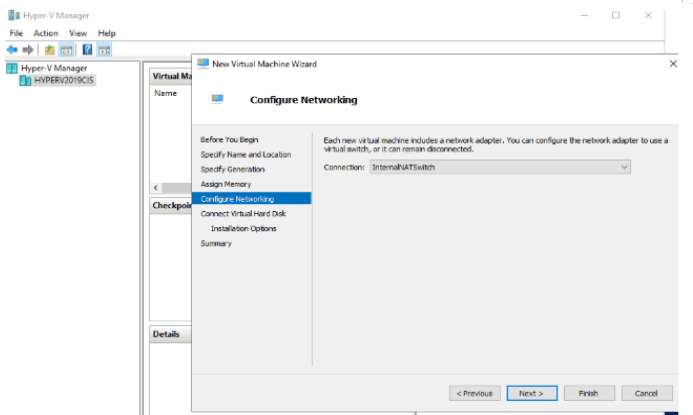
Install-WindowsFeature -Name Routing –IncludeManagementTools5. We need to create a new virtual machine, as shown in the screenshot below.
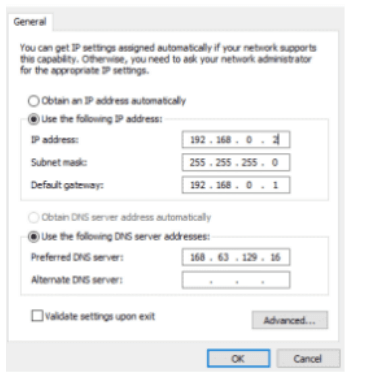
6. In the next step, we need to configure the guest VM or add the IP address, as shown in the screenshot below.
7. In the next step, we need to create the azure user to define routes and Test connectivity.
Azure Hyper-V for Setting up RRAS
First, we need to install the RRAS with the help of the below command:
Install-WindowsFeature –routing specified name –IncludeManagementToolsAfter the successful installation of RRAS, we need to configure it, so open Hyper- V, click on new Routin and select Remote Access console from administration tools. If our service is not started, we need to restart the server by clicking on the specified server name. For setup and configuration, we need to click on Custom configuration, as shown in the below screenshot.
Here we can see the different options for configuration; let’s consider NAT under the IPv4 for the new interface and click on the ok button for configuration.
Azure Hyper-V Replicate
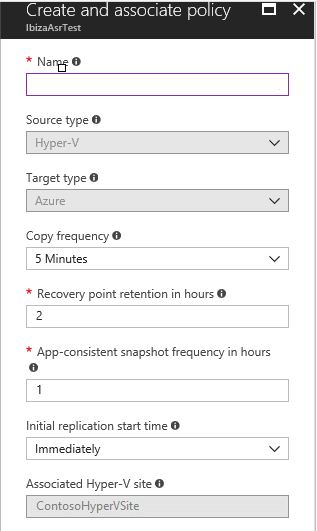
Azure provides the recovery service to the user, or we can say that it maintains the replication of our data. Azure offers different policies to users. After completion of installation and configuration, we need to set up the replication policy as below.
1. First, we must select the prepared infrastructure inside this menu. We have the replication setting and click on the create and associate buttons.
2. In the next step, we need to provide the policy name.
3. If we want to change the default setting, then we can change otherwise, we keep the default. Create a policy as shown in the below screenshot.
Azure Hyper-V Deployed
We need to follow the below steps for the deployment of hyper-v.
- Installation of the Hyper-V job on that Windows Server VM running in purplish-blue.
- Configuration of network for your settled VM running on the virtual Hyper-V host in Sky blue.
- Replicate a VM from your physical (on-premise) Hyper-V host to a virtual Hyper-V host running as a VM in Sky blue.
- If a VM fails to be stable, imitate running on a Hyper-V host in Purplish blue if a catastrophe occurs.
- In the next step, we need to create and configure the Hyper V and restart it.
Azure Hyper-V Parameters
- ComSession: This is one of the parameters to handle the remote session and computer, so first, we need to run a cmdlet and start a new CimSession.
- ClusterObject: It is used to specify the cluster resources and group for the virtual machine.
ComputerName: It is used to specify the virtual machine name and allows NetBIOS names, IPs, and fully qualified names. - Credential: It is used to provide the authentication or permission to perform any action. As well as we also have ID and Name parameters.
FAQ
Given below are the FAQs mentioned:
Q1. Is azure supported by Hyper- V?
Answer: Azure has a nested virtualization feature, so with the help of this, we can run Hyper- V. It is also helpful to run the phone emulator on the virtual machine.
Q2. What is the replacement for Hyper- V?
Answer: Microsoft does not deprecate Hyper- V but has a different version of Hyper- V Server 2022 and supports only the Hyper- V feature. It introduces a new version that is Azure HCI.
Q3. Which one is better, either VMware or Hyper- V?
Answer: VMware supports different types of operating systems, and Hyper- V supports a limited kind of operating system.
Conclusion
From the above article, we have taken in the essential idea of the Azure Hyper-V and the representation of the Azure Hyper-V. From this article, we saw how and when we use Azure Hyper-V.
Recommended Articles
This is a guide to Azure Hyper-V. Here we discuss the introduction and how to set up Azure Hyper-V on windows. Replicate, deployed, and FAQ. You may also have a look at the following articles to learn more –
