Updated March 28, 2023

Introduction to Break in MATLAB
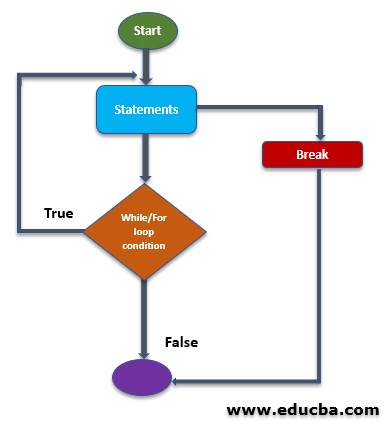
Break-in MATLAB is the command that is used to terminate the execution of any FOR or WHILE loop before the looping condition expires. Post break statements within the immediately associated loop do not get executed. The scope of the execution of the break statement is within its immediate ‘For’ or ‘While’ loop.
In real-time, let us consider a system which is running based on the temperature of its environment/surrounding. The working of the system is regulated based on the variation in the surrounding temperature. But in case the temperature reaches the level which is dangerous for the system, the execution of the program should immediately be stopped. In such a case in the program designing, a break statement must be used.
The keyword ‘Break’ is used to define the break statement.
Syntax:
break
FlowChart
How to Use Break in MATLAB?
Below are some of the uses in MATLAB:
1. Use of Break within a single loop
Break command is used to take control out of the loop without executing the instruction designed after the break statement within the scope of the loop.
Example:
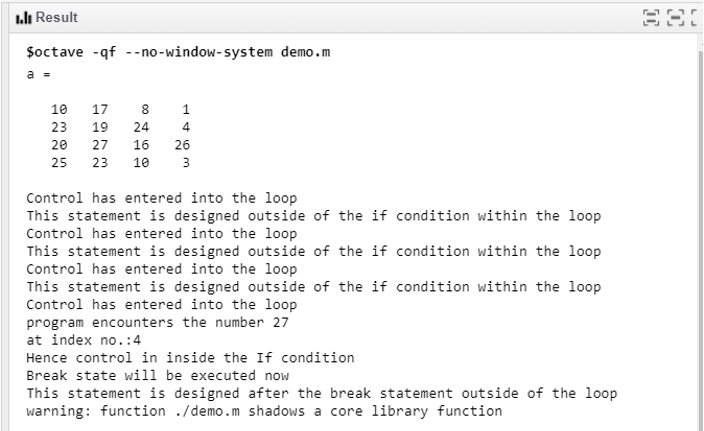
The below code snippet is written to demonstrate the application of the break statement with a single loop. The code is written to run a while loop to go through each value of the matrix ‘a’. The break instruction will be called when any number in the matrix ‘a’ is equal to 25. When there is value equals to 25, the break statement will be executed and the disp() commands after a break will not get executed.
Code:
% Program to break the flow of Execution

% randi() is used to generate numbers between 0 to 30 positioned in 4X4 matrix

a = randi(30,4,4)

k = 1;

while k

disp('Control has entered into the loop')

if a(k) ==25

disp('program encounters the number 25')

disp(['at index no.:',num2str(k)])

disp('Hence control in inside the If condition')

disp('Break state will be executed now')

% terminate the loop using break statement

break

disp('This statement is designed immediate after the break statement')

end

disp('This statement is designed outside of the if condition within the loop')

k = k+1;

end

disp('This statement is designed after the break statement outside of the loop')
Output:
The matrix ‘a’ of 4X4 size is generated from the randi() function. If the condition is hit for 4th position and control has come out of the loop.
2. Use of Break with a nested loop
When the break statement is called from the nested loop, the control comes out from the immediate inner loop, which has the break statement.
Example #1
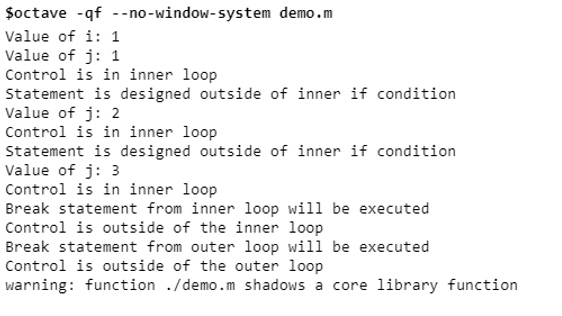
The below code snippet is written to illustrate the behavior of the break statement used for an inner loop as well as for the outer loop.
The values from matrix ‘i’ have created the outer loop whereas the values from matrix ‘j’ have created the inner loop.
Code:
% Program to break the flow of Execution

flag=0;

%Beginning of outer loop

for i=1:10

disp(['Value of i: ',num2str(i)])

%Beginning of inner loop

for j=1:5

disp(['Value of j: ',num2str(j)])

disp('Control is in inner loop')

if(j==3)

disp('Break statement from inner loop will be executed')

% Break statement to come out of the inner loop

break

end

disp('Statement is designed outside of inner if condition')

flag=1;

end

disp('Control is outside of the inner loop')

% Break statement to come out of the outer loop

if(flag==1)

disp('Break statement from outer loop will be executed')

break

end

disp('Statement is designed outside of outer if condition')

end

disp('Control is outside of the outer loop')
Output:
Break statement from the inner loop is executed when the inner if the condition results in a true value. The control came out of the inner loop but the outer loop is continued unaffected. Control in the outer loop is continued until the if condition present in the outer loop is not resulted in true.
The application of Break also helps to improve the coding quality. It optimizes the coding execution time hence improve the performance of the application.
Example #2
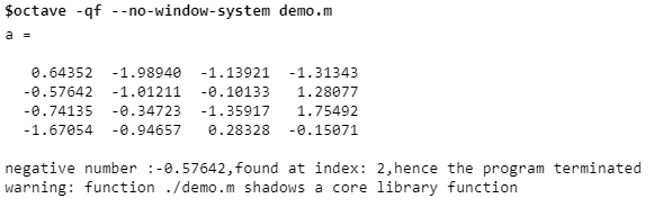
The below code snippets are written to read the first negative number that is present in the matrix ‘a’. Case 1 is written without using a break statement whereas case 2 has the code snippet which is developed using a break statement.
Case 1:
% program to terminate the execution on finding negative input

a = randn(4)

k = 1;

flag=0;

negnum=0.0;

pos=0;

%Beginning of while loop

while k < numel(a)

if a(k) < 0

flag=1;

negnum=a(k);

pos=k;

end

k = k + 1;

end

if flag ==1

disp(['negative number :', num2str(negnum), ',found at index: ', num2str(pos),',hence the program terminated'])

else

disp('There is no negative number present in the matrix')

end
Output:
In this case, the loop is executed until the looping condition is in action. The control still revolves within the loop even after a negative number is found. Once the loop will be over, then it displays the result. This code snippet includes the number of variables, more lines of code. In the case of huge data, the execution shall take a long time and hence the performance of the program will be significantly slower.
Case 2:
% program to terminate the execution on finding negative input

a = randn(4)

k = 1;

%Beginning of the while loop

while k < numel(a)

%Use of break statement to fetch the result fast

if a(k) < 0

break

end

k = k + 1;

end

if a(k) < 0

disp(['negative number :', num2str(a(k)), ',found at index: ', num2str(k),',hence the program terminated'])

else

disp('There is no negative number present in the matrix')

end
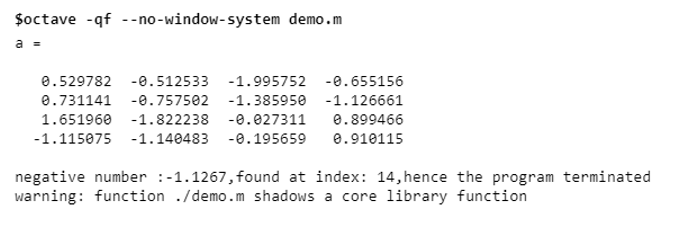
Output
In this case, the control comes out of the loop once the first negative number is fetched. Once the desired result is achieved, the additional execution does not take place. Hence execution is fast and performance is improved. It involves fewer variables or lines of code which has reduced the complexity of the program.
Break and return, both are used to redirect the flow of execution. The difference exists as a return statement returns the control to parent calling function where is break statement takes the control out from its immediate loop and continues the same function execution.
Recommended Articles
This is a guide to Break in MATLAB. Here we discuss how to use Break in MATLAB, along with flow chart, appropriate syntax, and respective examples. You can also go through our other suggested articles to learn more –
