Updated March 28, 2023

Introduction to Cascade in Hibernate
Whenever the propagation takes place from one object to another in the hibernate framework or associated technology, persistence actions are involved in it. It is all about what persistence actions should be performed and all the attributes that should be followed while maintaining the persistence. It applies to many types of hibernate actions that are performed and it is transitive. That means all the child nodes of the parent where the cascade is specified will get applied for its child-nodes too.
The cascade is defined in the association with the help of the keyword cascade and it specifies all the operations that must be cascaded to the target of the association and mostly used while collection mapping. By default, there are no operations cascaded to the association. It is the convenient solution provided which saves the lines of the code needed to be added for handling sate of the other side while doing it manually.
Types of Cascading Values and Operations Supported by Hibernate
Different types of cascading values and operations supported by Hibernate are given below:
- delete / remove
- detach / evict
- merge
- lock
- persist
- refresh
- replicate
- save_update / update
- all_delete_orphan
- delete_orphan
- none
Some of the above mentioned cascading values are deprecated nowadays. However, we will some of the cascading properties that are most commonly used. It is necessary to know that cascade property can be used in both configurations using an XML file as well as using annotations in the hibernate framework. While using it in the XML files we can use the cascade property or keyword and then assigning the cascade values to it in a comma-separated format. In the case of annotations, @Cascade annotation can be used to mention all the cascade values inside the braces {} just after @Cascade annotation. In both the methods if cascade property is set to all then it means that all the above-mentioned cascade values and operations will be performed.
Now, let us see how cascade can be used in hibernate and how it makes it easy to perform operations for related referenced objects without extra coding for them.
Examples of Cascade in Hibernate
Given below are the examples:
Consider example where we maintain the data of departments and then the subjects under each department. There is a one-to-many association between departments and subjects.
Example #1: Cascade save-update
Example of adding a department and its subjects into the database.
Firstly, we will perform the task of saving both the entities individually without using the cascade property of save-update.
Code: Without Cascade
Department department = new Department();
Subject subject = new Subject();
//set the department and subject  data
subject.setDepartment(department);
department.getSubjects().add(subject);
session.save(department);
session.save(subject);
Output:
Code: With Cascade
<!-- Department.hbm.xml -->
<set name="Subject" cascade="save-update" table="subject"...>
<key>
<column name="DEPARTMENT_ID" not-null="true" />
</key>
<one-to-many class="com.college.common.Subject" />
</set>
Department department = new Department();
Subject subject = new Subject();
//set the department and subject  data
subject.setDepartment(department);
department.getSubjects().add(subject);
session.save(department);
Output:
Here, we did’nt need to specify the session.save() method for subject separately. It automatically builds the query for the referenced table Subject whenever the Department is saved.
Example #2: Cascade Delete
If we need to delete the department and all the referenced subjects then we will delete both of them individually when we are not using cascading.
Code: Without using Delete Cascade
You need to loop all the ‘subject’ and delete it one by one.
Query q = session.createQuery("from Department where departmentId = :departmentId ");
q.setParameter("departmentId", "4715");
Department department = (Department)q.list().get(0);
for (Subject sdr :department.getSubjects()){
session.delete(sdr);
}
session.delete(department);
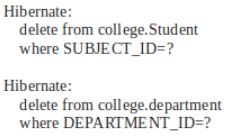
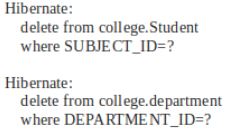
Output:
Code: With Delete Cascade
In the above snippet, we observed that we needed to delete both department and subject records separately even though, they were related. This is where delete cascade functionality can come to use. When we use cascade=”delete” then if we will delete department record all the referenced entries of subject also gets deleted automatically.
<!-- Department.hbm.xml -->
<set name="subject" cascade="delete" table="Student" ...>
<key>
<column name="DEPARTMENT_ID" not-null="true" />
</key>
<one-to-many class="com.college.common.Subject" />
</set>
Query q = session.createQuery("from Department where departmentId = :departmentId ");
q.setParameter("departmentId", "4715");
Department department = (Department)q.list().get(0);
session.delete(department);
Output:
Example #3: Cascade delete-orphan
We saw that we will delete the referenced records of a particular record when we use delete cascade automatically. Now, we will see how we can delete only specific child nodes or only some of the referenced records of the main record with the help of cascading but before that we will see how this can be done without using cascading.
Code: Without delete-orphan Cascade
You need to delete the ‘subject’ one by one.
Subject sdr1 = (Subject)session.get(Subject.class,
new Integer(56));
Subject sdr2 = (Subject)session.get(Subject.class,
new Integer(57));
session.delete(sdr1);
session.delete(sdr2);
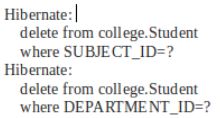
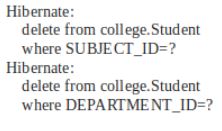
Output:
Code: With delete-orphan Cascade
Now when we delete the subjects with id 56 and 57 only related to a particular department then we can do so by simply using cascade option of delete-orphan value.
<!-- Department.hbm.xml -->
<set name="Subject" cascade="delete-orphan" table="Student" >
<key>
<column name="DEPARTMENT_ID" not-null="true" />
</key>
<one-to-many class="com.college.common.Subject" />
</set>
Subject sdr1 = (Subject)session.get(Subject.class,
new Integer(56));
Subject sdr2 = (Subject)session.get(Subject.class,
new Integer(57));
Department department = (Department)session.get(Department.class, new Integer(2));
department.getSubjects().remove(sdr1);
department.getSubjects().remove(sdr2);
session.saveOrUpdate(department);
Output:
delete-orphan provides us the functionality to delete selective records from its child records.
Cascading in Hibernate
Cascading can be done and enabled in either ways in hibernate. By using XML mapping file or by using annotations.
1. XML Mapping File
We need to declare the cascade in the relationship variable in the XML mapping file of our hibernate project.
Code:
<!-- Department.hbm.xml -->
<set name="student" cascade="save-update, delete"
table="subject" ...>
<key>
<column name="DEPARTMENT_ID" not-null="true" />
</key>
<one-to-many class="com.college.common.subject" />
</set>
2. Annotation
When using annotations you can make use of @Cascade annotation and mention CascadeType.SAVE_UPDATE to enable save and update cascade or CascadeType.DELETE for enabling delete operation in cascading and so on. If you want to mention multiple Cascade operations, you can do so by specifying them in a comma-separated string.
Code:
//Department.java
@OneToMany(mappedBy = "department")
@Cascade({CascadeType.SAVE_UPDATE, CascadeType.DELETE})
public Set<subject>getsubjects() {
return this.student;
}
Conclusion
In this way, cascading makes it easy and automatic to enable the functionality and operations for the referenced objects without writing special lines of code for it. However, you should be careful while using Cascade as this could result in unexpected behavior when not wanted. All in the association and don’t want related or referenced entries to delete. But they get deleted because setting the cascade to all. So, be careful while using cascading.
Recommended Articles
This is a guide to Cascade in Hibernate. Here we discuss the introduction, examples and cascading in hibernate. You may also have a look at the following articles to learn more –


