Updated April 15, 2023
Introduction to CentOS useradd
The CentOS is a flavor of the Linux operating system. As we know, the Linux / CentOS are multi-user supporting operating systems. In other words, we can say that it is having the capability to manage multiple users. In Linux, every user is having a different set of permissions and access information. The useradd command is used to create the users in the CentOS operating system. It will also help to update the default new user information as well. In CentOS, we need to manage multiple users hence it is mandatory to keep the proper management of the user level.
Syntax of Useradd Command
useradd [options] LOGIN User_Name
useradd –D User_Name
useradd -D [options] User_Name- useradd: We can use the useradd keyword in the syntax or command. It will accept arguments like different options, user_name, etc. The useradd command will help to create the user in the CentOS ecosystem.
- option: We can provide the different flags as the option that is compatible with the “useradd” command.
- User_Name: As per the requirement or the industry nomenclature, we need to define
How CentOS useradd Command Works?
As we have discussed, CentOS is supporting multiple users. Hence it is very important to do the proper management of the user. The useradd command will help to add the new user to the CentOS ecosystem. Once the user will create, it will affect the multiple parts. The affected parts will on the home directory creation, shell access, skeleton information, profile creation, etc. Once the user will create, we are not aware of the correct password. We can switch users from root users. But if we will go with the normal user or the system then we are not able to do data. For that, we need to set the password from the new user and then only the system or normal user will able to access it.
Below are the lists of option that are compatible with the useradd command.
- -b, –base-dir BASE_DIR: While creating a new user in the CentOS if we are not providing the home directory with the help of the “-d” option. Then the base directory (BASE_DIR) will able to concatenate with the current user account to define the home user directory.
In the useradd command, we are not using the “-m” option then the BASE_DIR should exist.
- -c, –comment COMMENT: Generally, this option is used to keep some comment or information for the current user. It is in text format. Normally, we are using this field for the user’s full name.
- -d, –home-dir HOME_DIR: In the CentOS, when any user will log in. It will the first login with his home directory. This option will help to set the home directory for the new user. By default, the user is having full access to the same directory.
- -e, –expiredate EXPIRE_DATE: In the useradd command, we are having the functionality to set the expiry date of the user. Once the expiry date will come then the user account will automatically disable it. There is a specific format to set the date in it. The format will be year month and day.
- -f, –inactive INACTIVE: With the help of this option, Once the password will expire. The number of days the user account will permanently disabled. If the value is zero “0” then the user account will disable as soon as the user password will expire. If we will set the value “-1” then this option will be disabled.
- -g, –gid GROUP: With the help of this option, we can set the group for the user. While creating a new user, the user must alien with the same username group. It is the primary group for the same user.
- -G, –groups GROUP1[,GROUP2,…[,GROUPN]]]: This option will help to set the number of secondary groups to the same user. In other words, we can say that the same user will part of the supplementary groups in the CentOS environment.
- -h, –help: This option will help to print the help or the information related to the option as well as the command. It will automatically exit once the information will share on the screen.
- -k, –skel SKEL_DIR: While creating any user. The CentOS operating system will create the skeleton directory for the user. It will place all the necessary files in the user home directory.
Note: This option will only be valid if the option “-m” will specify.
Examples to understand CentOS useradd Command
Here are the following examples mention below
1. Useradd Command
In the useradd command, it is the simple way to add the user in the CentOS.
Note: if we will run only the useradd command without any option then it will take the default parameters.
Command:
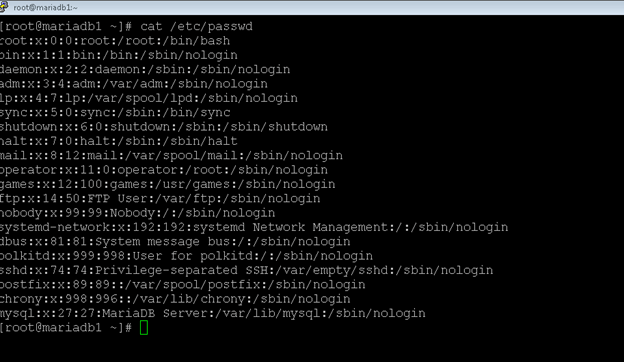
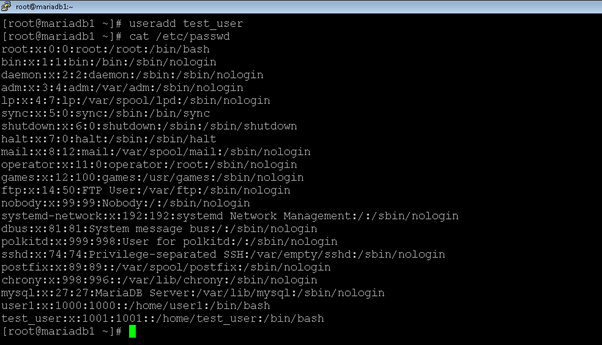
useradd test_userExplanation:
As per the above useradd command, we are adding the test_user in the CentOS environment.
Output:
Screenshot 1 (a)
Screenshot 1 (b)
2. Useradd Command: Login Shell Option
In the useradd command, we are having the functionality to set the shell option for the new user.
Command:
useradd -s /sbin/nologin user3
cat /etc/passwd | grep -i user3
Explanation:
As per the above command, we are set up the nologin shell option for the user3 user.
Output:
3. Useradd Command: Change the home directory
In the CentOS environment, we can add the user with a different home directory.
Command:
useradd -d /user5_home_dir user5
ls /
Explanation:
As per the above command, we can set the own user directory (/user5_home_dir) for the user5 user.
Output:
4. Useradd Command: With Specific userid
In the useradd command, we can set the own userid.
Command:
useradd -u 3000 user6
cat /etc/passwd | grep -i user6
Explanation:
We can set the 3000 user id for the user6 user.
Output:
Conclusion
We have seen the uncut concept of “CentOS Useradd Command” with the proper example, explanation, and command with different outputs. The useradd command is useful to create users. As per the requirement, we can set the different option with the useradd command.
Recommended Articles
We hope that this EDUCBA information on “CentOS useradd” was beneficial to you. You can view EDUCBA’s recommended articles for more information.


