Updated March 10, 2023
Introduction to CentOS wget
In the CentOS environment, we are working on multiple tasks. Sometimes we need to connect to the external world like the internet, different websites, and download the packages or some content. Here, the wget command or utility works. The wget is coming under the GNU. It is a computer-based program and is able to retrieve the webserver content. The wget utility or the program is part of the GNU project only. It is made up of the combination of two things like www (World Wide Web) and gets. It will support multiple platforms like SFTP, FTP, HTTP, HTTPS, etc. It is having multiple features like conversion of links, recursive download, etc. It will also support the proxy environment also.
Syntax of CentOS wget:
wget [ option ]... [ URL ]...
1) wget: We can use the wget keyword in the syntax or command. It will accept different arguments like compatible options, URL’s, etc. As per the provided input, the wget will be able to retrieve the web content from the external world and keep available for use on the CentOS system. The wget command will help to manage the different download-related tasks as well.
2) OPTION: As per the requirement, we can provide the different flags as the option that is compatible with the wget command.
3) URL: As per the requirement or need, we can also use the necessary URL with the wget command.
How CentOS wget Works?
In the Linux environment, we can use any distribution as per our needs. There are multiple utilities and tools that we can use to extract the content for the internet. As per the application or job need we can choose which utility or the program that we need to use. In the CentOS environment, generally, we are using the wget command. It will help to download the internet content in the CentOS environment.
In backed, the wget command or utility is using the two methods like www (World Wide Web) and get. As per the requirement, we need to pass the URL link to the wget command. It will accept the compatible option and the download URL. Once we will trigger the command, it will access the URL and get the content from the remote location. Once the content will be there it will download or get it in the current working environment.
Below is the list of options that are compatible with the wget command.
1. -V –version: This option will help to print the version information of the wget command.
2. -h –help: The help option will print the basic help-related messages for the wget command on the command line view.
3. -b –background: It will help to go the command or process on the background immediately after it is the startup. While doing this process if we haven’t provided the output file via the -o option then the output will be redirected to wget log.
4. -e command –execute the command: It will help to execute the command as if it is a part of .wgetrc. If you want to use more than one wgetrc command then we need to use the multiple instances of the -e option.
5. -o logfile –output-file=logfile: This option will help to log all the messages to the log file. The messages are normally reported to the standard error messages.
6. -a logfile –append-output=logfilen: It will help to append to the log file. This is similar to the -o option. It will just append the log file instead of overwriting the actual old log file. In some cases, if the log file is not present then it will create the new log file into the system.
7. -d –debug: It will help to turn on debug mode for the output. It will help to get the various meaning information, helpful for the developers of wget. It is running fine then no issues. But if it does not work properly then the system administrator will compile it without the compile option. Note: Please consider it, the compiling code or command with debug mode or support is always safe. The –wget compiled method with the debug support will not print any debug level information unless and until it will not used or requested with the -d option
8. -q –quiet: This option will help to turn off the wget output.
9. -v –verbose: It will help to enable the verbose output. It will enable it with all the available data information. In the wget, the default output method is verbose only.
Examples to understand CentOS wget
Let us discuss examples of CentOS wget.
Example #1: CentOS wget: Get the single file
In the CentOS environment, we are able to download or get a single file from the internet.
Command:
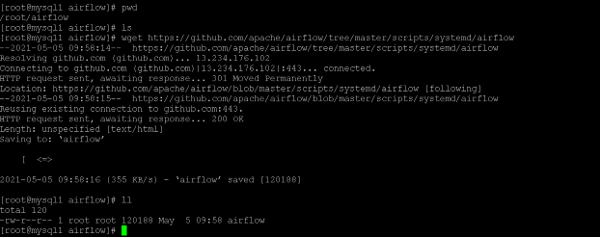
Wget https://github.com/apache/airflow/tree/master/scripts/systemd/airflow
Explanation:
As per the above command, we are downloading the “airflow” file from the environment.
Output:
Example #2: CentOS wget: Download file with own file name
In wget, we are able to change the download file name with its own file name while it will download.
Command:
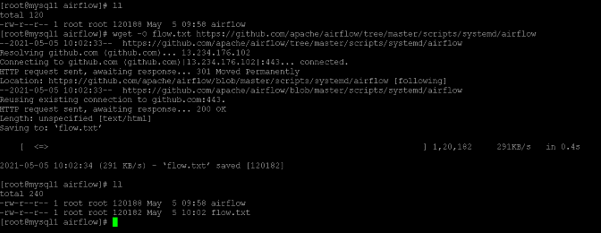
wget -O flow.txt https://github.com/apache/airflow/tree/master/scripts/systemd/airflow
Explanation:
As per the above command, we are downloading the airflow file from the internet but we are changing the file name from airflow to flow.txt. To achieve this, we need to use the “-O” option with the wget command.
Output:
Example #3: CentOS wget: Download multiple files
In the wget command, we are able to download multiple files in the same command.
Command:
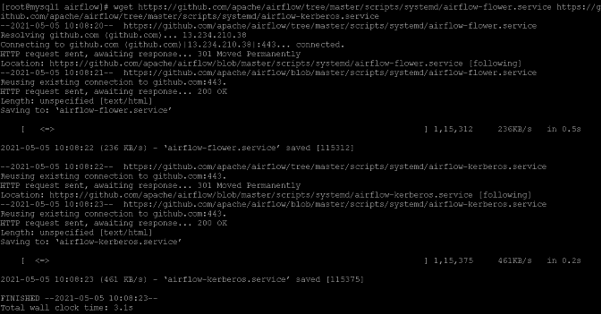
wget https://github.com/apache/airflow/tree/master/scripts/systemd/airflow-flower.service https://github.com/apache/airflow/tree/master/scripts/systemd/airflow-kerberos.service
Explanation:
As per the above command, we are downloading multiple files. Here, we are downloading the two files at the same time.
Output:
Conclusion
We have seen the uncut concept of the “CentOS wget” with the proper example, explanation, and command with different outputs. The wget command is used to download the content from the internet. As per the requirement, we need to use the compatible option with the wget command.
Recommended Articles
This is a guide to CentOS wget. Here we discuss Introduction, parameters, syntax, How CentOS wget Works, examples with code implementation. You may also have a look at the following articles to learn more –


