Updated July 12, 2023
Introduction to Excel CheckBox
A CheckBox in Microsoft Excel is a versatile tool allowing users to select and deselect an option. It is a small interactive box, and when you click it, a tick mark shows that the task has been checked or completed.
CheckBoxes are used for creating forms, surveys, or checklists and also help to track goals and completed tasks. For example, if you have a list of domestic chores to finish, you can add a checkbox next to each task and tick it on completion. The data from Checkboxes are useful for creating pivot tables, dashboard reports, excel reports, charts, graphs, and checklists.
How to Enable the Developer Tab?
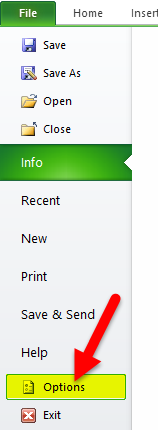
Step 1: Go to the “File” tab, then click on “Options”.
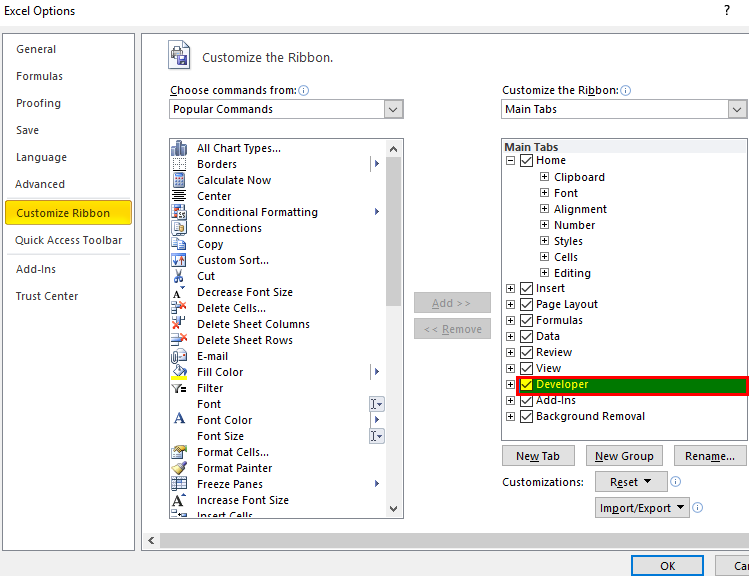
Step 2: Go to the “Customize Ribbon” tab, search for the “Developer” checkbox (highlighted in the image below), and tick it.
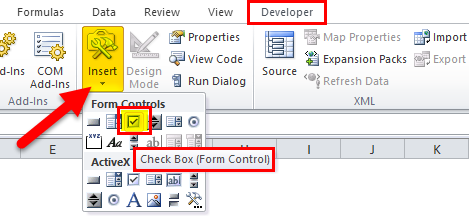
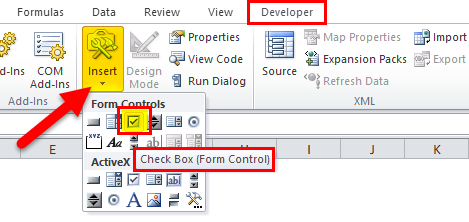
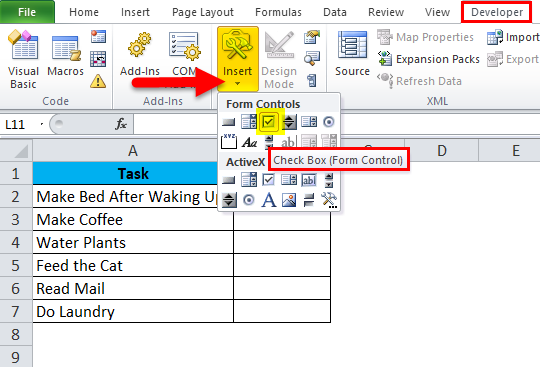
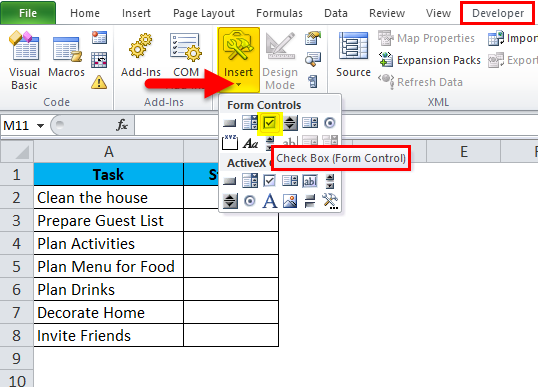
You will now be able to access the developer tab. The checkbox symbol is present in the “Form Controls” of the “Insert” section of the “Developer” tab. It looks like a square box with a tick mark.
How to Insert a Checkbox in Excel?
You will learn how to insert the Checkbox in Excel with the help of the following examples.
Example #1
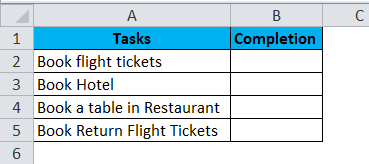
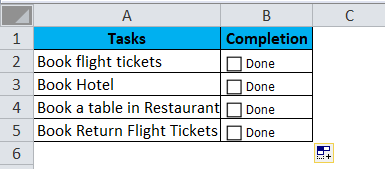
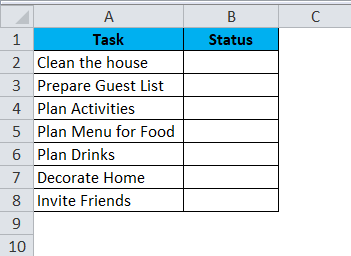
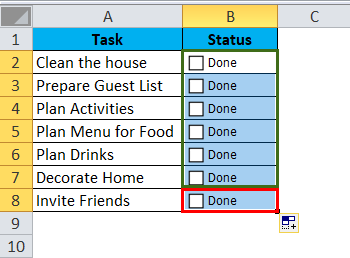
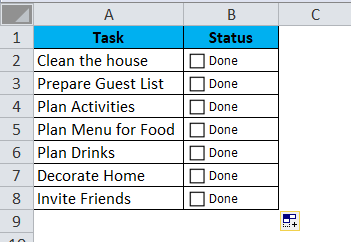
Suppose you are in charge of planning a holiday with your friends. You want to ensure that everything is planned and sorted out. You’ve created an Excel task list to aid in planning (as shown in the image below). You also want to add a check box to track what is complete and pending.
Here are the steps to add checkboxes in Excel to keep track of your holiday planning tasks:
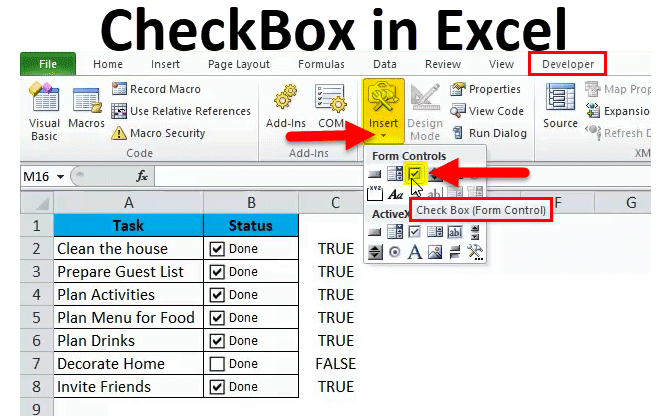
Step 1: In the Excel sheet, go to the “Developer” tab and select “Insert”. Click on the “Checkbox” image in the “Form Controls” section. (Refer to the below-mentioned image)
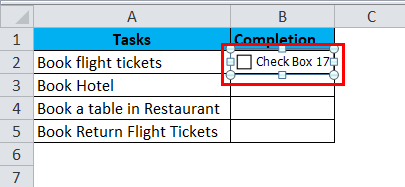
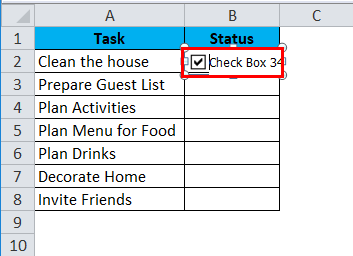
Step 2: Click on the particular cell where you want to add the Checkbox. In this example, we want to add CheckBox in cell B2.
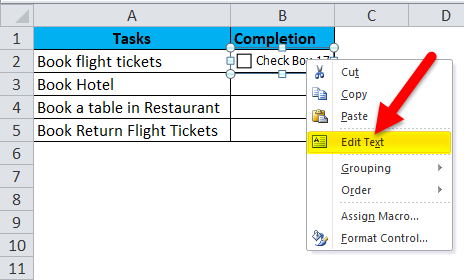
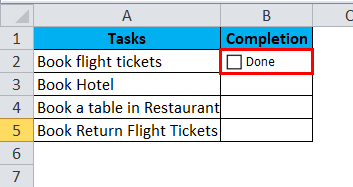
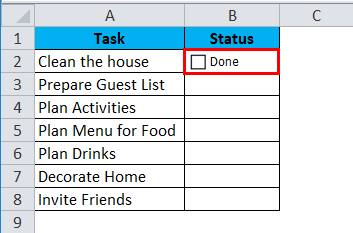
Step 3: A default text appears in CheckBox as “Check Box 17”. To remove it, right-click the checkbox and select “Edit Text.” Enter the text you want to display, such as “DONE.”
Your first CheckBox is ready.
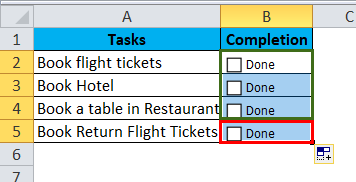
Step 4: To add more CheckBoxes, drag the CheckBox downwards to other cells.
Your holiday checklist is now complete and ready to use.
In the next example, you will learn how to link the checkboxes to specific cells.
Example #2
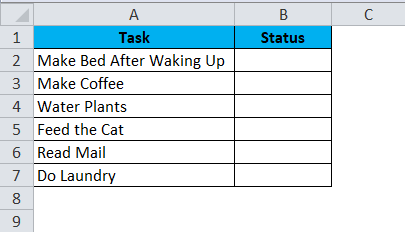
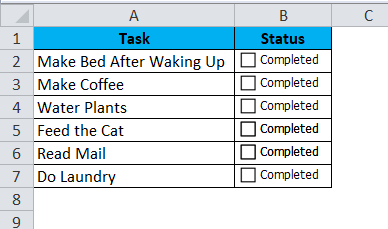
For instance, you want to keep track of your routine tasks. You can create a To-do list with checkboxes. The table below lists the routine tasks you wish to add to your list.
Follow the below steps to insert checkboxes in the data.
Step 1: In the “Insert” section of the “Developer” tab, click “Check Box” under “Form Controls.”
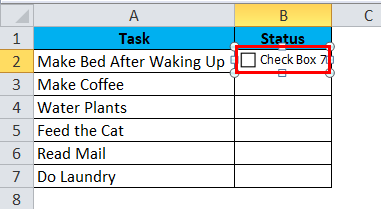
Step 2: Select the cell where you want to place the CheckBox. Here, we have put our CheckBox in cell B2.
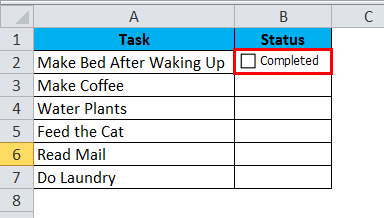
Step 3: Edit the text “Check Box 1” to “Completed” on the CheckBox or any other word you want to display.
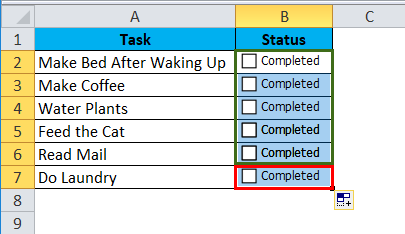
Your first checkbox is ready. Now drag it to the other cells.
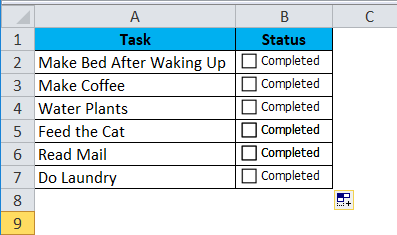
Congratulations, your To-Do list with checkboxes is now ready to use!
Example #3
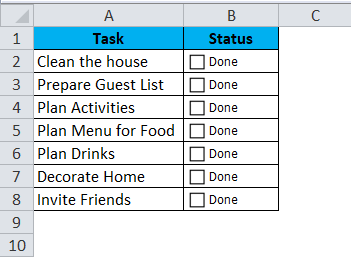
Tomorrow is your birthday, and your friends are requesting a party. You want to ensure everything goes well and nothing is left out. You have made the below party planner list for the birthday party. Thus, let’s see how you can add checkboxes for the same with the help of the following steps.
1: To add checkboxes to the table, follow Step 1, used in previous examples.
2: To place the CheckBox in cell B2, select that cell (B2) directly.
3: Lastly, edit the pre-written text “checkbox 1” to “DONE” in the checkbox.
Your first CheckBox is ready. Now, drag it to the other cells
Your party planner is ready to use.
Example #4
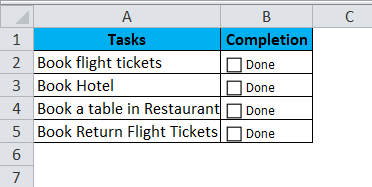
The below-mentioned table is from example #1. In this example, we will understand how to use checkboxes with additional features. Here, we will try to get the value of “TRUE” and “FALSE”, for each checkbox.
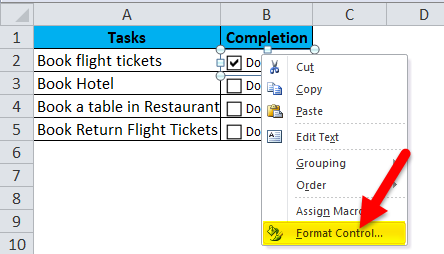
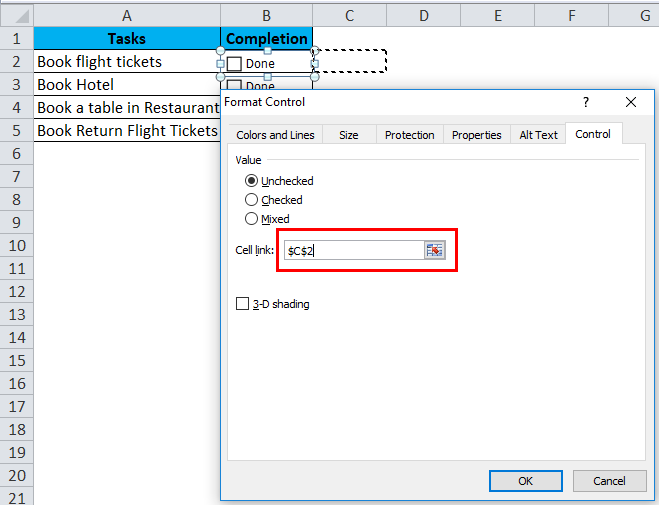
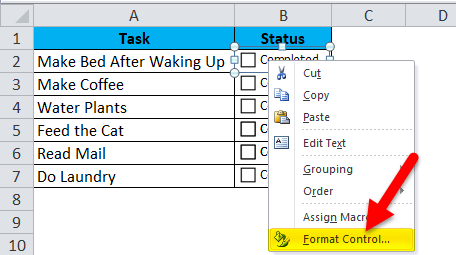
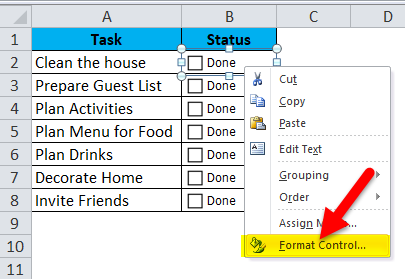
Step 1: Right-click on a checkbox and click on “Format Control”.
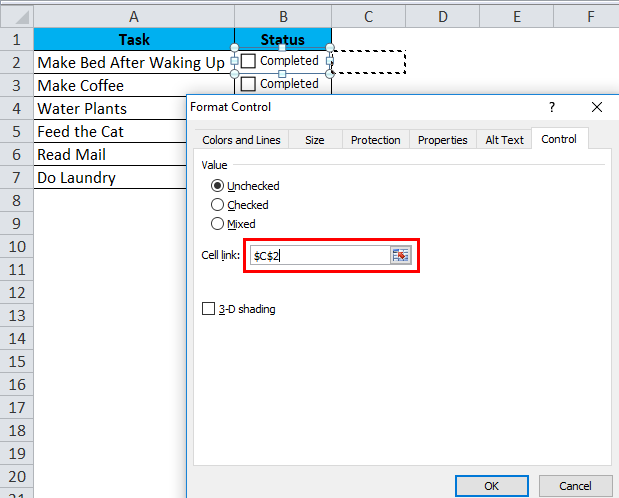
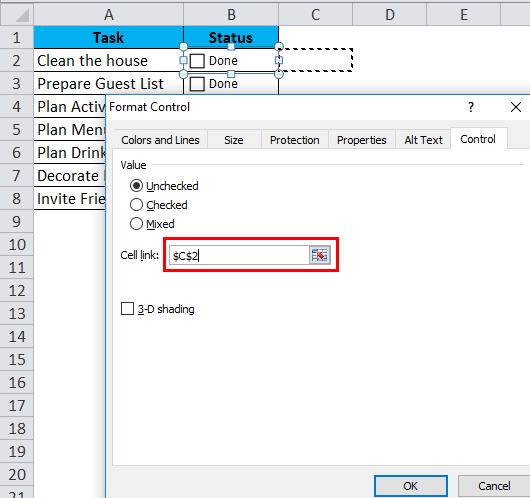
Step 2: A “Format Control” dialog box pops up; go to the “Control tab” > “cell link” and then select an empty cell to link that checkbox.
Step 3: Repeat the above step with all the CheckBoxes.
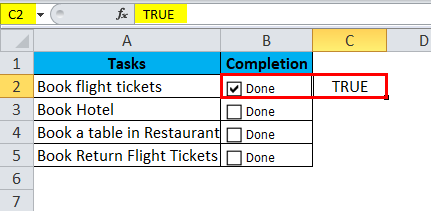
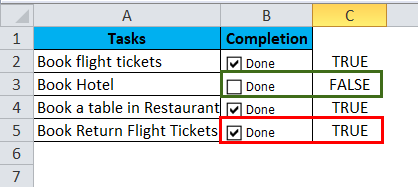
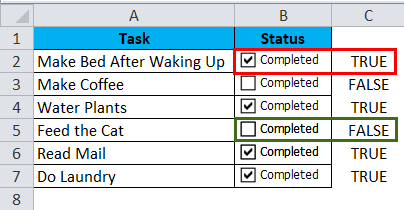
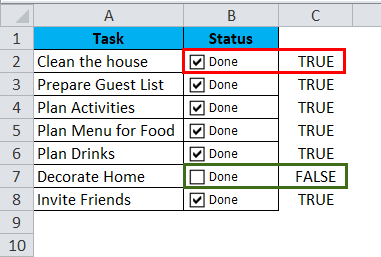
Step 4: Now click on any checkbox, and if the checkbox is ticked/checked, then “TRUE” appears in the corresponding cell, and if it is unchecked, “FALSE” appears in the respective cell.
In the above table, the book hotel task is still incomplete, whereas the rest tasks are complete.
Example #5
Let’s take here table from example #2.
Now to assign the checkboxes to specific cells, please follow the below steps,
Step 1: Right-click on a checkbox and click on “Format Control”.
Step 2: A format control dialog box will open; under the “Control” tab in the “Cell link” section, select an empty cell to link that particular checkbox. Repeat this for all the checkboxes, and remember to select the adjacent cell to avoid confusion.
Therefore, a tick mark on any checkbox gives a “TRUE” value; if it is unticked, it displays a “FALSE” value.
In the above table, making coffee and feeding the cat still need to be done.
Example #6
The below table is from example# 3.
Let’s assign checkboxes to this table,
Step 1: Right-click a particular checkbox and click “Format Control”.
Step 2: The “Format Control” dialog box will open; click on the “Cell link” under the “Control“ section and select an empty cell to link that checkbox.
Step 3: Repeat the same procedure for all the checkboxes, and select the adjacent cell to that checkbox to avoid confusion.
Lastly, click on any checkbox; if the task is complete, it will give a “TRUE” value; if it is incomplete, it will show a “FALSE” value.
In the above example, all tasks are complete for the party except decorating the home.
How to Customize Checkbox in Excel?
Step 1: To customize the checkbox, right-click on the checkbox and select “Format Control”.
Step 2: In the “Format Control” dialog box, you can customize the checkbox from “Colors and Lines” or “Size” to change the colors, styles, and size of the checkbox.
- On the “Colors and Lines” tab, you can select the color, line style, transparency, and other options available for changing the color of a checkbox.
- To change the checkbox size, you can select height and width on the “Size” tab.
- Hence, if you want to fix the position of the checkbox, you can select the “Don’t move or size with cells” option from the “Properties” tab.
How to Use the IF Function with Checkboxes?
This method will teach you how to apply formulas based on another cell value.
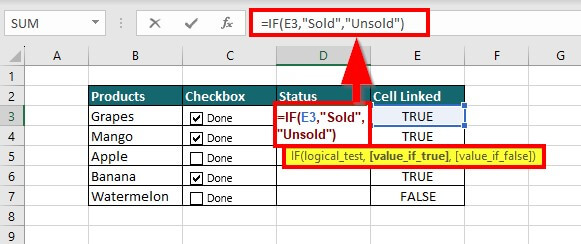
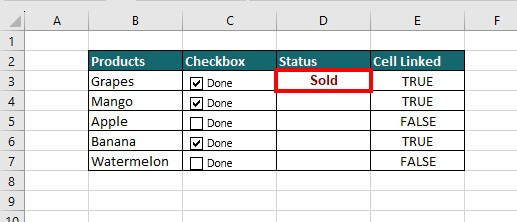
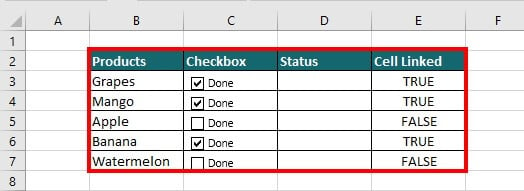
Let’s say you are a fruit seller, and you want to keep track of fruits that are sold and unsold. Suppose you have made the below data of fruits and want to add checkboxes and apply the formula to know the status.
Thus, follow the below steps to accomplish the task.
Step 1: Follow the steps from example #6 to add checkboxes and link the cell to the corresponding cell checkbox. Check whether the checkbox is properly linked to the corresponding cell.
Step 2: Apply the below formula of the “IF” function in cell E3 and press enter.
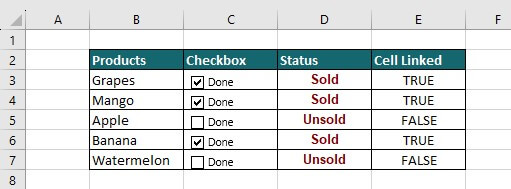
Step 3: At last, drag the cell to the adjacent cells to get the results as “Sold” and “Unsold”
The table below displays the status of the sold and unsold fruits.
Advanced Uses of Checkboxes
- In Excel, interactive and dynamic charts with multiple series selections can be created using checkboxes for comparative data analysis.
- Checkboxes can also be formatted with conditional formatting to highlight the important individual cell or a range of cells in the dashboard.
- The data of the checkboxes can get filtered for key information for making a pivot table in dashboard reports.
How to Troubleshoot Checkbox Issues?
- If the checkbox is not clickable, check if the spreadsheet is protected or blocked for security purposes. Remove this blockage and try again.
- If a checkbox in Excel is not working, try to link to another cell in the workbook because the Checkbox will only work if linked to another cell value.
- If the checkbox size is too small or too big, you can change the checkbox size from the “Format Control” dialog box.
- Add-ins can also cause issues in the checkbox; you can restart your application safely to resolve this problem.
Things to Remember
- CheckBox control only activates upon unlocking the “Developer” tab option in the “Customize Ribbon” section.
- You don’t have to follow the same procedure for adding a checkbox in each cell; drag the cell containing the checkbox to adjacent cells.
- Please ensure the checkboxes are correctly linked to the corresponding cell and the linked cell is placed in the adjacent column to identify it easily.
- If the checkbox is checked, the value changes to “TRUE“; if unchecked, it returns a “FALSE” value.
- Use radio buttons instead of checkboxes if there are more than two options for a single task/question.
- You can customize the check box’s color, style, and size from the “Format Control” window.
Frequently Asked Questions (FAQs)
Q1. How to add checkboxes in Excel?
Answer: Follow the below steps to add checkboxes in Excel
1: Go to “File” > “Options” > “Customize Ribbon”.
2: In the “Customize Ribbon” tab, select “Developer” and click the “OK” button.
3: Click “Developer” > click “Insert” in the controls group > select the checkbox (small box with tick sign) symbol under “Form Control” Tab
Q2. How to delete checkboxes in Excel?
Answer: Method 1: Select the checkboxes and press “Ctrl +Delete” from the keyboard to delete single or multiple checkboxes.
Method 2: To delete multiple checkboxes using Go to Special, use the following steps:
Step 1: Go to the “Home”> “Editing group”> “Find & Select”> “Go to Special”
Step 2: Select “Objects” and click the “OK” button.
Note: In Excel, checkboxes are considered “Objects”
Step 3: Press “Delete” from the keyboard to remove all checkboxes.
Q3. How to insert multiple checkboxes in Excel?
Answer: Method 1: You can select the checkbox you want to copy and press “Ctrl + D” from the keyboard to copy and paste it.
Method 2: Select the checkbox and drag it downwards to the adjacent range of cells till where you want the checkbox.
Recommended Articles
This article has been a guide to CheckBox in Excel. Here we have explained its uses and how to create CheckBox in Excel with examples. You will also get downloadable Excel templates for this article. You may also check out these useful Excel functions.
