Introduction to Wand
Wand is a Python library that serves as a Pythonic interface to the ImageMagick image processing toolkit. It allows developers to manipulate images efficiently, supporting tasks such as opening, creating, editing, and converting various image formats. With Wand, users can perform a variety of image operations, such as resizing, cropping, and applying filters, giving it a flexible instrument for image processing tasks in Python applications. It helps generate thumbnails, perform batch processing, or create complex image compositions. Wand simplifies the complexities of image manipulation, making it an important resource for developers engaged in projects involving graphics and multimedia.
Table of Contents:
Key Takeaways
- Learn how to use the Wand Library in Python for complex image-processing applications.
- Examine practical examples that illustrate image operations and offer helpful implementation tips.
- Recognize how to apply it to image manipulation tasks such as cropping, rotating, resizing, and adding borders.
- Acknowledge the Wand Library as a powerful graphic tool with a variety of features for Python image manipulation.
Installation and Setup
Kindly follow this article for installation and setups and Verify Basic Uses.
Link: Python Wand Library
Uses of the Python Wand Library
1. Basic Image Operations
- Image Conversion: You can use Wand to convert images from one format to another. For instance, you can convert a JPEG image to a PNG file or vice versa.
- Image Editing: You can perform various editing operations like cropping, resizing, rotating, and flipping images using Wand. Additionally, Wand provides tools for adjusting brightness, contrast, and color balance.
- Watermarking: Wand enables you to add watermarks to images, which helps protect your images’ copyright or brand them with logos or text.
- Text and Annotation: You can add text, labels, and annotations to images using Wand. You have control over the added text’s font, size, color, and positioning.
2. Advanced Image Operations
- Image Generation: Wand allows you to generate images programmatically. This can help create various applications’ charts, graphs, or custom images.
- Image Analysis: For image analysis tasks, Wand can extract information from images, such as pixel values, color histograms, or even object detection, when used in conjunction with other libraries like OpenCV.
- Batch Processing: When dealing with a large number of images, Wand can automate image processing tasks by writing scripts that apply the same operations to multiple images. This is valuable for efficiency and consistency.
- Thumbnail Generation: Wand can generate thumbnail images from larger pictures. Many website creators use this technique to create galleries or efficiently display images.
- Image Comparison: In computer vision applications, Wand can compare or identify differences between images for similarity. This is useful in tasks like image recognition and content matching.
3. Web Development and Graphic Design
- Web Development Tasks: Wand is a valuable tool for web developers. It can resize images, create thumbnails, and manage user-uploaded images, making it an essential part of web application development.
- Graphic Design Features: Wand extends its functionality beyond basic editing by allowing you to apply artistic filters, add text, create artistic effects, and design visually appealing graphics for various creative projects.
4. Data Science and Machine Learning
- Data Science Applications: In the field of data science and machine learning, Wand can preprocess and manipulate image datasets. This is crucial for preparing data for machine learning projects that involve image analysis, object detection, or image classification.
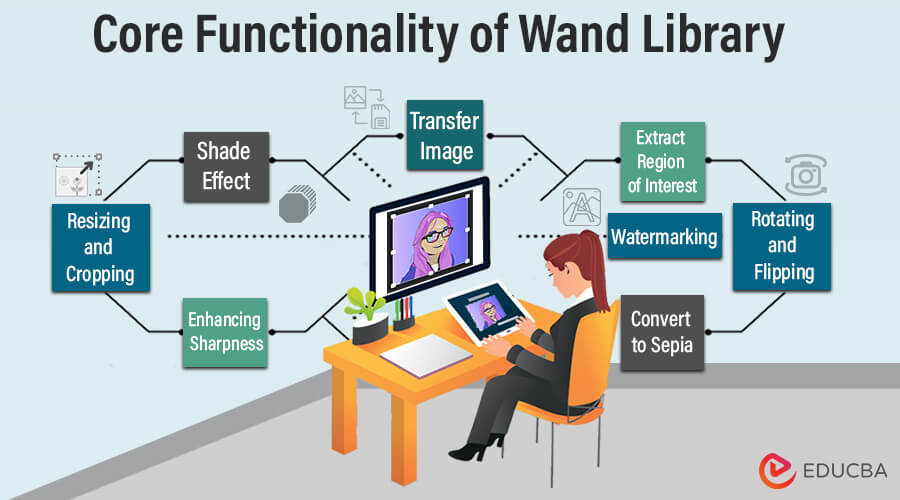
Core Functionality of Wand Library
The Wand Library in Python has various core functionalities. We have discussed some of them here, as below.
1. Resizing and cropping
You can resize or crop a given image.
For example,
# Resize the image
with Image(filename='https://cdn.educba.com/content/educba.png') as img:
img.resize(width=200, height=100)
img.save(filename='resized_image.jpg')
display(IPImage(filename='resized_image.jpg'))
The output image will be,
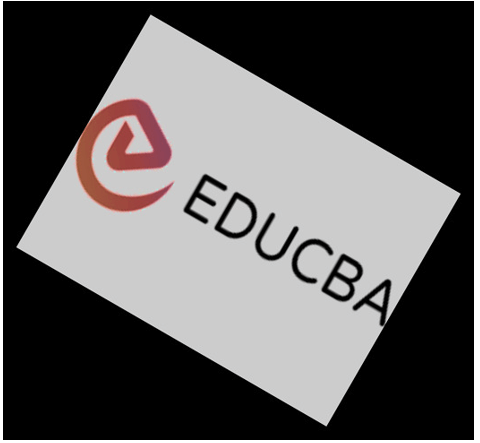
2. Rotating and flipping
You rotate and flip a given image.
For example,
# Rotate the image
with Image(filename='https://cdn.educba.com/content/educba.png') as img:
img.rotate(45)
img.save(filename='rotated_image.jpg')
display(IPImage(filename='rotated_image.jpg'))
The output image will be,
3. Adjusting brightness and contrast
It is possible to modify the contrast and brightness of the given image.
For example,
# Adjust brightness and contrast
with Image(filename='https://cdn.educba.com/content/educba.png') as img:
img.modulate(brightness=70, saturation=40)
img.save(filename='adjusted_image.jpg')
display(IPImage(filename='adjusted_image.jpg'))
The output image will be,
4. Open and create a new image
You can open existing images and create new images.
For example,
# Opening an existing image and creating a new image
with Image(filename='https://cdn.educba.com/content/educba.png') as img:
# Access image properties
print(f"Original Image Format: {img.format}, Size: {img.width}x{img.height}")
# Create a new image with a white background
with Image(width=400, height=300, background='white') as new_img:
# Access properties of the new image
print(f"New Image Format: {new_img.format}, Size: {new_img.width}x{new_img.height}")
The output will be,
5. Adding borders to images
You can add borders to images.
For example,
# Add a border to the image
with Image(filename='https://cdn.educba.com/content/educba.png') as img:
img.border(color='black', width=10, height=10)
img.save(filename='bordered_image.jpg')
display(IPImage(filename='bordered_image.jpg'))
The output image will be,
6. Enhancing sharpness
You can enhance the sharpness of a given image.
For example,
# Enhance sharpness of the image
with Image(filename='https://cdn.educba.com/content/educba.png') as img:
img.sharpen(radius=2, sigma=0.5)
img.save(filename='sharpened_image.jpg')
display(IPImage(filename='sharpened_image.jpg'))
The output image will be,
7. Edge
You can apply edge detection to the image.
For example,
# Apply edge detection to the image
with Image(filename='https://cdn.educba.com/content/educba.png') as img:
img.edge(radius=3)
img.save(filename='edge_image.jpg')
display(IPImage(filename='edge_image.jpg'))
The output image will be,
8. Emboss
You can apply emboss to the image.
For example,
# Apply emboss effect to the image
with Image(filename='https://cdn.educba.com/content/educba.png') as img:
img.emboss(radius=1, sigma=3)
img.save(filename='embossed_image.jpg')
display(IPImage(filename='embossed_image.jpg'))
The output image will be,
9. Apply shade effect to the image
You can apply a shade effect to the image.
For example,
# Apply shade effect to the image
with Image(filename='https://cdn.educba.com/content/educba.png') as img:
img.shade(gray=True, azimuth=45, elevation=45)
img.save(filename='shaded_image.jpg')
display(IPImage(filename='shaded_image.jpg'))
The output image will be,
10. Spread pixels in the image
You can spread pixels in the image.
For example,
# Spread pixels in the image
with Image(filename='https://cdn.educba.com/content/educba.png') as img:
img.spread(radius=2)
img.save(filename='spread_image.jpg')
display(IPImage(filename='spread_image.jpg'))
The output image will be,
11. Transfer Image
You can transfer the image to a new location or format with desired operations.
For example,
# Transfer the image to a new location or format with desired operations
with Image(filename='https://cdn.educba.com/content/educba.png') as img:
img.resize(width=400, height=300)
img.border(color='black', width=10, height=10)
img.modulate(brightness=80, saturation=50)
img.rotate(30)
img.save(filename='transferred_image.jpg')
display(IPImage(filename='transferred_image.jpg'))
The output image will be,
12. Drawing
You can draw an Image.
For example,
# Drawing an Image
with Image(filename='https://cdn.educba.com/content/educba.png') as img:
with Drawing() as draw:
draw.stroke_color = 'red'
draw.stroke_width = 2
draw.rectangle(left=50, top=50, right=150, bottom=150)
draw(img)
img.save(filename='drawn_image.jpg')
display(IPImage(filename='drawn_image.jpg'))
The output image will be,
13. Flip Horizontally
You can flip the given image Flip Horizontally.
For example,
# Flip Horizontally
with Image(filename='https://cdn.educba.com/content/educba.png') as img:
img.flip()
img.save(filename='flipped_image.jpg')
display(IPImage(filename='flipped_image.jpg'))
The output image will be,
14. Extract Region of Interest (ROI)
You can crop and extract a specific region of interest from the image.
For example,
# Extract Region of Interest (ROI)
with Image(filename='https://cdn.educba.com/content/educba.png') as img:
img.crop(left=50, top=50, width=100, height=100)
img.save(filename='roi_image.jpg')
display(IPImage(filename='roi_image.jpg'))
The output image will be,
15. Watermarking
You can add your own watermark text in a given image.
For example,
# Watermarking
with Image(filename='https://cdn.educba.com/content/educba.png') as img:
with Drawing() as draw:
draw.font_size = 20
draw.fill_color = Color('green')
draw.text(20, 20, 'Watermark')
draw(img)
img.save(filename='watermarked_image.jpg')
display(IPImage(filename='watermarked_image.jpg'))
The output image will be,
16. Convert to Sepia
You can create a sepia effect by adjusting the image’s color channels.
For example,
def apply_sepia(image):
# Apply a sepia tone effect
image.colorize(Color('#006600'), Color('#C0A080'))
return image
with Image(filename='https://cdn.educba.com/content/educba.png') as img:
img = apply_sepia(img)
img.save(filename='sepia_image.jpg')
display(IPImage(filename='sepia_image.jpg'))
The output image will be,
17. Resize and Crop Center
The image can be resized to a desired size and crop it from the center.
For example,
with Image(filename='https://cdn.educba.com/content/educba.png') as img:
# Resize the image to 150x150
img.resize(width=150, height=150)
# Crop the center of the resized image
left = (img.width - 100) // 2
top = (img.height - 100) // 2
img.crop(left=left, top=top, width=100, height=100)
img.save(filename='resized_cropped_image.jpg')
display(IPImage(filename='resized_cropped_image.jpg'))
The output image will be,
18. Invert Colors
You can flip the image’s colors.
For example,
# Invert Colors
with Image(filename='https://cdn.educba.com/content/educba.png') as img:
img.negate()
img.save(filename='inverted_image.jpg')
display(IPImage(filename='inverted_image.jpg'))
The output image will be,
19. Cartoonize
You can create a cartoon-like effect on the image.
For example,
# Cartoonize
def apply_cartoonize(image):
image.type = 'grayscale'
image.edge(radius=2)
image.colorize(Color('#009900'), Color('#330033'))
return image
with Image(filename='https://cdn.educba.com/content/educba.png') as img:
img = apply_cartoonize(img)
img.save(filename='cartoonized_image.jpg')
display(IPImage(filename='cartoonized_image.jpg'))
The output image will be,
20. Solarize
You can apply a solarization effect to the image.
For example,
# Solarization
with Image(filename='https://cdn.educba.com/content/educba.png') as img:
img.solarize(threshold=0.5)
img.save(filename='solarized_image.jpg')
display(IPImage(filename='solarized_image.jpg'))
The output image will be,
21. Flip Vertically
You can flip the image vertically by rotating it by 180 degrees.
For example,
# Rotate the image 180 degrees for a vertical flip
with Image(filename='https://cdn.educba.com/content/educba.png') as img:
img.rotate(180)
img.save(filename='flipped_vertical_image.jpg')
display(IPImage(filename='flipped_vertical_image.jpg'))
The output image will be,
22. Oil Painting Effect
You can apply an oil painting effect to the image.
For example,
# Oil Painting Effect
with Image(filename='https://cdn.educba.com/content/educba.png') as img:
img.oil_paint(radius=3, sigma=0.5)
img.save(filename='oil_painting_image.jpg')
display(IPImage(filename='oil_painting_image.jpg'))
The output image will be,
23. Morphology – Dilation
You can apply a dilation operation to the image.
For example,
# Morphology - Dilation
with Image(filename='https://cdn.educba.com/content/educba.png') as img:
img.morphology(method='dilate', kernel='square:3x3')
img.save(filename='dilated_image.jpg')
display(IPImage(filename='dilated_image.jpg'))
The output image will be,
24. Morphology – Erosion
You can apply an erosion operation to the image.
For example,
# Morphology - Erosion
with Image(filename='https://cdn.educba.com/content/educba.png') as img:
img.morphology(method='erode', kernel='square:3x3')
img.save(filename='eroded_image.jpg')
display(IPImage(filename='eroded_image.jpg'))
The output image will be,
25. Perspective Transformation
You can apply a perspective transformation to the image.
For example,
# Perspective Transformation
with Image(filename='https://cdn.educba.com/content/educba.png') as img:
img.virtual_pixel = 'transparent'
img.distort('perspective', (0, 0, 50, 0, 0, 50, 50, 50))
img.save(filename='perspective_transformed_image.jpg')
display(IPImage(filename='perspective_transformed_image.jpg'))
The output image will be,
26. Add Noise
You can add random noise to the image.
For example,
# Add Noise
with Image(filename='https://cdn.educba.com/content/educba.png') as img:
img.noise('gaussian', attenuate=1.5)
img.save(filename='noisy_image.jpg')
display(IPImage(filename='noisy_image.jpg'))
The output image will be,
27. Motion Blur
You can apply a motion blur effect to the image.
For example,
# Motion Blur
with Image(filename='https://cdn.educba.com/content/educba.png') as img:
img.motion_blur(radius=5, sigma=4, angle=45)
img.save(filename='motion_blur_image.jpg')
display(IPImage(filename='motion_blur_image.jpg'))
The output image will be,
28. Lens Distortion
You can apply lens distortion effect to the image.
For example,
# Lens Distortion
with Image(filename='https://cdn.educba.com/content/educba.png') as img:
img.distort('barrel', [0.05, 0.1, 0.05])
img.save(filename='distorted_image.jpg')
display(IPImage(filename='distorted_image.jpg'))
The output image will be,
Operations Using Two Images
We have discussed these 30 examples using only one image. Now we will discuss the next 5 different examples with two images. We will use the first image as “educba.png” and the second image as “welcome.jpg” as given below.
“educba.png”
“Welcome.jpg”
1. Blend Images
You can blend “educba.png” and “welcome.jpg” together.
For example,
# Blend Images
with Image(filename='educba.png') as img1:
with Image(filename='welcome.jpg') as img2:
img1.composite(img2, left=70, top=50)
img1.save(filename='blended_images.jpg')
display(IPImage(filename='blended_images.jpg'))
The output image will be,
2. Image Watermark
You can add a watermark to “educba.png” using “welcome.jpg.”
For example,
# Image Watermark
with Image(filename='educba.png') as img:
with Image(filename='welcome.jpg') as watermark:
# Resize watermark to fit the main image
watermark.resize(width=img.width // 2, height=img.height // 2)
# Composite the watermark onto the main image
img.composite(watermark, left=80, top=50)
img.save(filename='watermarked_image.jpg')
display(IPImage(filename='watermarked_image.jpg'))
The output image will be,
3. Invert and Blend
You can invert colors in “educba.png” and blend it onto “welcome.jpg.”
For example,
# Invert and Blend
with Image(filename='educba.png') as img1:
with Image(filename='welcome.jpg') as img2:
# Invert the colors of the first image
img1.negate()
# Composite the inverted image onto the second image
img2.composite(img1, left=50, top=50)
img2.save(filename='inverted_and_blended.jpg')
display(IPImage(filename='inverted_and_blended.jpg'))
The output image will be,
4. Pixelate
You can apply to pixelate “educba.png” and overlay it onto “welcome.jpg.”
For example,
# Pixelate
with Image(filename='educba.png') as img1:
with Image(filename='welcome.jpg') as img2:
# Pixelate the first image
img1.resize(width=20, height=20)
img1.resize(width=img2.width, height=img2.height)
# Overlay the pixelated image onto the second image
img2.composite(img1, left=50, top=50)
img2.save(filename='pixelate_and_overlay.jpg')
display(IPImage(filename='pixelate_and_overlay.jpg'))
The output image will be,
5. Texture Mapping
You can apply texture mapping to “educba.png” using “welcome.jpg” as a texture.
For example,
# Texture Mapping
with Image(filename='educba.png') as img1:
with Image(filename='welcome.jpg') as img2:
# Apply texture mapping
img1.texture(img2)
img1.save(filename='texture_mapping.jpg')
display(IPImage(filename='texture_mapping.jpg'))
The output image will be,
Conclusion – Core Functionality of Wand Library
The Python Wand library proves to be an incredibly feature-rich and potent tool for image processing in Python. Wand simplifies complicated tasks, from basic operations to sophisticated manipulations, making it an essential tool for developers working on graphics and multimedia projects.
FAQs (Frequently Asked Questions)
Q1. Can the Python Wand library be combined with other image-processing libraries?
Answer: Yes, To meet project requirements and improve functionality, Python Wand can be integrated with other image-processing libraries, such as Pillow.
Q2. Does Python Wand support GPU acceleration for quicker image processing?
Answer: No, Python Wand does not currently have built-in support for GPU acceleration because it primarily depends on the ImageMagick toolkit. Nevertheless, optimizations can be investigated in combination with additional libraries.
Q3. Is Python Wand appropriate for applications involving real-time image processing?
Answer: Although Python Wand has strong image processing features, there might be some overhead due to its dependency on ImageMagick. Considering alternative libraries with optimized performance for real-time applications may be advantageous.
Recommended Articles
We hope that this EDUCBA information on “Core Functionality of Wand Library” was beneficial to you. You can view EDUCBA’s recommended articles for more information.
