Updated June 14, 2023
Definition of CSS Descendant Selector
CSS Descendant Selector is defined to select all the elements which are supposed to be the child elements and one of the CSS Combinators. This is implemented to select every single child element mentioned under the tags of the CSS selector part. Also, it makes use of the existing structure of XHTML format to style a document that gives finer control on the web page. In simple terms, this selector is simply a list of other selectors, too,, but followed by an HTML hierarchy. Descendant Selector includes elements that are not direct, like a child, grandchild, etc.
Syntax:
Here we have simple Syntax where we can write a parent and then followed the targeted element. The general Syntax is as follows:
Element element
{
// CSS Statements;
}
The above Syntax has two arguments. The first Element says the initial element to match; the second element must be a descendant of the first element. And the body statements follow the CSS Styles. And adding a small space between the two selectors, the same style element is also reflected in the child element.
How does Descendant Selector work in CSS?
We had already seen the keyword selectors; they target specific elements withss. The term Descendants targets HTML elements which are offspring such that the targeted elements are based on the relationship of the HTML document. CSS provides some special combinators like sibling selectors, child selectors, and Descendant Selectors. And this allows us to save big coding.
Here we learn on the simple concept of the Descendant selector and its working steps. Let’s take a Let’sHTML document to explain the descendant Selector.
<html>
<head> <title> hello </title> </head>
<body> <h1> hello everybody </h1>
<p>this is a text </p>
<img src=”gio.gif” > </img>
<a>  …</a>
<b>…. </b>
</html>
So, from the above code,, the <body> tag is the parent of both <h1> and <p> elements. In simple terms,, I could say that <p>, <a>,<img>,<b> elements are the descendant of the body element.
Sample example: You can use two or more selectors separated by whitespaces to apply a style to multiple elements.
p em {color: red; }The above statements trigger the browser to select all em elements, under the p elements according to the rule. The em element, not a descendant of the p element,, will not be selected.
If suppose we need to use a strong HTML element in the Heading element,, what do we do?
h2 strong
This statement completely selects a strong element under the heading of level 2 and makes it underlined.
Even nesting is possible here:
div p em {color: blue;}You can combine descendant selectors with grouping to create powerful and versatile CSS patterns.
Examples
Let us see different implementations of selectors.
Example #1
Code:
<!DOCTYPE html>
<html>
<head>
<meta charset="utf-8">
<title>Example on descendant selectors</title>
<style>
.DataMining {
background-color: Red;
}
.Python {
background-color: pink;
}
.BigData {
background-color: green;
color: white;
}
</style>
</head>
<body>
<h1> <center><b>COURSE CATEGORIES</center></b></h1>
<p>You can learn of your Wish with proper Schedule and Life time Access where you can learn from experts:</p>
<ul>
<li>
<strong class="DataMining">DataMining </strong>
</li>
<li>
<strong class="BigData">BigData</strong>
</li>
<li>
<strong class="Python">Python</strong>
</li>
</ul>
<p>Well ! Top Categories includes <strong class="green">schedule</strong> Improving Business Development , Marketing, design and in IT sector</p>
</body>
</html>
The above code snippets show how the the descendant selector adds paragraph tag <p> under the <h1> tags.
Output:
Example #2
Code:
<!DOCTYPE html>
<html>
<head>
<style>
div p {
background-color: green;
font-size : 20px;
}
</style>
</head>
<body>
<div>
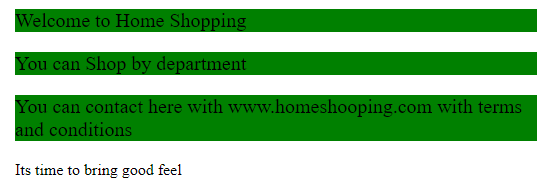
<p> Welcome to Home Shopping</p>
<p> You can Shop by department</p>
<section>
<p>You can contact here with www.homeshooping.com with terms and conditions</p>
</section>
</div>
<p>Its time to bring good feel</p>
</body>
</html>
From the above snippet,, we understood that <p> tag is affected inside <div> tag element. Such that the last <p> element is not highlighted as it is out of the <div> tag.
Output:
Example #3
Code:
<!DOCTYPE html>
<html>
<head>
<style>
p b {
background-color: pink;
color : red;
font-size : 20px;
}
</style>
</head>
<body>
<p> Hello , <b> CSS world! </b> - Introduction to CSS Selectors <b> CSS Working </b> </p>
linking , <b> CSS </b> - To HTML  <b>  with Bold elements </b> hi !.
</body>
</html>
The Above code says about the bold element. In this example,, I set the color of all bold elements inside a paragraph tag to red. However, the bold elements outside the paragraph tag remain bold,, but the color style is not applied since they are not affected by the descendant selector. The same example is useful for making the main menu links to change color.
Output:
Example #4
Descendant with no direct Child example- Here child of the child element is reflected.
Code:
<!DOCTYPE html>
<html>
<head>
<style type="text/css">
div.Selector b {
color: red;
background-color: Powderblue;
font-family : courier;
}
</style>
</head>
<body>
<div class="Selector">
<b>List 1</b>
<div>
<b>List 2</b>
<div>
<b>List 3</b>
</div>
</div>
</div>
</body>
</html>
The above code states that the targeted element here is <div> element with the class followed by a bold tag. But here,, it has many layers of div with the bold elements. The color style is still reflected in all the bold elements. If suppose we want the direct child to reflect a child selector is used. Here is the demonstration output:
Output:
Example #5: Selector with Different Elements
Code:
<!DOCTYPE html>
<html>
<head>
<style type="text/css">
div p
{
color :purple;
font-size :20px;
}
ul p {
background-color : yellow;
}
</style>
</head>
<body>
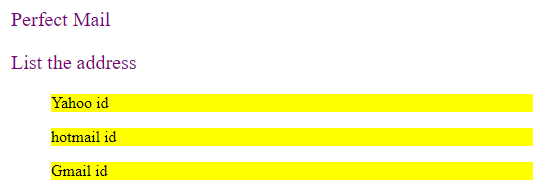
<div> <p> Perfect Mail </p>
<p> List the address </p>
</div>
<ul> <p> Yahoo id </p>
<p> hotmail id </p>
<p> Gmail id </p>
</ul>
</body>
</html>
Here two different selectors operate parallel with a common <p> element.
Output:
Conclusion
To conclude, we seen how to use CSS descendant selectors with their Syntax and implementations. This gives us a way to provide a super presentation by making separations which makes the code clear and clean with good structure. However, we have seen the initial selector in the previous articles,, which gives control over the web page. Therefore, this Descendant selector provides fine control of the HTML elements. Anyways it is good to see CSS selectors are extremely powerful to do so.
Recommended”Articles
We hope that t”is EDUCBA information on “CSS DescendEDUCBA’sctor” was beneficial to you. You can view EDUCBA’s recommended articles for more information.


