Updated June 26, 2023

Definition of CSS Resize
The CSS resize property is an in-built property that enables developers to make CSS elements resizable based on user requirements. The user can resize the element by dragging the bottom right corner or a draggable handle, typically a small UI handler. This interaction allows users to expand the element, such as an image, on a website to their desired size.. The resize property also allows specifying the axis of resizability.
Syntax and Parameters
. element {
Overflow: auto;
Resize: value;
}
Sample Code:
text area {
resize: none;
}
The properties of the value are given as follows,
- none: No change in the element, which means that no resize action is performed. And it’s an initial value for most of the elements.
- Horizontal: Here, the width of an element is resized respectively.
- Height: here, the height of an element is resized.
- both: This value performs both the height and the width.
- initial: Making the property a default value.
How to Resize Property Works in CSS?
The working process is very simple such that it makes use of the in-built property but with limited functionality. The resize property in CSS interacts with the overflow value. It is advisable not to set the overflow value to ‘visible’ when using the resize property. To achieve the desired functionality, it is advisable to set the overflow property to either ‘auto’ or ‘scroll.’ As mentioned earlier, developers utilize a stylish dragger, referred to as a draggable handler, to specifically resize the element from the right corner of the box. To resize the handle on the border, it is important to have a width resize.
#resize {
--resizable-width: 400px;
height: 150vh;
width: var(--resizable-width);
background-color: red;
}
It is evident that resizing an element affects the layout. However, it should be noted that positioning is not applicable to inline elements.
Examples of CSS Resize
Here let’s see some implementation of resize property values in different cases.
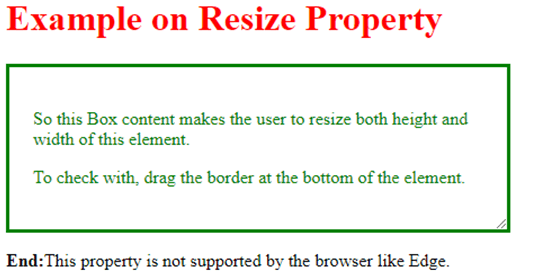
Example #1 – Example using the value ‘both’
When the resize property is set to “both,” it enables the user to expand or resize the element in both the width and height dimensions simultaneously.
Code:
<!DOCTYPE html>
<html>
<head>
<style>
div {
border: 3px solid;
padding: 21px;
width: 400px;
color : green;
resize: both;
overflow: auto;
}
h1 {color : red;}
</style>
</head>
<body>
<h1>Example on Resize Property</h1>
<div>
<p>So this Box content makes the user to resize both height and width of this element. </p>
<p>To check with, drag the border at the bottom of the element. </p>
</div>
<p><b>End:</b>This property is not supported by the browser like Edge. </p>
</body>
</html>
Output:
Example #2 – Demo on the resize value ‘initial’
Here the resize value is set to initial means it sets a default value.
Code:
<!DOCTYPE html>
<html>
<head>
<title> Demo on resize property</title>
<style>
.resiz{
border: 3px solid blue;
padding: 23px;
width: 400px;
resize: initial;
overflow: auto;
}
h1, h2 {
color: orange;
}
</style>
</head>
<body>
<center>
<h1>EDUCBA - ONLINE COURSE</h1>
<h2>Resizing Both the sides</h2>
<div class="resize">
<h2 style="color:green;">Course</h2>
<h3>Course Overview</h3>
<p>
Its a Training and certification on Cloud Skills where we get a class training and digital training.
</p>
<p>
The course focuses on AWS service and intended for individuals who are into leading paths.
</p>
</div>
</center>
</body>
</html>
Output:
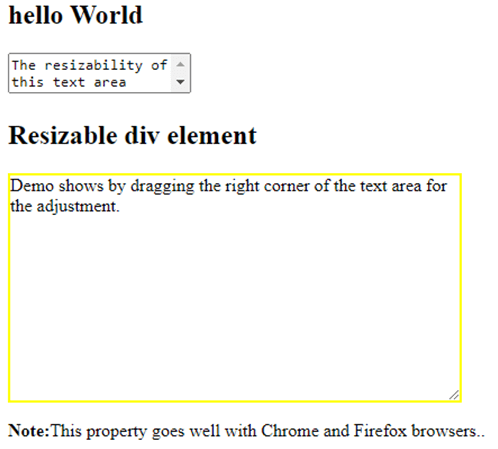
Example #3 – Using Resize Property in the Text Area
In the example below, we have used CSS property on the text area by not resizing.
Code:
<!DOCTYPE html>
<html lang="en">
<head>
<meta charset="utf-8">
<title>Example of CSS resize property</title>
<style>
textarea {
resize: none;
}
div {
resize: both;
overflow: auto;
width: 400px;
height: 200px;
border: 2px solid yellow;
}
</style>
</head>
<body>
<h2>hello World</h2>
<form>
<textarea>The resizability of this text area disabled</textarea>
</form>
<h2>Resizable div element</h2>
<div>Demo shows by dragging the right corner of the text area for the adjustment.</div>
<p><strong>Note:</strong>This property goes well with Chrome and Firefox browsers..</p>
</body>
</html>
Output:
Example #4 – Using Horizontal Value in Resizing Property
Code:
<!DOCTYPE html>
<html>
<head>
<title>Resize property - Horizontal</title>
<style>
.hori{
border: 3px ridge green;
padding: 22px;
width: 250px;
resize: horizontal;
overflow: auto;
}
h1, h2 {
color: brown;
}
</style>
</head>
<body>
<center>
<h1>Resize property - Horizontal</h1>
<h2> EDUCBA;</h2>
<div class="hori">
<h2 style="color:red;">Overview of the site</h2>
<h3>World’s Largest Web Development Portal</h3>
<p>
You can get web certificates and this is well optimized for learning and also simplifies learning methodologies.
</p>
<p>
Here the CSS resize property is to fit a content in a html element and this property can be expanded or shrink in the container.Demo in a paragraph
</p>
</div>
</center>
</body>
</html>
The provided code indicates that when the user clicks on the bottom right corner, the draggable handler expands along the width based on the cursor position.
Output:
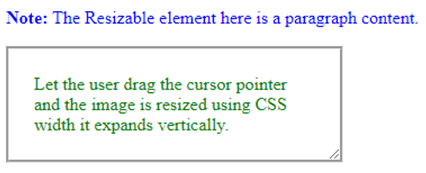
Example #5 – Using a value ‘vertical’
Code:
<!DOCTYPE html>
<html>
<head>
<style>
div {
border: 3px groove;
padding: 22px;
width: 250px;
resize: vertical;
overflow: auto;
color : green;
}
p { color : blue;}
</style>
</head>
<body>
<p><b>Note:</b> The Resizable element here is a paragraph content.</p>
<div>Let the user drag the cursor pointer and the image is resized using CSS width it expands vertically.</div>
</body>
</html>
Output:
Conclusion
Therefore, here we have seen a well-organized and easy-to-understand concept of resizing property with examples of HTML and CSS. And we have seen how these elements shrink and expand in action by the resize handler. You can also make images resizable by setting max-width and height.
Recommended Articles
This is a guide to CSS Resize. Here we also discuss the definition and how to resize property works in css? along with a different example and its code implementation. You may also have a look at the following articles to learn more –


