Updated March 16, 2023
Introduction to Cursors in SQL
A cursor in SQL is a momentary memory space formed in the computer memory whenever an SQL statement is run, where it is used to position the row that is currently being worked on. It is used to manage the records in a table by fetching data from the database after running a query in an order that trails one row at a time. This cursor can keep hold of an ‘active set’ for more than one record during a query execution but cannot keep actively processing more than one record.
So, cursors create a temporary workspace with the selected set of rows and a pointer that points to the current row. This set of rows, on which the cursor will perform the desired operation, is called an Active Data Set. The pointer retrieves the rows from the result set one by one. You can then perform any SQL operation one row at a time.
Implicit Cursors
Implicit cursors, as the name implies, are generated by the SQL parser for DML queries. DML queries are Data Manipulation Queries. These queries manipulate or change the data. They do not interfere with the structure or the schema of the database. Queries such as SELECT, INSERT, UPDATE, and DELETE generate an implicit cursor. Implicit cursors are hidden to the end-user.
Explicit Cursors
Explicit cursors are user-generated cursors. When a user instructs the SQL parser to create a cursor for an active set, the cursor thus created is called an explicit cursor. The active set is defined through a SELECT query by the user. We would be covering explicit cursors in detail in this article.
Cursor Actions – The Lifecycle of a Cursor
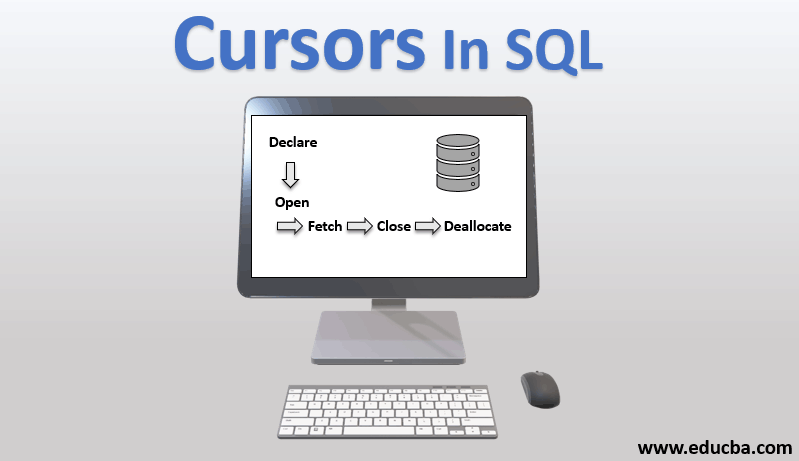
The lifecycle of a cursor typically involves five stages:
1. Declare: The first step is to declare a cursor. This step instructs the system to generate a cursor with the given data set. The data set is constructed using a SQL statement. At this stage, the active set is created, but the cursor’s temporary workspace is not yet opened in the memory.
2. Open: Next, the system is instructed to open the cursor. At this stage, the temporary workspace is loaded in the memory with the active set, and a pointer is generated, which points to the first row in the active set.
3. Fetch: This is the recurring step in the whole process. The pointer’s current row is fetched, and the desired task is performed on the row data. The pointer moves to the next row in the cursor.
4. Close: After the data manipulation is done, the cursor needs to be closed.
5. Deallocate: This is the final step to delete the cursor and release the memory, processor and other system resources allocated to the cursor.
Explicit Cursors – In Action!
Okay, so now we have a basic understanding of what cursors are and how they work. It’s time to get our hands dirty and create an explicit cursor ourselves.
The Terminology of Cursors in SQL
Let’s understand the terminologies used in this syntax.
Cursor Scope
- Cursor Scope can be either GLOBAL or LOCAL. A global cursor is available throughout the connection. A local cursor is scope-limited only to the stored procedures, functions or the query that holds the cursor.
- This is the MS SQL Server-specific feature. MySQL supports local scoped cursors only.
Cursor Movement
- MS SQL Server also gives the option to set the Cursor movement. It can be either the conventional Forward_Only mode, which moves the pointer from the first row until the last line. Or, it can be scrolled to the first, last, previous or next row.
- Cursors in MySQL are non-scrollable.
Cursor Type
- A cursor can be static as in it can cache the active set till deallocation and can juggle forward and backward through this cached active set. A cursor can be fast_forward only in static mode.
- It can also be dynamic to allow the addition or deletion of rows in the active set while the cursor is open. These changes are not visible to other users of the cursor in keyset mode. Cursors in MySQL are fast_forward only.
Cursor Lock
- Cursor locks are useful in a multi-user environment. They lock the row so that no two users operate on the same data simultaneously. This ensures data integrity.
- A read-only lock states that the row cannot be updated.
- Scroll-locks lock the row as they are fetched in the cursor, ensuring that the task succeeds and updated data is available outside the cursor. Optimistic attempts to update the row without any lock. Thus, if the row has been updated outside the cursor, the task will not succeed.
- MySQL supports only read-only locks. This means that MySQL won’t update the actual table; rather, it would copy the data to carry out update commands.
Thus, we see that these options are available only in MS SQL Server. This makes the syntax for MySQL cursors even more simple.
Example
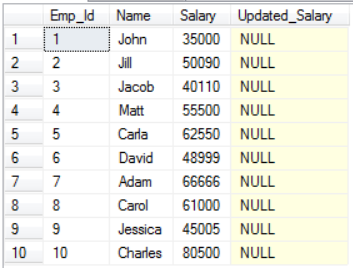
Let us now update the salary of employees in our Employee table.
We would be using the below data in these cursors in SQL example.
Our cursor code would be as follows:
DECLARE @sal float
DECLARE @newsal float
DECLARE Emp_Cur CURSOR FOR SELECT Salary, Updated_Salary FROM Employees
OPEN Emp_Cur
FETCH NEXT FROM Emp_Cur INTO @sal, @newsal
WHILE @@FETCH_STATUS = 0
BEGIN
SET @newsal = @sal*1.25
UPDATE Employees SET Updated_Salary = @newsal WHERE CURRENT OF Emp_Cur
FETCH NEXT FROM Emp_Cur INTO @sal, @newsal
END
CLOSE Emp_Cur
DEALLOCATE Emp_Cur
And the Output after executing the above cursor command would be:
Conclusion – Cursors in SQL
Thus, we have seen what cursors are, how to use them and where to avoid them. Cursors do prove to be a helpful utility for developers but at the cost of performance. So, be careful when you opt for cursors.
Recommended Articles
We hope that this EDUCBA information on “Cursors in SQL” was beneficial to you. You can view EDUCBA’s recommended articles for more information.


