Updated March 16, 2023
Introduction to Data Binding in ASP.Net
In a similar fashion, ASP.Net also supports the concept of Data Binding. Through Data Binding, you can bind any server control to various properties, expressions, collections or even methods. There is also the flexibility to select the data source, which can be a database, a static file, an enum or any other source. Thus, ASP.Net Data Binding provides a simple and convenient way to create a link between the server control and the application data.
Concepts of Data Binding in ASP.Net
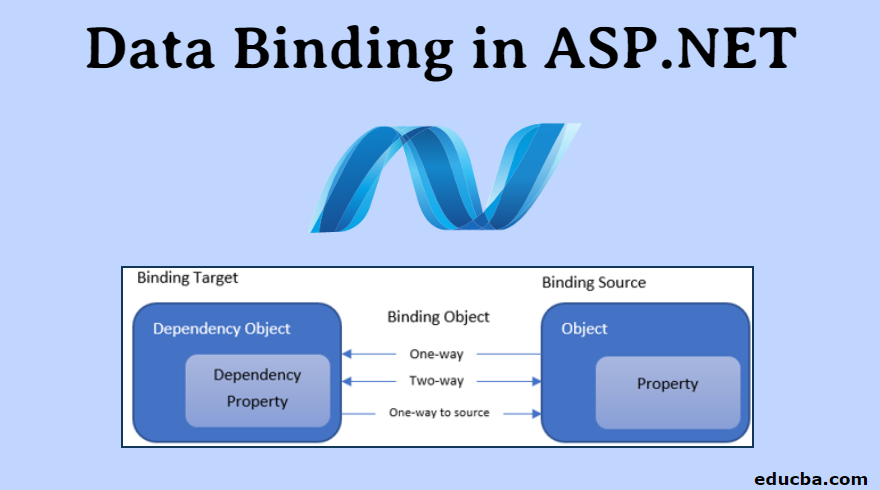
The Basic concept can be very well illustrated in the following image.
Let us understand the Terminologies used in the image.
- Binding Source – The application data variable which holds the business data.
- Binding Target – The server control or the UI element to which the data is bound.
- Dependency Object – The object which is associated with the Binding Target.
- Dependency Property – The property or the attribute of the Dependency Object to which the data is bound.
- Source Object – The object which holds the business data.
- Source Property – The property or attribute of the Source Object whose value is the actual data.
So, if you want to bind the text property of an input control on the UI to the employee name, then the TextBox is the Target/Dependency Object. Text is the target property. The employee is the business object and the name is the property.
The direction of the binding determines the propagation of data back and forth between the source and target. In a One-way binding, any changes in the business data are reflected in the UI element but not vice versa. This is helpful in cases when the business data is read-only, and the UI control is informative in nature.
Two-way binding ensures that data change in either source or target objects is synchronized automatically. This creates fully interactive UI forms, where changes in form fields are instantly updated in the back-end variables.
In a One-way to source binding, any changes in the UI element data is updated in the business object but not vice versa. This is helpful in scenarios when the data is calculated based on other user inputs and needs frequent re-evaluation.
What is Data Binding?
- Before we proceed, let us first understand the concept of Data Binding in general. Data binding is the process of connecting the Application User Interface with the Business Data. Now you may wonder that this is the same as displaying the business data on the UI. No, it is not. What if the data is changed? Does it automatically get updated on the user interface?
- So, when the binding of data is done correctly, the elements on the user interface reflect the changes in the business data automatically. Imagine that your UI elements are constantly watching the data variable/set assigned to them. As soon as there is any change in the data, the UI elements are instructed to reflect the change accordingly.
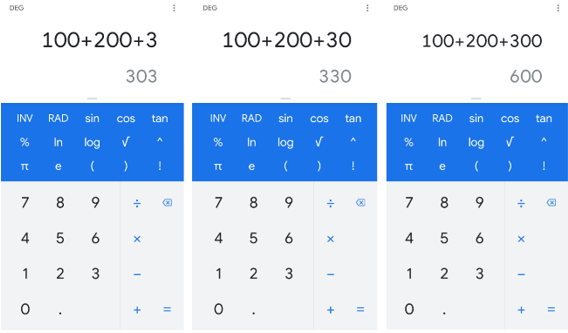
- A real-world beautiful example of this phenomenon is the calculator in our smartphones. They are designed to give the result as soon as the user types any value. Notice in the screenshot below, how the results are produced and displayed in real-time. Without the need of giving the ‘equals’ command.
This is achieved by data binding. The element on the user interface responsible for displaying the result keeps a close watch on the element that captures the user input. It is then instructed to calculate and display the results as soon as data in the user input changes.
How to Create Data Binding in ASP.Net?
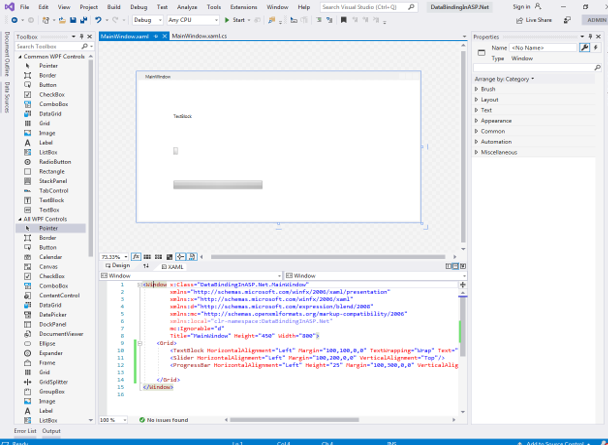
Below is a simple example to demonstrate Data Binding in ASP.Net. We would create a simple WPF application with three controls (text block, slider and progress bar) on the user interface. The value of two controls would be bound to the data in the third control.
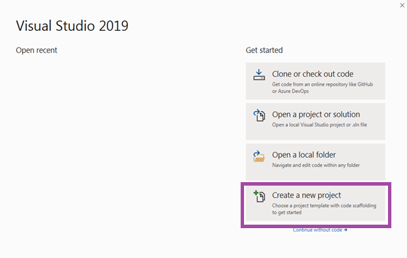
Step 1: Open Visual Studio and Create a New project.
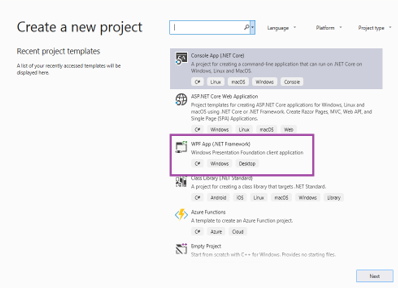
Step 2: Select WPF App (.Net Framework) from the New Project Wizard Box.
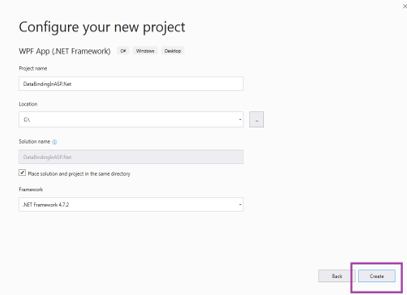
Step 3: Configure the basic details and hit Create.
Step 4: This creates a Shell WPF application. Now insert a TextBlock, a Slider and a ProgressBar control in the UI. We will bind the value of the TextBlock and ProgressBar to the Slider control’s value.
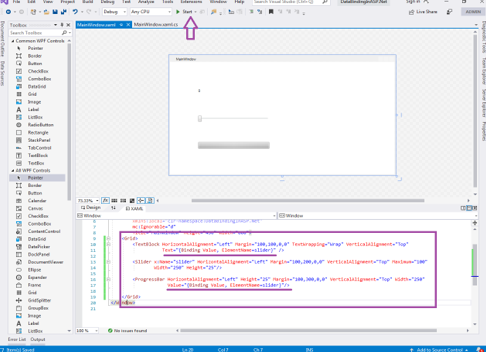
Step 5: Now add the Code underlined in the figure to bind the Text property of TextBlock.
Text="{Binding Value, ElementName=slider}"
Similarly, for the Value property of ProgressBar.
Value="{Binding Value, ElementName=slider}"
This binds the properties to the Value property of Slider.
Step 6: Run the application. You would see that the slider control now updates the values of the text block and progress bar. Move the slider to see this in action.
Let us understand the terminologies used from the example.
- Binding Source – The Slider control in the UI.
- Binding Target – The TextBlock and the ProgressBar
- Dependency Object – The TextBlock and ProgressBar objects created.
- Dependency Property – The Text property of TextBlock and the Value property of ProgressBar.
- Source Object – The Slider object created with x: Name=”slider”.
- Source Property – The Value property of the Slider.
Step 7: The Final code should be as below:
<Window x:Class="DataBindingInASP.Net.MainWindow"
xmlns="http://schemas.microsoft.com/winfx/2006/xaml/presentation"
xmlns:x="http://schemas.microsoft.com/winfx/2006/xaml"
xmlns:d="http://schemas.microsoft.com/expression/blend/2008"
xmlns:mc="http://schemas.openxmlformats.org/markup-compatibility/2006"
xmlns:local="clr-namespace:DataBindingInASP.Net"
mc:Ignorable="d"
Title="MainWindow" Height="450" Width="800">
<Grid>
<TextBlock HorizontalAlignment="Left" Margin="100,100,0,0" TextWrapping="Wrap" VerticalAlignment="Top"
Text="{Binding Value, ElementName=slider}" />
<Slider x:Name="slider" HorizontalAlignment="Left" Margin="100,200,0,0" VerticalAlignment="Top" Maximum="100"
Width="250" Height="25"/>
<ProgressBar HorizontalAlignment="Left" Height="25" Margin="100,300,0,0" VerticalAlignment="Top" Width="250"
Value="{Binding Value, ElementName=slider}"/>
</Grid>
</Window>
Conclusion
We learned the basic concept of Data Binding and how it is implemented in ASP.Net. This is a very basic example and the topic goes far beyond this. It is highly recommended to explore more, write more code, experiment more with various data sources. This would greatly help in getting a thorough understanding and grip on the subject.
Recommended Articles
This has been a guide to Data Binding In ASP.NET. Here we have discussed overviews on Data Binding In ASP.NET, what is data blinding and steps to create Data Binding In ASP.NET with the final code. You can also go through our given articles to learn more-

