Updated July 6, 2023

Introduction to Databricks CLI
Databricks CLI, Command Line Interface provides an easy-to-use interface to Azure Databricks Platform. This command-line interface is built up on top of Databricks REST APIs and can be used along with DBFS, Clusters, Jobs, Workspaces, Secrets API, and Libraries. Command Line Interface has its code on the open-source platform GitHub. The Databricks Workspace is an environment to manage all the Databricks assets, and the workspace allows to organize tables, clusters, notebooks, and help manage jobs. Let us look into the CLI command for Databricks, configuration, and installation of CLI.
Databricks CLI Command
For Command Line Interface, Python is a prerequisite, and the version required is 2.7.9v and above. For Python2 and Python3, it is 3.6v and above.
As said above, Databricks Workspace is one of the essential environments to manage Databrick assets. Even though the interface is quite user-friendly, importing or exporting the notebooks, linking each notebook to Git repo, and kickstarting clusters is difficult. It becomes worst if the user has to manage multiple workspaces in the platform, which becomes tough to manage.
To find the Command Line Interface version,
databricks –version
D. Command Line Interface has been classified into many sub CLI, listed below,
Cluster Policies CLI:
Command to run Databrick Cluster Policies CLI: databricks cluster-policies –help
Clusters CLI:
Command to run Clusters CLI subcommands(Need to appends with the mentioned command): databricks clusters –h
DBFS CLI: DBFS CLI Commands are run by appending them to databricks fs or dbfs: databricks fs –h
Groups CLI: D. Command Line Interface subcommands are appended to databricks groups
databricks groups –help
Instance Pools CLI: This pool CLI requires Databricks with 0.9.0v or above it.
databricks instance-pools -h
Libraries CLI: Can use D. Command Line Interface subcommands by appending to databricks libraries.
databricks libraries -h
Repos CLI: It requires CLI with 0.15.0v or above. D.Command Line Interface commands are appended to CLI reports
databricks repos –h
Secrets CLI: It requires a database of CLI 0.7.1 or above it. D.Command Line Interface subcommands are appended to databricks secrets.
databricks secrets –help
Stack CLI: It required 0.8.3v or above it for databricks. It gives way to managing a stack of databricks resources.
databricks stack –help
Tokens CLI: D.Command Line Interface subcommands are appended to databricks tokens,
databricks tokens –help
Databricks Workspace: CLI subcommands are appended to the databricks workspace.
databricks workspace –h
Configuring Databricks CLI
Step 1: Run pip install databricks-cli with the appropriate pip version of python.
Step 2: Once the user has installed the required libraries, the user can check the software version installed by command: databricks –version
Step 3: To start writing the CLI commands, the user must first set up authentication to Databricks Workspace that the user wants to manage, which has to be done only once.
Step 4: Authentication needs to be set using DPAT (Databricks Personal Access Token, which can be created from the workspace directly.
Step 4a: Click on the User Profile in the workspace and select User Settings.
Step 4b: Here, there is an option to create New Token. Before generating the token, a lifetime has to be set and one needs to copy the token.
Step 4c: Also, grab the workspace URL of the below format from the browser,
Error! The hyperlink reference is not valid.
Step 5: Then, the user could configure authentication on the local machine with the command databricks configure –token through the command line.
Step 6: User will be asked to enter Databricks Host; workspace URL is to be provided from Browser. Then, the user is asked to enter the generated token.
Step 7: To check if the authentication is working, run the command databricks workspace list; the user will be able to see the list of directories from the databricks workspace on the console.
Step 8: But, it allows user to manage a single workspace; so what if the user wants to manage workspaces in multiple belonging to various environments, or else the user working for various clients with each of them have a dedicated workspace.
Step 9: Hence, this particular scenario can be configured on a console by setting the connection profile.
Step 10: To add the connection profile, a unique name is set to identify a specific workspace, such as development or UAT.
Step 10a: Give command databricks configure –token –profile <<profile_name>>. This creates an alias for each workspace on the CLI for remembrance.
Step 10b: Enter token and hostname as said above.
Step 10c: To use the connection profile, the user needs to complement the CLI command with –profile <<profile_name>>
Step 10d: If the user needs to switch to another workspace, a profile must be changed.
**Same configuration steps can be repeated for setting up of workspaces, such that giving unique names to each workspace will help for identification further.
Installing Databricks CLI
Step 1: Install Python of version 2.7.9 or above. Can download the latest version of Python below link. https://www.python.org/downloads/
Step 2: Once Python is downloaded, need to add the PYTHON_HOME system variable that points to the directory of python installation.
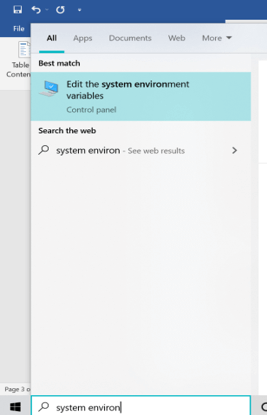
Step 3: Search for “system” and select “Edit the system environment variables” as below.
Step 4: In this system properties, move to Advanced Tab, and click on the Environment Variables.
Step 5: Click on New and enter the variable name as PYTHON_HOME and variable value as the path of python installed.
Click on OK,
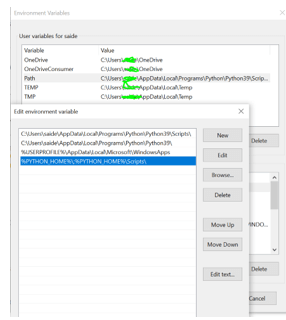
Step 6: Then, the PYTHON_HOME variable has to be added to the path environment variables. In Environment Variables Window, click on Path system variable and Edit à New à. Enter the path as “%PYTHON_HOME%\;%PYTHON_HOME%\Scripts\”
Save the changes.
Step 7: If Python is being installed for the first time, the user needs to install pip as well. PIP is the standard package manager for python and allows users to install and manage additional packages which are not a part of Python’s standard library.
Step 8: Install PIP from https://bootstrap.pypa.io/get-pip.py, Right-click and click on Save as and Save.
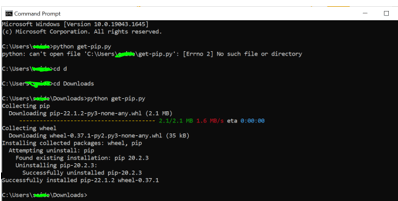
Step 9: Open Command Prompt, move to the folder where the file has been saved, and type in python get-pip.py
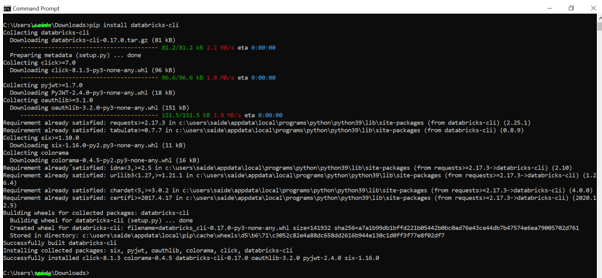
Step 10: Then execute the following command, pip install databricks-cli
Step 11: Create Access Token for Databricks; accessing Databricks via Databricks CLI requires Access Token generation. This requires the installation of the Azure Databricks portal.
Account à User Settings à Access Tokens à Generate New Token à Add lifetime and comment.
The token can then be used on connecting with Databricks CLI, it is recommended to store in a safe place like the Azure Key Vault.
Step 12: Then, log in to Databricks runtime from the Command prompt as
databricks configure –token
Host Databricks URL would look like, Error! Hyperlink reference is not valid.>
If it is successful, the user will be able to manage Databricks by using multiple commands.
Conclusion
With this, we shall conclude the topic “Databricks CLI.” We have seen what Databricks CLI means and how is it useful in providing solutions to various problems. Also gone through a few cli commands in databricks and how to configure databricks cli for usage. A step-by-step procedure has been listed for the installation of databricks cli with screenshots for a clear explanation. Hope this article helps in understanding the Databricks CLI concept. Thanks! Happy Learning!!
Recommended Articles
This is a guide to Databricks CLI. Here we discuss the introduction, Databricks CLI command, and the steps for configuration. You may also have a look at the following articles to learn more –


