Introduction to Django DateTimeField
The DateTimeField is a field type offered by Django’s ORM (Object-Relational Mapping) system, designed for modeling date and time data in Django applications. It facilitates efficient storage and retrieval of date and time information within your database.
Date and time management are critical components of web application development. Numerous web applications require managing various time-related data, such as event schedules, user activity timestamps, blog post publication dates, and more. Effective handling of date and time ensures data accuracy and enhances the overall user experience.
Django’s ORM offers a high-level abstraction for database interaction, enabling developers to define database models using Python classes without the need to manage SQL queries directly. Models, which are Python classes, subclass django.db.models.Model, with each attribute representing a database field.
Table of Contents:
Syntax:
from django.db import models
class MyModel(models.Model):
my_datetime_field = models.DateTimeField(verbose_name="My Date and Time Field", auto_now_add=True)
Explanation:
- DateTimeField: Defines a DateTimeField in a Django model, representing a date and time.
- verbose_name: An optional argument used to specify a human-readable name for the field in forms and admin interfaces.
- auto_now_add: Optionally set the field to the current date and time for new objects, ideal for creation timestamps.
Setting Up Django DateTimeField
Installing Django:
Before utilizing DateTimeField in your project, you must install Django. You can install Django using pip, the Python package manager, by executing the following command:
pip install djangoCreating a Django Project:
Once you complete the installation, you can create a new Django project using the django-admin command-line utility by running the following command:
django-admin startproject educbaConfiguring settings.py:
Within your Django project, the settings.py file holds crucial configuration settings. It’s essential to double-check that your project accurately configures its settings for the database connection and timezone settings.
Creating Django Applications:
Django projects consist of one or more applications. You can generate a new Django application using the manage.py command-line utility:
python manage.py startapp mainDefining models and fields:
In your Django application, define models by creating Python classes inherited from django.db.models.Model. These models include fields like DateTimeField to represent date and time information.
Migrating changes to the database:
Once you’ve defined your models and fields, applying these changes to your database schema is next. Utilize the manage.py command-line utility to create and execute migrations:
python manage.py makemigrations
python manage.py migrate
Using DateTimeField in Models
Common Arguments and Options:
The DateTimeField accepts various arguments and options to customize its behavior, including
- auto_now: The field automatically updates to the current date and time each time you save the object.
- default: Establishes a default value for the field if no value is specified.
- blank: Determines whether the field can be left blank (i.e., have no value).
- null: Determines whether the field can be NULL in the database (if True, overrides blank).
- auto_now_add: This field acts as a “born on” stamp, automatically setting the date/time at creation and never changing.
Timezone Considerations:
When dealing with DateTimeFields, it’s crucial to consider timezones to ensure precise representation and management of date and time data across various timezones.
- Timezone aware vs. Timezone naive: Django’s DateTimeField can store datetime values in either timezone-aware or timezone-naive formats. Timezone-aware datetime objects contain information about the timezone they represent, whereas timezone-naive datetime objects do not.
- TIME_ZONE Setting: The settings.py file in Django also contains a TIME_ZONE setting that designates the default timezone for the application. Setting the TIME_ZONE to the correct timezone for your application is crucial in maintaining consistent behavior across various servers and environments.
- Handling timezone conversions: When dealing with datetime objects in Django views and templates, it’s essential to handle timezone conversions correctly to ensure an accurate display of datetime values to users in their respective local time zones. Django offers utilities such as timezone.localtime() and timezone.now() to convert datetime objects to the current timezone specified in the settings.
- Storing and retrieving timezone-aware datetime objects: When storing datetime values in a DateTimeField, Django automatically converts timezone-aware datetime objects to UTC (Coordinated Universal Time) before saving them to the database. When retrieving datetime values from a DateTimeField, Django automatically converts them back to the timezone specified in the TIME_ZONE setting.
- Dealing with user input: When managing user input of datetime values, it’s crucial to consider the timezone of the input and convert it to the suitable timezone before storing it in the database. Django’s forms and model forms offer tools to handle datetime input and transform it to the application’s timezone before saving it.
Example of DateTimeField Usage in Models
Step 1: Creating a virtual environment
Create a virtual environment for django setup. Go to the terminal and add the command:
python -m venv myenvThis command will create a virtual environment, but we also have to activate this environment, so to activate it, add in the terminal:
myenv\Scripts\activateStep 2: Installing django
Now we can install django in the environment.
pip install django
Django will get installed.
Step 3: Setup Django project and app
Create a new Django project. Under the project, create an app:
django-admin startproject educba
cd educba
python manage.py startapp main
Step 4: Model
Open models.py inside your app directory (main/models.py).
Define a model with a DateTimeField.
from django.db import models
class MyModel(models.Model):
datetime_field = models.DateTimeField()
Step 5: Make Migrations
Make migrations for your app.
python manage.py makemigrations main
python manage.py migrate
Apply migrations to create database schemas.
Step 6: Make the Model Accessible
Open the admin.py file in your app directory (main/admin.py).
from django.contrib import admin
from .models import MyModel
admin.site.register(MyModel)
Save the admin.py file.
Step 7: Use DateTimeField in Views
Open the views.py file in your Django app directory (main/views.py).
from django.http import HttpResponse
from django.utils import timezone
from .models import MyModel
def my_view(request):
# Create a new instance with the current date and time
my_instance = MyModel.objects.create(datetime_field=timezone.now())
# Return a simple HttpResponse
return HttpResponse("Instance created successfully.")
Save the views.py file.
Step 8: Create a Super User
Create a super user to log on to the server.
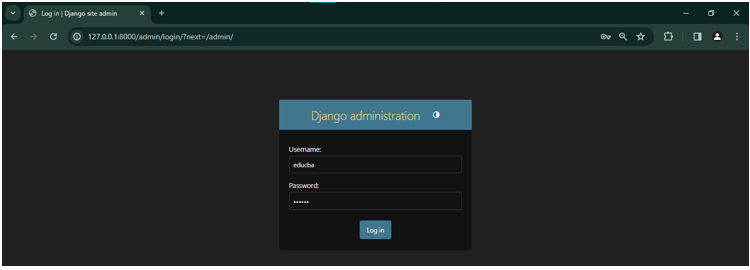
python manage.py createsuperuserTo proceed with the login process, input your username and password.
Step 9: Run the Django Server
Start the django development server.
python manage.py runserverOpen your web browser and go to http://127.0.0.1:8000/admin/ to view your Django project.
After logging into the server, you will find the specified options:
Navigate to the My Models and add a new DateTime field.
Save it, or you can add more data to the field.
Step 10: Checking the Database in the Shell
Run the Django shell by executing the following command in your terminal:
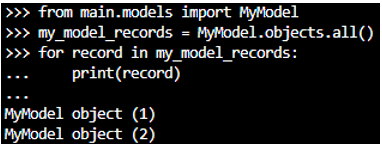
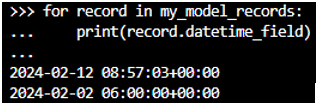
python manage.py shellOnce in the shell, you can interact with your models and query the database.
It is how we can create a DateTime field in django.
Real Life Example
Step 1: Create a Django Project and App
Bash:
django-admin startproject django_forms
cd django_forms
python manage.py startapp main
Step 2: Models.py (main/models.py)
Code:
from django.db import models
# Create your models here.
class position(models.Model):
position_name = models.CharField(max_length=200, blank=True, null=True)
created_at = models.DateTimeField(auto_now_add=True)
edited_at = models.DateTimeField(auto_now=True)
def __str__(self):
return self.position_name
class Employee(models.Model):
emp_name = models.CharField(max_length=50, null=False, blank=False)
employee_joining_date = models.DateTimeField(null=True, blank=True)
Step 3: Migrate the main app
python manage.py makemigrations main
python manage.py migrate
Step 4: Forms.py (main/forms.py)
Code:
from django import forms
from .models import Employee, position   # Import our Employee model here
class EmployeeForm(forms.ModelForm):
class Meta:
model = Employee
fields = ['emp_name']
def clean_emp_name(self):
emp_name = self.cleaned_data['emp_name']
if emp_name == "":
raise forms.ValidationError("The name field cannot be empty")
if emp_name == "Name":
raise forms.ValidationError("Please enter a valid name")
return emp_name
emp_name = forms.CharField(
max_length=50,
label="Employee Name",
required=False,
widget=forms.TextInput(attrs={
'class': 'form-control',
}),
initial="Name",
)
employee_joining_date = forms.DateTimeField(
widget=forms.DateInput(
attrs={
'class':'form-control',
'type':'datetime-local'
}
),
initial='2024-02-12'
)
Step 5: Views.py (main/views.py)
Code:
from django.shortcuts import render, redirect
from django.http import HttpResponse
from .forms import EmployeeForm
from .models import Employee
# Create your views here
def home(request):
return render(request, "main/home.html")
def employee_data(request):
# def create_employee(request):
if request.method == 'POST':
# If the request method is POST, it means the form is submitted
form = EmployeeForm(request.POST)
if form.is_valid():
name = form.cleaned_data['emp_name']
employee_joining_date = form.cleaned_data['employee_joining_date']
emp = Employee.objects.create(
emp_name = name,
employee_joining_date = employee_joining_date
)
emp.save()
return HttpResponse("The data is saved in database")
else:
form = EmployeeForm()
return render(request, 'main/employee.html', {'form': form})
Step 6: Urls.py (main/urls.py)
Code:
from django.urls import path
from . import views
urlpatterns = [
path('', views.home, name="home"),
path('employee/', views.employee_data, name="employee")
]
Step 7: Urls.py (django_forms/urls.py)
Code:
"""
URL configuration for django_forms project.

The `urlpatterns` list routes URLs to views. For more information please see:
    https://docs.djangoproject.com/en/5.0/topics/http/urls/
Examples:
Function views
    1. Add an import:  from my_app import views
    2. Add a URL to urlpatterns:  path('', views.home, name='home')
Class-based views
    1. Add an import:  from other_app.views import Home
    2. Add a URL to urlpatterns:  path('', Home.as_view(), name='home')
Including another URLconf
    1. Import the include() function: from django.urls import include, path
    2. Add a URL to urlpatterns:  path('blog/', include('blog.urls'))
"""
from django.contrib import admin
from django.urls import path, include
from django.conf import settings
from django.conf.urls.static import static
from main import views

urlpatterns = [
    path('admin/', admin.site.urls),
    path('', include('main.urls'))
] + static(settings.MEDIA_URL, document_root = settings.MEDIA_ROOT)
Step 8: Create base.html (create templates/base.html)
Code:
<!doctype html>
<html lang="en">
<head>
<meta charset="utf-8">
<meta name="viewport" content="width=device-width, initial-scale=1">
<title>
{% block title %}{% endblock title %}
</title>
<link href="https://cdn.jsdelivr.net/npm/bootstrap@5.3.0/dist/css/bootstrap.min.css" rel="stylesheet"
integrity="sha384-9ndCyUaIbzAi2FUVXJi0CjmCapSmO7SnpJef0486qhLnuZ2cdeRhO02iuK6FUUVM" crossorigin="anonymous">
<!-- Custom CSS -->
<style>
/* Add your custom CSS styles here */
body {
background: linear-gradient(to right, #24c6dc, #514a9d); /* Example gradient background */
}
.navbar {
background: linear-gradient(to left, #19c0dd, #00223E); /* Example gradient background */
}
.navbar-brand {
color: #ff450d; /* Example navbar brand text color */
}
.nav-link {
color: #ffffff; /* Example navbar link text color */
}
</style>
</head>
<body>
<nav class="navbar navbar-expand-lg bg-dark border-bottom border-bottom-dark" data-bs-theme="dark">
<div class="container-fluid">
<a class="navbar-brand" href="{% url 'home' %}">EDUCBA</a>
<button class="navbar-toggler" type="button" data-bs-toggle="collapse" data-bs-target="#navbarNav"
aria-controls="navbarNav" aria-expanded="false" aria-label="Toggle navigation">
<span class="navbar-toggler-icon"></span>
</button>
<div class="collapse navbar-collapse" id="navbarNav">
<ul class="navbar-nav">
<li class="nav-item">
<a class="nav-link active" aria-current="page" href="{% url 'home' %}">Home</a>
</li>
<li class="nav-item">
<a class="nav-link" href="{% url 'employee' %}">Employee</a>
</li>
</ul>
</div>
</div>
</nav>
<div class="container">
{% block content %}
{% endblock content %}
</div>
<script src="https://cdn.jsdelivr.net/npm/bootstrap@5.3.0/dist/js/bootstrap.bundle.min.js"
integrity="sha384-geWF76RCwLtnZ8qwWowPQNguL3RmwHVBC9FhGdlKrxdiJJigb/j/68SIy3Te4Bkz"
crossorigin="anonymous"></script>
</body>
</html>
Step 9: Create employee.html (templates/main/employee.html)
Code:
{% extends 'base.html' %}
{% block title %}Employee{% endblock title %}
{% block content %}
<style>
/* Custom CSS for form styling */
form {
max-width: 400px;
margin: 0 auto;
}
.form-control {
margin-bottom: 10px;
}
.btn-primary {
background-color: #007bff;
border-color: #007bff;
}
.btn-primary:hover {
background-color: #0056b3;
border-color: #0056b3;
}
</style>
<h1 class="text-center">Employee</h1>
<form method="post" enctype="multipart/form-data">
{% csrf_token %}
{{ form.as_p }}
<button type="submit" class="btn btn-primary mt-2">Submit</button>
</form>
{% endblock content %}
Step 10: Settings.py (django_forms/settings.py)
Code:
# Application definition
INSTALLED_APPS = [
'main',
'crispy_forms',
'crispy_bootstrap5',
'django.contrib.admin',
'django.contrib.auth',
'django.contrib.contenttypes',
'django.contrib.sessions',
'django.contrib.messages',
'django.contrib.staticfiles',
]
CRISPY_ALLOWED_TEMPLATE_PACKS = "bootstrap5"
CRISPY_TEMPLATE_PACK = "bootstrap5"
MIDDLEWARE = [
'django.middleware.security.SecurityMiddleware',
'django.contrib.sessions.middleware.SessionMiddleware',
'django.middleware.common.CommonMiddleware',
'django.middleware.csrf.CsrfViewMiddleware',
'django.contrib.auth.middleware.AuthenticationMiddleware',
'django.contrib.messages.middleware.MessageMiddleware',
'django.middleware.clickjacking.XFrameOptionsMiddleware',
]
ROOT_URLCONF = 'django_forms.urls'
TEMPLATES = [
{
'BACKEND': 'django.template.backends.django.DjangoTemplates',
'DIRS': ['templates'],
'APP_DIRS': True,
'OPTIONS': {
'context_processors': [
'django.template.context_processors.debug',
'django.template.context_processors.request',
'django.contrib.auth.context_processors.auth',
'django.contrib.messages.context_processors.messages',
],
},
},
]
Step 11: Runserver
Code:
python manage.py runserverOutput:
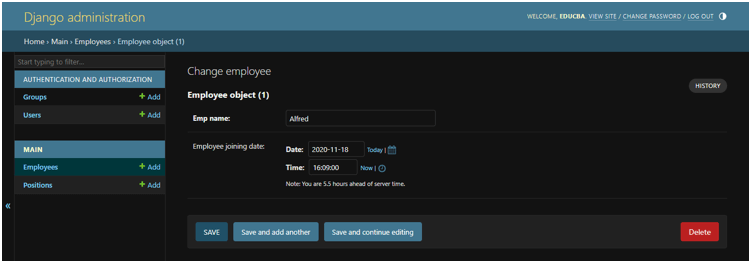
Once you submit the data, you can see your input data in the admin database.
Hence, with this procedure, you can create django forms for datetimefield.
Best Practices for Django DateTimeField
1. Use Timezone-Aware DateTime Objects
- Employ timezone-aware objects (through django.utils.timezone) to guarantee consistent time representation and eliminate timezone-related misunderstandings in your Django application.
- By consistently using timezone-aware datetime objects provided by django.utils.timezone, you can ensure the accuracy and clarity of time-related data in your Django project, avoiding complications arising from different time zones.
2. Set TIME_ZONE and USE_TZ in settings.py
- For developers: Remember to update the TIME_ZONE and USE_TZ settings in your project’s settings.py file to establish the default time zone and activate time zone support for your Django application.
- For project managers: Ensure the development team configures the TIME_ZONE and USE_TZ settings in settings.py to define the application’s time zone and enable timezone support for accurate date and time management.
3. Handle Timezone Conversion Consistently
- For consistent and accurate timezone conversions in your Django project, leverage the dedicated timezone utilities provided by django.utils.timezone when working with datetime objects.
- Employ Django’s comprehensive timezone conversion functions within django.utils.timezone to ensure consistent handling of all datetime object manipulations across different time zones and to avoid potential errors.
4. Use AutoNow and AutoNowAdd Sparingly
- While auto_now and auto_now_add options in DateTimeField offer convenience, use them selectively as they limit flexibility and might not be suitable for all scenarios. Consider implementing custom logic for more control over timestamp updates.
- While offering automatic timestamp updates, auto_now and auto_now_add can restrict your ability to manage timestamps precisely. Evaluate your specific needs carefully before employing them.
5. Display Timezone Information to Users
- Make it a practice to display the date/time and the time zone whenever showing time-related information to users, especially in a multi-timezone application.
- Remember to include the time zone information when displaying date/time values to users, particularly in your global app, to eliminate potential confusion.
Performance Considerations for Django DateTimeField
1. Indexing
- When to do it: Indexing is crucial for faster performance if you frequently filter or query based on date and time. Consider common queries like “find all orders placed on Monday” or “show all events happening next month.”
- What to index: Consider indexing specific parts of the DateTimeField that you often use in queries, like the year, month, or day. It can be more efficient than indexing the entire field.
2. Avoiding Excessive Timezone Conversions
- Minimize conversions: Convert datetime objects to the user’s preferred timezone only once, ideally at the point of display or when necessary for calculations.
- Store UTC internally: Consider storing datetime objects in UTC internally and converting them to the user’s timezone only when needed. It can simplify logic and reduce conversions.
3. Using Database-Level Functions
- Leverage efficiency: Database functions like DATE_ADD or EXTRACT are often more efficient than equivalent Python code. Explore the specific functions offered by your database and use them whenever possible.
- Be aware of limitations: Not all database functions are universally available, so check your documentation for compatibility.
4. Optimizing Query Complexity
- Keep it simple: Break down complex queries into smaller, more efficient ones. Avoid unnecessary joins, subqueries, or calculations within the query itself.
- Use filters effectively: Use filters like date__gte or time__lt instead of complex string comparisons for better performance.
5. Selecting Specific Fields
- When you only need specific information like the date or time, don’t retrieve the entire DateTimeField. This practice reduces the amount of data transferred and improves query speed.
Conclusion
The Django DateTimeField, a Django’s ORM system component, adeptly manages date and time information within Django applications. It streamlines storage and retrieval processes, which is pivotal for tasks like event scheduling and timestamping blog posts. The setup process entails installing Django, configuring settings, defining models, and migrating changes to the database. Adhering to best practices involves utilizing timezone-aware objects, establishing TIME_ZONE settings, ensuring consistent handling of timezone conversions, and optimizing performance through indexing and leveraging database-level functions.
FAQs
1. How do we filter objects based on DateTimeField values in Django?
Answer: To focus on specific objects based on their DateTimeField values, use queryset filters like filter(), exclude(), and get(). For instance:
events = Event.objects.filter(start_datetime__gte=timezone.now())2. Can I perform calculations with DateTimeField in Django?
Answer: Django’s DateTimeField and its friends (datetime module, timezone tools) let you perform calculations beyond filtering. Calculate differences, add/subtract durations, or extract specific components – all based on your particular needs and application logic.
3. How do I handle DateTimeField values in Django REST Framework serializers?
Answer: Django REST Framework provides built-in capabilities to handle date and time data within serializers. You can leverage fields like DateTimeField for standard serialization/deserialization and SerializerMethodField for incorporating custom logic. Additionally, you have the flexibility to tailor the behavior of DateTimeField using various serializer features.
Recommended Articles
We hope that this EDUCBA information on “Django DateTimeField” was beneficial to you. You can view EDUCBA’s recommended articles for more information.
