Updated May 4, 2023

Introduction to Django Forms
For a web application, creating forms is a critical capability; These forms act as the key source through which the user keyed-in input enters into the application. This user-keyed-in input could be further validated and processed in a precise manner. These are among the key capabilities in form processing. Django offers a classified set of methods for formulating the form entities.
How to Create a Django Form?
The step to Create a Django form is explained below:
1. Create a forms.py file in the application
The forms.py file is similar to models.py; all fields used in the form will be declared here under a form class.
forms.py
from django import forms
class Valueform(forms.Form):
    user = forms.CharField(max_length = 100)
2. Create a View for The Form
A Django view method is created for the form in the views.py file. An object for the form class is created here. This object is used as a value for the context dictionary in the template rendering.
views.py
from django.shortcuts import render
from django.http import  HttpResponse
from Django_app1.forms import Valueform
defform_view(request_iter):
    form = Valueform()
    return  render(request_iter,'Form_Handeling.html', {"form": form})
3. Formulate an HTML file for displaying the form
An HTML file must be created in the templates directory to display the form. Here the file is template tagged using the below tag. Here “as_p” is used for better designing of the form elements. The {% csrf_token %} line attests to the internal security verification performed by django.
Example
<!DOCTYPE html>
<html lang="en" dir="ltr">
<head>
<meta charset="utf-8">
<title>Django App1</title>
</head>
<body>
<h1><u> FORMS HANDELING IN DJANGO </u></h1>
<div style = "max-width:470px;">
{{ form.as_p }}
{% csrf_token %}
<input type="submit" class="btnbtn-primary" value="submit">
</div>
</body>
</html>
4. Tag the view in urls.py file
This is the process of creating a url for the view.
- Import the library from django.conf.urls import URL
- Declare a url entry in the urlpatterns list
url(url_path,view_to_be_tagged,name_for_this_view)Example
from django.contrib import admin
from django.conf.urls import url
from Django_app1 import views
urlpatterns = [
    url(r'^$',views.index,name='index'),
    url(r'formpage/',views.form_view,name='form'),
    url(r'admin/', admin.site.urls), ]
Output:
All Form Fields Available in Django Forms
Form fields available in django forms are as given below:
| Field type | Django form field type | HTML output | Description | Django Widget |
| Boolean | forms.BooleanField() | <input type=’checkbox’> | Creates a Boolean field | forms.widgets.CheckboxInput() |
| Boolean | forms.NullBooleanField() | <select> <option value=”1″ selected=”selected”> Unknown </option> <option value=”2″> Yes </option> <option value=”3″> No </option> </select> |
Very similar to Boolean fields but also allows unknown value | forms.widgets.NullBooleanSelect() |
| Text | forms.CharField() | <input type=”text”> | Creates a simple character field | forms.widgets.TextInput() |
| Text | forms.EmailField() | <input type=”email”> | Creates a field for email Input | forms.widgets.EmailInput() |
| Text | forms.GenericIPAddressField() | <input type=”text”> | Allows insertion of the IP address | forms.widgets.TextInput() |
| Text | forms.RegexField( regex=’regular_expression’) | <input type=”text”> | A basic character field, but here validation happens on the server side | forms.widgets.TextInput() |
| Text | forms.SlugField() | <input type=”text”> | A basic character field that allows only lowercase values to be entered | forms.widgets.TextInput() |
| Text | forms.URLField() | <input type=”url”> | Allows insertion of url | forms.widgets.URLInput() |
| Text | forms.UUIDField() | <input type=”text”> | A basic character field but server side, the django validates whether the values are convertible to a UUID(Universal unique ID) | forms.widgets.TextInput() |
| Text | forms.ComboField(fields=[field_type#1,field_type#2]) | <input type=”text”> | Works just like CharField, Heredjango form fields are enforced with data pass rules on the server side. | forms.widgets.TextInput() |
| Text | forms.MultiValueField(fields=[field_type#1, field_type#1]) | <input type=”text”> | Allows creating form fields in a custom manner. | forms.widgets.TextInput() |
| Text / Files | forms.FilePathField( path=’directory’) | <select> <option value=”directory/file_1″> file_1 </option> <option value=”directory/file_2″> file_2 </option> <option value=”directory/file_3″> file_3 </option> </select> |
This field is used for holding the path of the directory | forms.widgets.Select() |
| Files | forms.FileField() | <input type=”file”> | Creates a field through which the user can attach a file to the form | forms.widgets.ClearableFileInput() |
| Files | forms.ImageField() | <input type=”file”> | Creates a field through which the user can attach an image to the form | forms.widgets.ClearableFileInput() |
| Date/time | forms.DateField() | <input type=”text”> | It works like a basic character field, but the django setup validates whether the inserted value is of Date format on the server end. (e.g. 2020-11-23, 11/23/20). | forms.widgets.DateInput() |
| Date/time | forms.TimeField() | <input type=”text”> | It works like a basic character field, but the django setup validates whether the inserted value is of time format on the server end. (e.g. 15:41:32, 11:44). | forms.widgets.TextInput() |
| Date/time | forms.DateTimeField() | <input type=”text”> | It works like a basic character field, but the django setup validates whether the inserted value is of datetime format on the server end. (e.g. 2020-11-15 12:30:59, 11/15/20 13:30). | forms.widgets.DateTimeInput() |
| Date/time | forms.DurationField() | <input type=”text”> | It works like a basic character field, but on the server end, the django setup validates whether the inserted value is to be converted to time delta. | forms.widgets.TextInput() |
| Number | forms.IntegerField() | <input type=” number” | On the server end, django verifies whether the input field is a valid integer. | forms.widgets.NumberInput() |
| Number | forms.DecimalField() | <input type=” number” | On the server end, django verifies whether the input field is a valid decimal. | forms.widgets.NumberInput() |
| Number | forms.FloatField() | <input type=” number” | On the server end, django verifies whether the input field is of float type. | forms.widgets.NumberInput() |
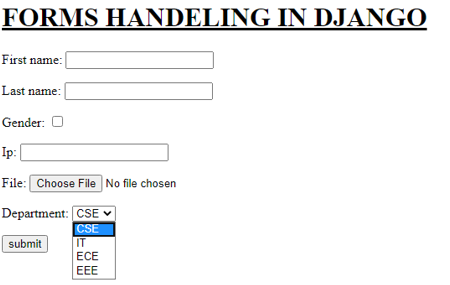
The forms.py file below contains several among the form mentioned above fields declared and executed as an application.
forms.py
#-*- coding: utf-8 -*-
from django import forms

class Valueform(forms.Form):
   first_name = forms.CharField(max_length = 100)
   last_name = forms.SlugField()
   gender =  forms.BooleanField()
   Ip = forms.GenericIPAddressField()
   file =  forms.FileField()
   department = forms.ChoiceField(choices = (('1','CSE'),('2','IT'),('3','ECE'),('4','EEE')))
Output:
Processing Form Fields in View
The value entered in the form fields can be captured and processed using the below form handling code in the view method for the form
views.py
from django.shortcuts import render
from django.http import  HttpResponse
from Django_app1.forms import Valueform
def form_view(request_iter):
    form = Valueform()
    if request_iter.method == "POST":
       value = Valueform(request_iter.POST)
       if value.is_valid():
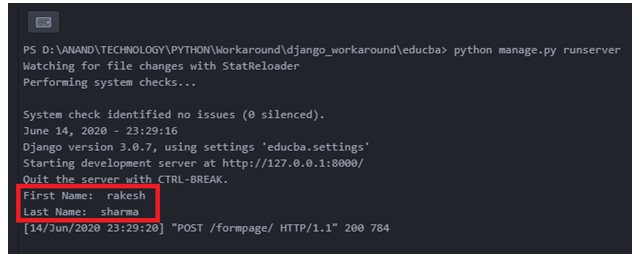
          print("First Name: ",value.cleaned_data['first_name'])
          print("First Name: ",value.cleaned_data['last_name'])
    return  render(request_iter,'Form_Handeling.html', {"form": form})
So when a ‘POST’ is submitted, the value associated with the POST request is captured into an object by referring to the form class declared in forms.py. The value keyed from the field is captured using the cleaned_data[] argument of this object and the name of the corresponding field. In this example, the captured value is printed onto the console. In real-time cases, further processing will be done to these values, like DB storage or server validation.
Output:
Recommended Articles
We hope that this EDUCBA information on “Django Forms” was beneficial to you. You can view EDUCBA’s recommended articles for more information.


