Updated May 23, 2023

Introduction to Django jsonfield
JSON has now become a very common datatype across software platforms. The flexibility of JSON fields helps to fetch and depict the data quickly, and processing can also be performed in a sophisticated manner with JSON fields. Even large applications like Amazon Textract utilize JSON fields to retrieve the output. These are among the critical needs of JSON fields. These fields are primarily used in today’s market, and Django also generates them for forms and models. Almost all the database backends supported by Django can have these jsonfields. Below, we discuss the syntax and process of adding these JSON fields to the model. The parameter setting the fields as all allows the model to inherit all the fields used in the model described. In this topic, we are going to learn about Django jsonfield.
Syntax:
Jsonfield = models.JSONField()The above-given syntax allows the creation of a model field sophisticatedly. The models class inherits and uses the JSONField() method within the models class. You can associate arguments such as Null and Null-based values with this JSONField() method. A variable maps the Created class. From there on, the mapped variable will be a responsible field for this Json field model.
Create a Django jsonfield
Below are the steps to create a Django jsonfield:
1. Changes in Models.py file
We generate the models.py file with a declared JSON field and the other fields present. We can notice the model has a large variety of fields. A form will be associated with this model schema. The form will integrate with the fields of this corresponding model through a JSONField import. This is how the import process works for the models. Very importantly, the JSON field is allocated with a nullable value, which allows all the non-value records for this field to hold a default value of Null. Removing this argument from the field may throw an error in the migration process.
Ex: (models.py)
from django.db import models
from django.contrib.auth.models import User
# Create your models here.
class Bride(models.Model):
    name = models.CharField(max_length=200,null=True)
    age = models.IntegerField(null=True)
    thegai = models.CharField(max_length=200,null=True)
    State =  models.CharField(max_length=50,null=True)
    District = models.CharField(max_length=50,null=True)
    Address = models.TextField(null=True)
    Phone = models.BigIntegerField(null=True)
    profession = models.CharField(max_length=200,null=True)
    salary = models.BigIntegerField(null=True)
    Under_Graduation_Degree = models.CharField(max_length=200,null=True)
    Under_Graduation_college = models.CharField(max_length=400,null=True)
    Post_Graduation_Degree = models.CharField(max_length=200,null=True)
    Post_Graduation_college = models.CharField(max_length=400,null=True)
    Rasi = models.CharField(max_length=200,null=True)
    Nakshatra = models.CharField(max_length=200,null=True)
    Jsonfield  =  models. JSONField(null=True)
    def __str__(self):
        return self.name
2. Changes in Forms.py file
I create the forms.py file and imported the model from models.py here. In this case, I import the form with the model details and then allocate the model from there. The model allocation will be taking place within the class Meta: statement. For example, model = Bride will allow the Bride class to be associated here. The parameter of setting the fields as all enable the model to inherit all the fields used in the model described.
Ex: (forms.py)
from django import forms
from .models import Bride
from django.contrib.auth.forms import UserCreationForm
from django.contrib.auth.models import User
class Valueform(forms.ModelForm):
 #   Rasi = forms.ChoiceField(choices = Rasi_CHOICES)
    class Meta:
        model = Bride
        fields = "__all__"
3. Create a view for the form
To render the form with the JSON field listed in it, you need to create a Django view that acts as middleware. In this view, you handle the form submission and save the form when the submit button clicks. We can notice from the below code of views that the views.py first imports render from the shortcuts of the Django library. This renders import will be very useful in rendering the html file to the browser. The views method imports the HTTP response. Here, the instantiation of the Value form will occur. You will perform the instantiation on a variable named form. On top of the instantiation, the value of the form returned is verified for validity. If the value of the form is valid, then the save process will be performed. The save process will take place with the form.save() method. Next, we will fetch and store the details of the currently logged-in user on the form. This is how the form storage will take place. Once we successfully store the form, we will render it onto the browser using the render method.
Ex: (views.py)
from django.shortcuts import render
from django.http import  HttpResponse
from Django_app1.forms import Valueform
def form_view(request):
    form = Valueform(request.POST or None)
    if form.is_valid():
        post = form.save()
        post.Creator = request.user
        print('Creator user stored',request.user)
        post.save()
    return  render(request,'form.html', {"form": form})
4. Formulate an HTML file for displaying the form
An HTML record desires to be created within the template listing for showing the shape; right here, the record is tagged with the use of the under the tag,
{{ form.as_p }}and “as_p” is used for higher designing of the shape elements. The line testifies to the internal security verification accomplished through Django.
Form.html:
<!DOCTYPE html>
<html style="font-size: 16px;">
<head>
<title>form</title>
{% load static %}
<link rel="stylesheet" href="{% static 'admin/css/Formpage.css' %}" media="screen">
</head>
<body class="body">
<nav class='navbar'>
<div class='navbar_div'>
<a class="navbar" onclick="redirect2()" >Home! </a>
<a class="navbar" onclick="redirect2()" >Contact</a>
</div>
</nav>
<div class="body">
<br>
{% block content %}
<form method="POST" class='formarea'>
<div class='formdiv'>
{{ form.as_p }}
{% csrf_token %}
<input type="submit" class='button' value="submit">
</div>
</form>
{% endblock content %}
</div>
<script>
function form1() {
window.location.href = "http://127.0.0.1:8000/form";
}
function redirect1() {
window.location.href = "http://127.0.0.1:8000/Mainpage";
}
function redirect2() {
window.location.href = "http://127.0.0.1:8000/";
}
</script>
<script src="https://code.jquery.com/jquery-3.4.1.slim.min.js" integrity="sha384-J6qa4849blE2+poT4WnyKhv5vZF5SrPo0iEjwBvKU7imGFAV0wwj1yYfoRSJoZ+n" crossorigin="anonymous"></script>
<script src="https://cdn.jsdelivr.net/npm/popper.js@1.16.0/dist/umd/popper.min.js" integrity="sha384-Q6E9RHvbIyZFJoft+2mJbHaEWldlvI9IOYy5n3zV9zzTtmI3UksdQRVvoxMfooAo" crossorigin="anonymous"></script>
<script src="https://stackpath.bootstrapcdn.com/bootstrap/4.4.1/js/bootstrap.min.js" integrity="sha384-wfSDF2E50Y2D1uUdj0O3uMBJnjuUD4Ih7YwaYd1iqfktj0Uod8GCExl3Og8ifwB6" crossorigin="anonymous"></script>
</body>
</html>
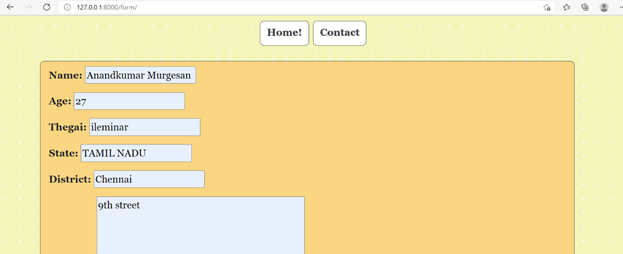
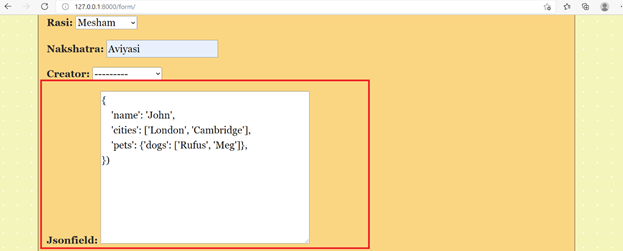
Output:
Conclusion
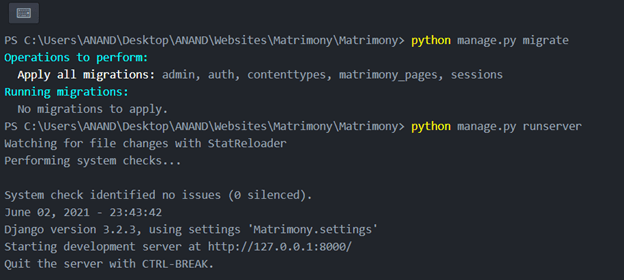
From the abovementioned article, we can understand how to create a JSON field in Django. Moreover, we can examine how to map this field onto a form and process it in the associated view by setting up the form. We also generate the HTML code linked to these forms. Finally, we launch the site on port 8000 and view it in a browser.
Recommended Articles
We hope that this EDUCBA information on “Django jsonfield” was beneficial to you. You can view EDUCBA’s recommended articles for more information.


