Updated April 14, 2023
Introduction to Docker Container Linking
Docker container linking is used to link multiple containers to each other and share connection information. Data or information of a source container can be shared with a recipient container when containers are linked which means the recipient container can see selected information of the source container. It is a legacy feature of Docker and it may be removed in future versions. It was the main way of communication between containers before introducing the Docker Networking feature by Docker in Docker version 1.9. However, it is good to know about container linking as there might be some legacy code running using it.
How Docker Container Linking Works?
Understand the Importance of Naming Convention: Docker depends heavily on the names of our containers to establish links. When we create or run a container, we can assign a name to it. If we do not assign any name, docker daemon assigns any random name automatically to the container. It is recommended to give a name to the containers as it is useful in below two scenarios: –
- It is easier to remember the name of the container if we give the name to the containers as per its functions, for example, a container running web application can be named as ‘web’, a container running db should have named as ‘db’, etc.
- It works as a reference point for Docker that allows it to refer to other containers, for example, we can specify the ‘web’ container to link to the ‘db’ container.
If we don’t know the name of the container, then we can run the ‘dockerps’ command or ‘docker inspect’ command to know the name of the container. Ctainer names must be unique which means we can not assign the same name to the two different containers. If we want to assign the same name to any other container, we must delete the existing container with that name.
How Communication Works Across Links?
When we configure a link, we create a secure channel between a source container and a recipient container to discover each other and transfer information about one container to another container. So that the recipient container can access the information about the source container. Behind the scene, Docker creates a secure tunnel between the containers and we do not have to expose any ports externally on the container. Docker shares connectivity information for the source container to the recipient container in below two ways: –
- By sharing environment variables
- By updating the /etc/hosts file
1. By Sharing Environment Variables
When we create links, Docker creates many environment variables automatically in the target container based on the ‘–link’ parameters passed. It includes variables that are set to the ENV directive in the source container’s Dockerfile and also the variables that are passed using ‘-e’, ‘–env’, and ‘–env-file’ options while creating the source container.
These variables are important as it allows the target container to the programmatic discovery of information related to the source container. We must remember one thing about the environment variable is that if the source container restarted by chance, old IP addresses stored in the environment variables are not updated automatically with the new IP address of the container.
2. By Updating the /etc/Host File
Docker makes a host entry for the source container to the ‘/etc/hosts’ file as well. It adds two entries in the ‘/etc/hosts’ file, the first entry for the recipient container that uses container ID as a hostname, and the second entry uses the link alias to reference the IP address of the source container. The IP address of the source container gets updated automatically with a new IP address if the source container restarted, so it is recommended to use the ‘/etc/hosts’ file to resolved IP addresses of linked containers.
Let’s understand with an example:
- First, create a source container named ‘my-db’ using ‘mysql’ Docker image as below:
$docker run -d --name my-dbmysql sleep 3600
- Next, create a web container named ‘my-web’ using ‘nginx’ Docker image and link the ‘my-db’ container with alias ‘db’ to this container as below: –
$docker run -d -p --name my-web --link my-db:dbnginx
- Let’s check the created link in the ‘my-web’ container using below command:
$docker inspect -f "{{ .HostConfig.Links }}" my-web
Explanation: In the above example, we can see that the link ‘[/my-db:/my-web/db]’ has been created between ‘my-db’ and ‘my-web’ containers. Here, ‘db’ is the alias for the link name, however, it is optional; if we do not provide an alias, it will take the container name as an alias that is used to create the environment variables.
- Now, check the created environment variables in the ‘my-web’ container using below command:
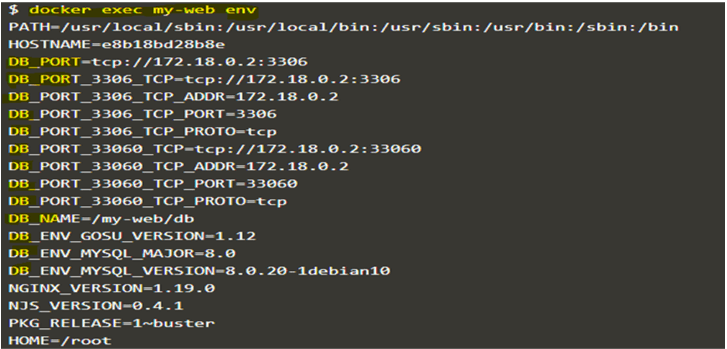
$docker exec my-web env
Explanation: In the above snapshot, we can see many variables start with DB_ that is the alias for the link. These are the variables that are shared from the source container to the recipient container. If we create a link with alias ‘my-db’ for the link, then the environment variables start with ‘my-db_’.
- Next, check the ‘/etc/hosts’ file entries of the ‘my-web’ container using below command:
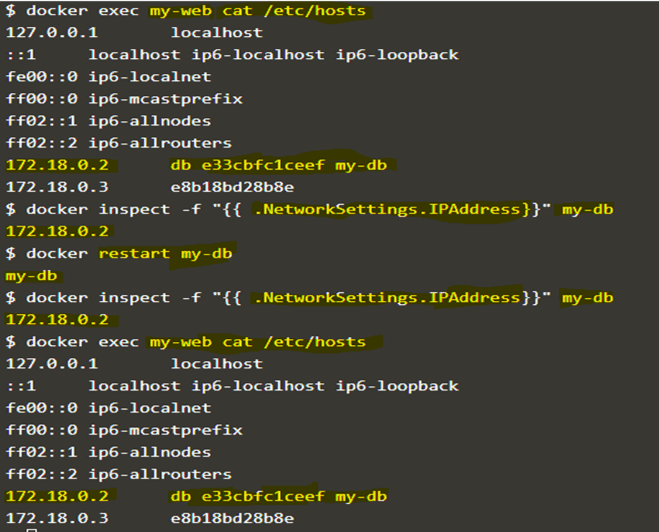
$docker exec my-web cat /etc/hosts

$docker inspect -f "{{ .NetworkSettings.IPAddress}}" my-db

$docker restart my-db

$docker inspect -f "{{ .NetworkSettings.IPAddress}}" my-db

$docker exec my-web cat /etc/hosts
Explanation: In the above snapshot, checked the ‘/etc/hosts’ file entry and we can see the IP Address entry of the ‘my-db’ container and the ‘db’ for the link name. We have restarted the ‘my-db’ container and check the IP address and it is the same as earlier if IP Address of the ‘my-db’ container gets changed then that will be updated in the ‘/etc/hosts’ file, in above case IP Address did not change so when we checked the entries of the ‘/etc/hosts’ file once again it is the same.
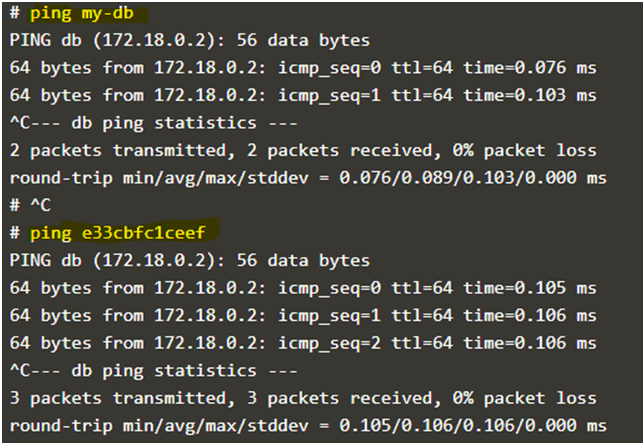
- Finally, we try to ping the ‘my-db’ container using the link alias, container name, and container ID as below:
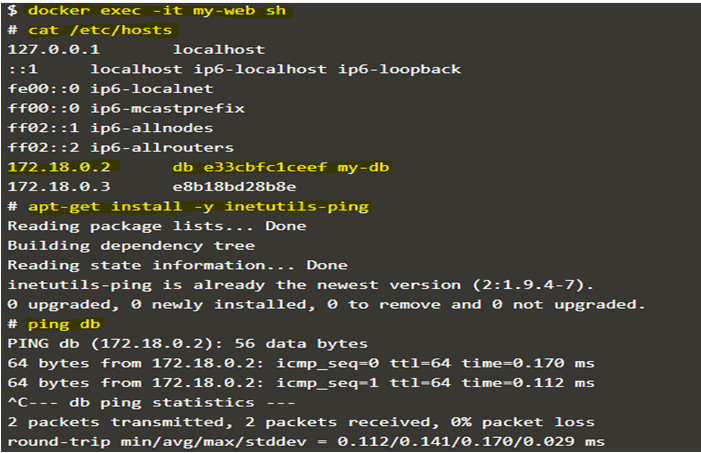
$docker exec --it my-web sh

#apt-get update

#apt-get install -y inetutils-ping

#ping db

#ping my-db

#ping <container_ID>
Explanation: In the above snapshot, we are able to ping the source container i.e. ‘my-db’ from the recipient container i.e. ‘my-web’, also able to ping the alias for the link and container ID.
- Let’s create two more web containers ‘my-web2’ and ‘my-web3’ and link it to the ‘my-db’ container as we can link multiple containers to the source container.
$docker run -d -P --name my-web2 --link my-db:dbnginx

$docker run -d -P --name my-web3 --link my-db:dbnginx
Recommended Articles
This is a guide to Docker Container Linking. Here we also discuss the introduction and how docker container linking works? along with different examples and its code implementation. You may also have a look at the following articles to learn more –
