Updated April 18, 2023
Introduction to Docker EXPOSE
Docker EXPOSE is a Dockerfile directive or instruction specified in the Dockerfile to inform that the image created by this Dockerfile will listen on this port when running a container. It does not expose the mentioned port; rather, it is just a type of documentation that tells a person who runs the container about the port that needs to be exposed or published to allow communication to the container from outside. We have to use the ‘-p’ option while running the container to publish the port so that the application hosted inside the container can be accessed externally.
Syntax:
Here is the syntax for the ‘EXPOSE’ instruction in Dockerfile:
………..

EXPOSE <port> [<port>/<protocol>…]
We have to specify at least one port. The protocol is optional, we can specify whether the application is going to listen on TCP or UDP port, and protocol is not specified, then TCP is going to use by default.
How EXPOSE works in Docker?
As we know, it is only used for documentation; there is no special functionality included in this instruction which means if we don’t include this instruction in the Dockerfile, the image created using Dockerfile is still going to work in the same way, but yes, if Docker image is created by someone else and the container is getting created by someone else then who is going to create the container will get confused that on which port application is listening.
Example of Docker EXPOSE
Given below is the example of Docker EXPOSE:
We will create two nginx images with and without the ‘EXPOSE’ instruction mentioned in the Dockerfile and try to access the nginx within the container, from different containers, and from the host.
Step 1: First thing, we need to create two Dockerfile, we will mention the ‘EXPOSE’ instruction in the first Dockerfile, and we will create the second one without the ‘EXPOSE’ instruction.
Dockerfile with ‘EXPOSE’ instruction:
Code:
FROM ubuntu

RUN apt-get update && apt-get install -y nginx

RUN apt-get install -y curl

EXPOSE 80
Dockerfile without ‘EXPOSE’ instruction:
Code:
FROM ubuntu

RUN apt-get update && apt-get install -y nginx

RUN apt-get install -y curl
Step 2: Let’s build Docker images using the above two Dockerfile.
Code:
docker build -t nginx:expose .

docker build –t nginx:no_expose .

docker image ls
Output:
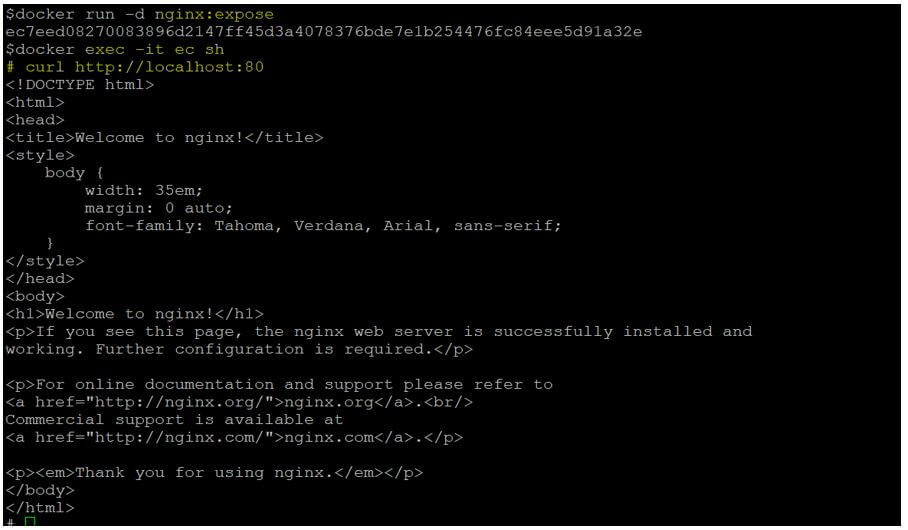
Step 3: Now, start a container using the ‘nginx:expose’ image, connect to it, and access the default page of nginx.
Code:
docker run -d nginx:expose

docker exec -it <container_ID> sh

#curl http://locahost:80
Output:
In the above snapshot, we can see that the nginx default page is accessible.
Step 4: Let’s check the IP address of this container so that we can connect this from a different container.
Code:
#ip addr
Output:
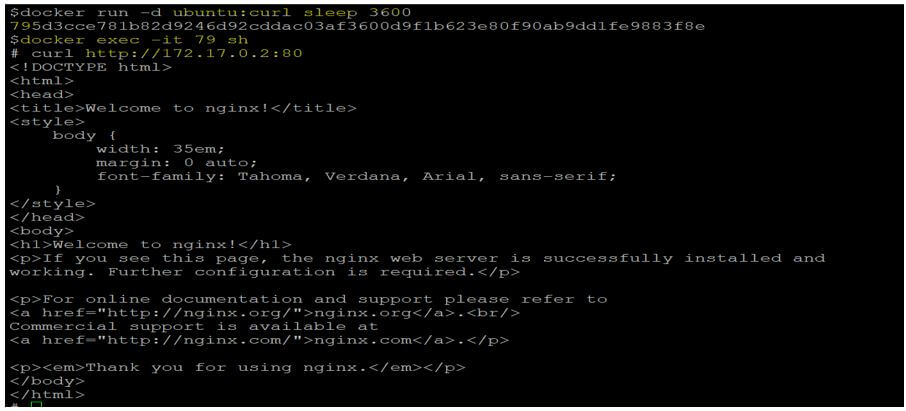
Step 5: Let’s create another container that has curl already installed and access the nginx default page using the IP address of the nginx:expose container.
Code:
docker run -d  ubuntu:curl sleep 3600

docker exec -it <container_id> sh

#curl http://<IP_Address>:80
Output:
In the above snapshot, we can see that we can successfully access the nginx default page running from a different container.
Note: The ‘ubuntu:curl’ image has been created using the below Dockerfile:
FROM ubuntu
RUN apt-get update && apt-get install curl -y
Step 6: Finally, let’s try to access it from the host.
Code:
curl http://localhost:80
Output:
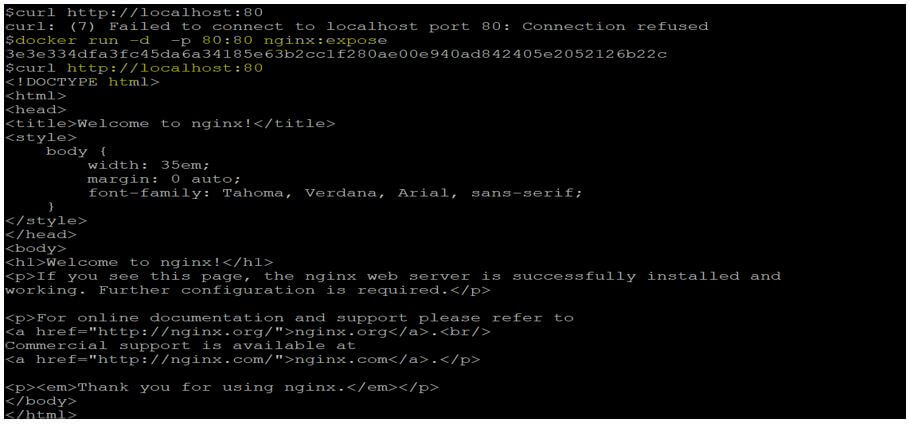
Step 7: So, we are unable to access the nginx default page because the port has not been exposed while running the container in step 3. Let’s run another container with the same image ‘nginx:expose’ but expose the port 80 this time.
Code:
docker run -d -p 80:80 nginx:expose
Output:
In the above snapshot, we can see that we can access the nginx default page from the host on port 80 as well.
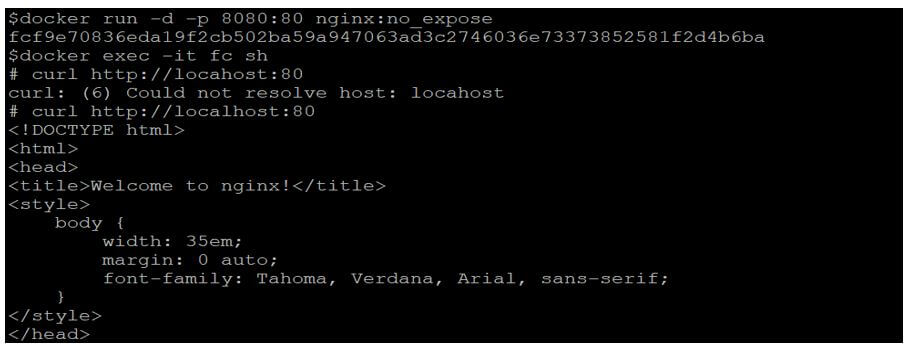
Step 8: Let’s create a new container using the ‘nginx:no_expose’ image and expose the port 8080 on the host as we have already used port 80.
Code:
docker run -d -p 8080:80 nginx:no_expose

docker exec -it <container_ID> sh

#curl http://locahost:80
Output:
In the above snapshot, we are able to access the default page from inside the container.
Step 9: Let’s check the container’s IP address and access it from a different container that we have used above.
Code:
#ip addr
Output:
Code:
docker exec -it <container_ID> sh
Output:
In the above snapshot, we can see that the nginx default is accessible from the different container as well.
Step 10: Finally, access it from the host, but this time we have to use port 8080.
Code:
curl http://localhost:8080
Output:
Advantages of Docker EXPOSE
Given below are the advantages mentioned:
- It is a useful instruction to document the ports in the Dockerfile itself, on which that application will listen if a container is got created using that image.
- It clarifies the confusion that might occur between who has created the Docker image and who is going to run the container using that image.
Conclusion
Sure enough, the above scenario has clarified that the ‘EXPOSE’ instruction is only used for documentation in the Dockerfile as we have seen that both containers are behaving in the same way in terms of functionality whether we have mentioned the ‘EXPOSE’ instruction or not.
Recommended Articles
This is a guide to Docker EXPOSE. Here we discuss the introduction, how EXPOSE work in docker? Example and advantages, respectively. You may also have a look at the following articles to learn more –


