Updated April 13, 2023

Introduction to Docker Start
The ‘docker start’ is a Docker command to start one or more stopped containers. We can also use this container to start the container that we have created using the ‘docker create’ command or the containers that are in ‘created’ status because the ‘docker create’ command creates the container but it does not start automatically.
For example, if we have created an nginx container and exposed port 80 externally but that container is going to serve until it is started using the ‘docker start’ command. This command has also a few flags to get the interactive console, restore from the checkpoint, attach STDOUT/STDERR, etc.
Syntax:
docker start [OPTIONS] CONTAINER [CONTAINER...]
Options:
- attach, -a: It is used to attach STDOUT/STDERR and forward signals.
- checkpoint: It is used to restore the container from a specific checkpoint(experimental).
- checkpoint-dir: We can use a custom checkpoint storage directory using this option.
- detach-keys: Override the key sequence for detaching a container.
- interactive, -i: It is used to attach the container’s STDIN.
- help: It is used to get help for this command as shown below.
Command:
docker start --help
How does Start Command work in Docker?
The ‘docker start’ works in the same way other commands work in Docker. When we run this command from the CLI with container name passed as an argument, Docker CLI makes an API call to the Docker daemon and daemon starts that container if the container is in the stopped state or in the created state. We can not expose port, give it a name, attach volumes, etc. when starting the container if it is not configured while running or creating that container. This command is simply going to start the container, however, we can use a few flags to control few things like connecting to the container once it is started, attaching STDOUT/STDERR, etc.
Examples of Docker Start
Given below are the examples mentioned:
Example #1
Start One or Multiple Stopped Containers.
Step 1: Let’s create an nginx container using the below command and access the default page using curl.
Command:
docker run -d -p 80:80 --name my-nginx nginx:alpine
curl http://localhost:80
Step 2: Now, stop this the container using the ‘docker stop’ command and try to access localhost.
Command:
docker container stop my-nginx
curl http://localhost:80
Step 3: Let’s start the container again but this time using the ‘docker start’ command as we want to just start the stopped container, don’t want to create a new one.
Command:
docker start my-nginx
In the above example, we can see that the default page is again accessible after starting the container.
Step 4: Let’s assume we have multiple containers in exited status that we want to start using a single command. We can do so as shown below:
Command:
docker start <container_name1> <container_name2> <container_name3>
Or
docker start $(docker ps -q -f “status=exited”)
In the above snapshot, we can see that we have 3 stopped containers and all stopped containers have been successfully started.
Note: The command shown in the snapshot will only work if the container status is ‘exited’, we have to use the first command mentioned above if the container is in a different state or change the status in the command.
Example #2
Create a Container and then start it.
Step 1: Let’s create a container using the below command.
Command:
docker create -p 80:80 –name my-nginx2 nginx:alpine
docker ps -f ‘status=created’
curl http://locahost:80
Step 2: Now, start the container as below and try to access it again.
Command:
docker start my-nginx2
curl http://localhost:80
Example #3
Attach the Container STDOUT/STDERR while starting it.
Step 1: Let’s create a ‘hello-world’ container as shown below and try to start it without any flag.
Command:
docker create hello-world
docker start <container_ID or container_name>
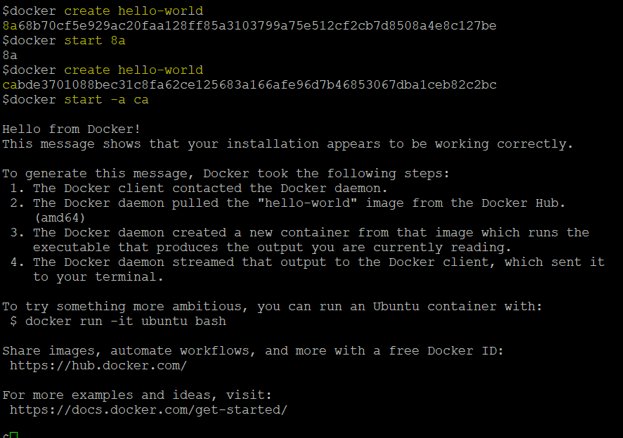
Step 2: We can see that there is no output on the screen after starting the container. Let’s create another container and start it with the ‘-a’ or ‘–attach’ flag.
Command:
docker create hello-world
docker start -a <container_ID or container_name>
In the above snapshot, we can see that we got the output on the STDOUT when we run the ‘docker start’ command with the ‘-a’ option. We also get the error if the container throws an error while starting it.
Example #4
Start Container with the Checkpoint.
Step 1: First thing first, we need to install CRIU (Checkpoint/Restore in User space) to work with Docker checkpoints.
We can simply install CRIU using the below command:
Command:
sudo apt-get install criu
Step 2: Docker checkpoint only works in experimental mode for Docker, so let’s enable experimental mode by editing daemon.json file as shown below and restart the docker service.
Command:
sudo vi /etc/docker/daemon.json
sudo systemctl restart docker
Step 3: Let’s run a container using the ‘ubuntu’ Docker image using the below command.
Command:
docker run -d --name checkpoint-cont --security-opt seccomp:unconfined ubuntu /bin/sh -c 'i=0; while true; do echo $i; i=$(expr $i + 1); sleep 5; done'
In the above example, we have created a container named ‘checkpoint-cont’ and it starts printing counting from 0 in every 5 secs that we can see in the logs and it is increasing.
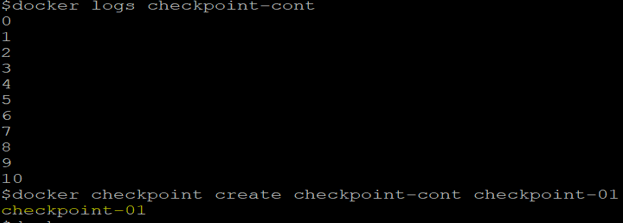
Step 4: Let’s create a checkpoint named ‘checkpoint-01’ for this container using the below command.
Command:
docker logs checkpoint-cont
docker checkpoint create checkpoint-cont checkpoint-01
In the above snapshot, we can see that the container has already printed to 10 before creating a checkpoint.
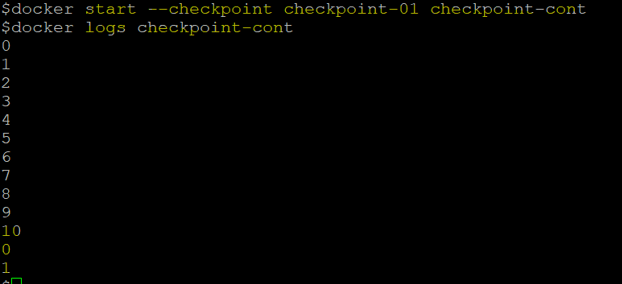
Step 5: Finally, start the container using the ‘docker start’ command with the ‘–checkpoint’ option as shown below.
Command:
docker start --checkpoint checkpoint-01 checkpoint-cont
In the above snapshot, we can see that the counting has started where it left before creating the checkpoint.
Note: The container is stopped after creating a checkpoint.
Advantages
Given below are the advantages mentioned:
- We can start the stopped or created container using Docker Start easily.
- We can also start any container from the checkpoint that we have created earlier using the ‘docker create checkpoint’.
- We can also start a new container with the checkpoint of any different container using the ‘—checkpoint—dir’.
Conclusion
This command is really useful in starting containers from checkpoints, however, the checkpoint function is only available in the experimental mode so we need to enable experimental view before using this function.
Recommended Articles
This is a guide to Docker Start. Here we discuss the introduction and how start command works in docker along with different examples. You may also have a look at the following articles to learn more –


