Updated July 3, 2023

Introduction to Drop Down List in ASP.NET
We all must have seen various web pages with drop-downs consisting of multiple options.it is usually a list with options. In the registration forms or while entering our details while signing on any page, we fill our details, there we can see the drop-down list with countries, states, areas, etc. The developer usually uses Drop-down List control to give a chance to select one option out of multiple options shown in the drop-down list or listed items. In this topic, we will learn about the drop-down list in asp.net. It is used to store multiple items. The drop-down list control is also named Combo box control.
Syntax
<asp:DropDownList ID="Trainings" runat="server">
<asp:ListItem Enabled="true" Text= "Select Subject" Value= "-1"></asp:ListItem>
<asp:ListItem Text= "Science' Value="1"><asp:ListItem>
< asp:ListItem Text= "Politics" Value="2"><asp:ListItem>
</asp:DropDownList>
Properties of Drop Down List in ASP.NET
Let us see some of the important properties of the drop-down list in ASP .NET.
- DropDownList1.Items.Count: It provides the total number of options or items in the drop-down list.
- DropDownList1.Items.Add(“ItemName”): Suppose we want to add some new item; this property is useful for adding the item to the drop-down list.
- DropDownList1.Items.Remove(“ItemName”): It will help to remove the item from the drop-down list.
- DropDownList1.Items.Insert(int index, “ItemName”): If we want the item added at a specific position, this property helps add a new item at a specific position in the drop-down list control.
- DropDownList1.Items.RemoveAt(int index): it will remove the specific item from a specific position (index) from the drop-down list control.
- DropDownList1.Items.Clear(): if we don’t want all the items, we want to add another, or maybe we want to change the items from the drop-down list.so it’s better to clear all the items first. This property clears all the provided items from the drop-down list.
- DropDownList1.SelectionItem.Text: this is one of the important properties because it will return the text value in the selected items in the drop-down list.
- DropDownList1.SelectedIndex: index will always start from zero. When we select any item from the drop-down list, it is associated with the index. This property will return the position of the selected item, that is, its index value.
- DropDownList1.DataSource: it is mostly the DataTable or DataSet.
- DropDownList1.DataValueField: It will bind the value to the drop-down list, which will be visible in the drop-down list.
- Item: it will collect the items from the drop-down list.
- AutoPostBack: Its value is ‘true’ or ‘false.’ True represents that form is posted back automatically to the server when the user changes the drop-down list selection.
- DataTextField: values will be visible to the end-users.it is used to set the text in the Drop-down list control.
- DataValueFeild: This is used to set the column’s name as a value in the drop-down list. This value is not visible to the end user.
How to create a Drop-down List in ASP.Net?
Let us see how we can create a Drop-down list in ASP .NET with the help of the below steps.
Step 1:
Open Visual Studio 2015 and create a new web form.
Step 2:
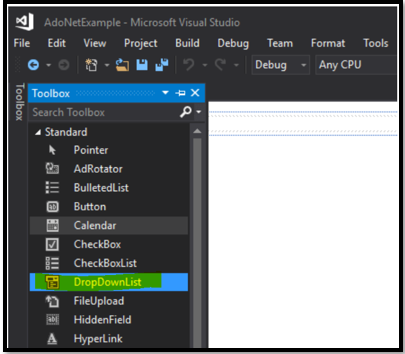
Now we must drag the drop-down list from the toolbox and drop it in the form.
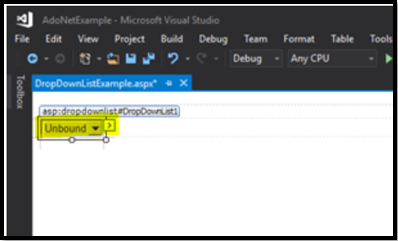
After dragging the drop-down list, it will look like this
Step 3:
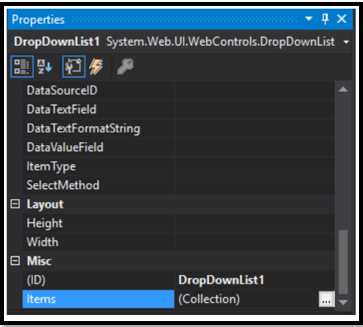
To add the items to the list, go to the Items property and add it.
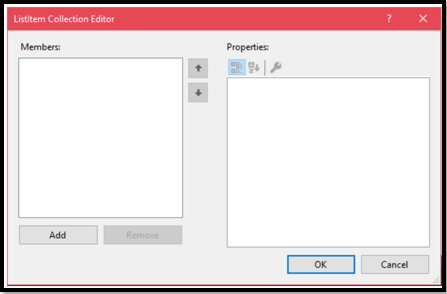
Click on the items (collection), and it will pop up a new window as given below. Initially, it does not have any items. It provides an add button to add new items to the list.
Step 4:
After clicking on items, it will give us a new window pop-up. In this window, initially, there will not be any items listed. We need to click the add button to add new items to the list.
Step 5:
Provide the values to the text and value properties, and add the items.
We can also provide its height and width by setting it via properties. It has properties by which we can modify the back color, forecolor, etc., through style properties of <span>. Like the image control property, it has no border style or border width properties in the drop-down list control. It has very fewer properties to enhance as compared to other controls.
We have two options to add the items; one is to add its multiple options in the items list directly by writing into the .aspx page. Secondly, we can add it dynamically or bind it via the database at run time.
Example of Drop Down List in ASP.NET
Now we will see how we implement a drop-down list in asp.net via code. Let’s have a look at this example for a better understanding.
Example
In this example, we want to display color from the multiple options of color present in the drop-down list.
Code:
<%@ Page Title="Home Page" Language="C#" AutoEventWireup="true"
CodeBehind="Default.aspx.cs" Inherits="DropDownListExample._Default" %>
<!DOCTYPE html>
<html xmlns="http://www.w3.org/1999/xhtml">
<head runat="server">
<title></title>
</head>
<body>
<form id="form1" runat="server">
<p>Select a color to start</p>
<div>
<asp:DropDownList ID="DropDownList1" runat="server" >
<asp:ListItem>Red</asp:ListItem>
<asp:ListItem>Black</asp:ListItem>
<asp:ListItem>Blue</asp:ListItem>
<asp:ListItem>Green</asp:ListItem>
<asp:ListItem>Yellow</asp:ListItem>
</asp:DropDownList>
</div>
<br />
<asp:Button ID="Button1" runat="server" OnClick="Button1_Click" Text="Submit">  <br />
<br />
<asp:Label ID="Label1" runat="server" EnableViewState="False"></asp:Label>
</form>
</body>
</html>
DropDownListExample.aspx.cs
Code:
using System;
using System.Collections.Generic;
using System.Linq;
using System.Web;
using System.Web.UI;
using System.Web.UI.WebControls;
namespace DropDownListExample
{
public partial class _Default : Page
{
protected void Page_Load(object sender, EventArgs e)
{
}
protected void Button1_Click(object sender, EventArgs e)
{
if (DropDownList1.SelectedValue == "")
{
Label1.Text = "";
}
else
Label1.Text = "Your selected color is: " + DropDownList1.SelectedValue;
}
}
}
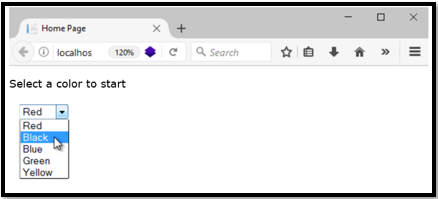
After executing the above code, we will get an output with a drop-down with different colors.
DropDownList1.SelectedValue property is used in this code to provide the selected item from the drop-down. Here, ListItem contains all the required items, which must be shown in the drop-down list.
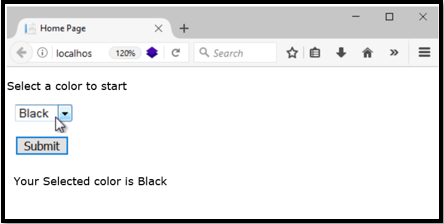
Output:
After selecting the color from the drop-down list in asp.net, it will be displayed to the user. Here we selected the “Black” Color.
Conclusion
I hope now you have some basic understanding of the Drop Down List in ASP.NET. Therefore, we have seen how the drop-down list is used in the .net framework to display it on the various forms and registration pages.it is a handy feature when you have a huge list, so storing these values in the drop-down list is better.
Recommended Articles
We hope that this EDUCBA information on “Drop Down List in ASP.NET” was beneficial to you. You can view EDUCBA’s recommended articles for more information.

