Updated February 18, 2023

Introduction to Entity Framework in .Net Core
Entity Framework in .Net Core is an Object Relational Mapper (ORM), and the tool makes mapping with objects in software simpler than the tables of a relational database. Entity Framework was released to interact between the relational database and .NET Applications. EF is an Open-Source ORM Framework for ADO.NET; the ORM takes part in building DB connections and executing commands. It takes the query results and automatically occurs in those results of application objects.
Entity Framework is an Open-Source Object Relational Mapper (ORM) that aims to increase the developer’s efficiency by decreasing the abandoned job of persevering data used in the application. EF built the essential DB Commands for writing or reading data in the database and executes them for you. Furthermore, it performs CRUD operations, and it simply manages the relationship of “one to one,” “one to many,” and “many to many.” In addition, it can have inheritance relationships between entities.
The Entity Framework communicates the queries against domain objects with the help of LINQ to entities. Entity Framework executes the relevant question in the database and shows the results into instances of domain objects for work within the application. EF is Microsoft’s suggested data access technology for applications. Microsoft suggested using EF over ADO.NET or LINQ to SQL for the latest development.
Creating Entity Framework in .Net Core
Entity Framework Core is the latest version; the ORM Framework is a superior version of ADO.NET, which mechanizes the storage and retrieval of data from the database. Here we will explain with Database First Approach, which is the domain and the context class created based on the existing database.
The Database-First approach is only based on the database where the Entity Framework Core automatically creates the entity class and the context class from the database, which means we have to create the database for EF Core.
Let’s create the database and corresponding tables as shown below.
Step 1:
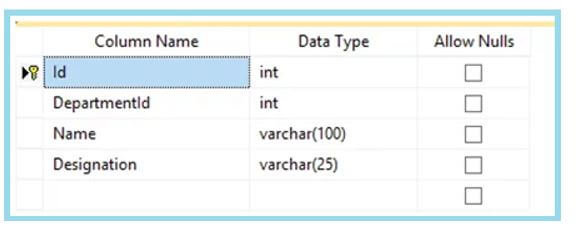
Create the Company database in your SQL Server and create two tables, Employee and Department.
The employee table as shown:
The department table as shown:
You can also create the tables using the following scripts in the Company Database.
Code:
--Department Table
CREATE TABLE [dbo].[Department](
[Id] [int] IDENTITY(1,1) NOT NULL,
[Name] [varchar](50) NOT NULL,
CONSTRAINT [PK_Department] PRIMARY KEY CLUSTERED
(
[Id] ASC
)WITH (PAD_INDEX = OFF, STATISTICS_NORECOMPUTE = OFF, IGNORE_DUP_KEY = OFF, ALLOW_ROW_LOCKS = ON, ALLOW_PAGE_LOCKS = ON) ON [PRIMARY]
) ON [PRIMARY]
--Employee Table
CREATE TABLE [dbo].[Employee](
[Id] [int] IDENTITY(1,1) NOT NULL,
[DepartmentId] [int] NOT NULL,
[Name] [varchar](100) NOT NULL,
[Designation] [varchar](25) NOT NULL,
CONSTRAINT [PK_Employee] PRIMARY KEY CLUSTERED
(
[Id] ASC
)WITH (PAD_INDEX = OFF, STATISTICS_NORECOMPUTE = OFF, IGNORE_DUP_KEY = OFF, ALLOW_ROW_LOCKS = ON, ALLOW_PAGE_LOCKS = ON) ON [PRIMARY]
) ON [PRIMARY]
GO
SET ANSI_PADDING OFF
GO
ALTER TABLE [dbo].[Employee] WITH CHECK ADD CONSTRAINT [FK_Employee_Department] FOREIGN KEY([DepartmentId])
REFERENCES [dbo].[Department] ([Id])
GO
ALTER TABLE [dbo].[Employee] CHECK CONSTRAINT [FK_Employee_Department]
GO
Step 2:
Then to create an application in Visual Studio, start the Visual Studio and choose “Create a new project.” In the “Create a new project” dialog, select ASP.NET Core Web Application – Next. In the configuring new project dialog, enter a suitable name for your project and select Create. Create a new ASP.NET Core Web Application dialog, choose .NET Core and ASP.NET Core in the dropdowns, then select Core ASP.NET Web App (Model-View-Controller) Create.
Step 3:
.NET Core Command Line Interface-Scaffold Command is as follows,
Once creating all, the next step is to run the CLI Scaffold Command on the Package Manager Console Window. Open Tools NuGet Package Manager- Package Manager Console.
The command to run is shown below:
Code:
PM> dotnet ef dbcontext scaffold "Server=---;Database=Company;Trusted_Connection=True;" Microsoft.EntityFrameworkCore.SqlServer -o Models
Just follow the command to execute as shown below:
Code:
PM> dotnet ef dbcontext scaffold "Server= (your-server-name);Database=Company;Trusted_Connection=True;" Microsoft.EntityFrameworkCore.SqlServer -o Models
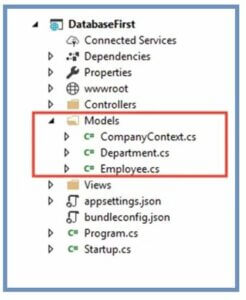
Step 4: Context Class and Entity Class Creation
Once the command executes, we can see the Context Class and Entity Class created inside the Models folder.
Step 5: Entity Classes
Let’s see the classes of entities are created.
Code:
using System;
using System.Collections.Generic;
namespace DatabaseFirst.Models
{
public partial class Employee
{
public int Id { get; set; }
public int DepartmentId { get; set; }
public string Name { get; set; }
public string Designation { get; set; }
public virtual Department Department { get; set; }
}}
Department.cs
using System;
using System.Collections.Generic;
namespace DatabaseFirst.Models
{
public partial class Department
{
public Department()
{
Employee = new HashSet<Employee>();
}
public int Id { get; set; }
public string Name { get; set; }
public virtual ICollection<Employee> Employee { get; set; }
}
}
Step 6: Context Class.
Next to see the Context Class created as follows:
Code:
using System;
using Microsoft.EntityFrameworkCore;
using Microsoft.EntityFrameworkCore.Metadata;
namespace DatabaseFirst.Models
{
public partial class CompanyContext : DbContext
{
public CompanyContext()
{
}
public CompanyContext(DbContextOptions<CompanyContext> options)
: base(options)
{
}
public virtual DbSet<Department> Department { get; set; }
public virtual DbSet<Employee> Employee { get; set; }
protected override void OnConfiguring(DbContextOptionsBuilder optionsBuilder)
{
if (!optionsBuilder.IsConfigured)
{
}
}
protected override void OnModelCreating(ModelBuilder modelBuilder)
{
modelBuilder.Entity<Department>(entity =>
{
entity.Property(e => e.Name)
.IsRequired()
.HasMaxLength(50)
.IsUnicode(false);
});
modelBuilder.Entity<Employee>(entity =>
{
entity.Property(e => e.Designation)
.IsRequired()
.HasMaxLength(25)
.IsUnicode(false);
entity.Property(e => e.Name)
.IsRequired()
.HasMaxLength(100)
.IsUnicode(false);
entity.HasOne(d => d.Department)
.WithMany(p => p.Employee)
.HasForeignKey(d => d.DepartmentId)
.OnDelete(DeleteBehavior.ClientSetNull)
.HasConstraintName("FK_Employee_Department");
});
OnModelCreatingPartial(modelBuilder);
}
partial void OnModelCreatingPartial(ModelBuilder modelBuilder);
}
}
Step 7: Scaffold DbContext Command.
We can also use Scaffold-DbContext Command instead of DotNet CLI Scaffold Command to create the entity and context classes from the database, which do a similar process; look at the console command on the Package Manager Console.
Code:
PM> Scaffold-DbContext "Server=your-server-name; Database=Company;Trusted_Connection=True;" Microsoft.EntityFrameworkCore.SqlServer -OutputDir Models
Next is the Code-First Approach- here, we will create only the Entity Class and then Migration Commands based on the Entity Classes the EF Core creates the database. To use the Code-First Approach, create the New ASP.NET Core Project. This project contains the Company Information and Department and Employee tables.
Step 1: Creating Context and Entity Classes.
Just create the “Information.cs” class in the Models Folder. For example, let’s see the following codes of information class.
Code:
using System;
using System.Collections.Generic;
using System.Linq;
using System.Threading.Tasks;
namespace CodeFirst.Models
{
public class Information
{
public int Id { get; set; }
public string Name { get; set; }
public string License { get; set; }
public DateTime Establshied { get; set; }
public decimal Revenue { get; set; }
}
}
And then create the DbContect – Database context class and name it CompanyContext.cs in the Models Folder.
Code:
using System;
using System.Collections.Generic;
using System.Linq;
using System.Threading.Tasks;
using Microsoft.EntityFrameworkCore;
namespace CodeFirst.Models
{
public class CompanyContext : DbContext
{
public DbSet<Information> Information { get; set; }
protected override void OnConfiguring(DbContextOptionsBuilder optionsBuilder)
{
if (!optionsBuilder.IsConfigured)
{
optionsBuilder.UseSqlServer(@"Server=--;Database=Company;Trusted_Connection=True;");
}
}
}
}
Step 2: To perform Migrations.
In the Migrations, we can create the db based on the classes of the entity and the database context. For example, to check in the method of OnConfiguration(), which is provided with the Connection String for db, here the name of the db is Company.
In VS, open NuGet Package Manager Console Tools – NuGet Package Manager- PMC and code the following command to create Migration.
Code:
PM> add-migration CompanyDB
You can also do a similar process with the DotNet CLI by running the following command as follows:
Code:
PM> dotnet ef migrations add CompanyDB
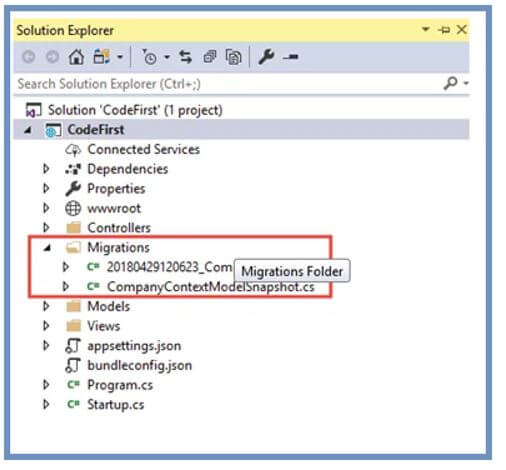
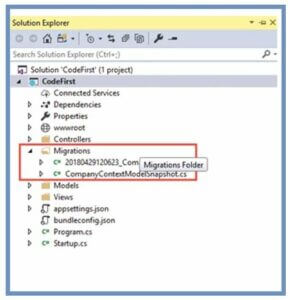
The above commands create the Migration Folder in your Project Solution as follows:
Step 3:
And then create the database by running the update commands like the update – database migration command in the PMC.
Code:
PM> update-database –verbose
You can also execute the DotNet CLI Command for doing a similar process as follows:
Code:
PM> dotnet ef database update
The above command will run and create the database of the Company, which we can see on the SQL Server.
Step 4:
To insert the record on the table by using the Entity Framework Core.
The database is ready to view; we can now add the records to the Information table; include the following code in the Controller of Index Action.
Code:
using System;
using System.Collections.Generic;
using System.Linq;
using System.Threading.Tasks;
using CodeFirst.Models;
using Microsoft.AspNetCore.Mvc;
namespace CodeFirst.Controllers
{
public class HomeController : Controller
{
public string Index()
{
using (var context = new CompanyContext())
{
var info = new Information()
{
Name = "YogiHosting",
License = "XXYY",
Revenue = 1000,
Establshied = Convert.ToDateTime("2014/06/24")
};
context.Information.Add(info);
context.SaveChanges();
}
return "Record Inserted";
}
}
}
Step 5:
When the Action method is called, the above code will be executed, and the newly added record will be included in the Information Table.
Let’s see the following output; the new record will be added to the SQL Server.
Entity Framework in .Net Core Access
In Entity Framework, we need to access the EF .Net Core by installing the EF Core using the NuGet Package to; install there are two types to install they are:
- EF Core DB Provider: It is used to install by using SQL Server by EF Core SQL Server Provider.
- EF Core Tools: In EF Core tools, in two ways we can install it; one is by .NET Core Command-Line-Interface (CLI) Tools, and the second one is (PMC) Package Manager Console Tools.
In EF Core Commands are of various ways like Migration, Scaffoldings which need to be executed; by the way, we can make use of two tools to manage them they are:
1. .NET Core Command-Line-Interface (CLI) Tools
Initially open PMC window Tools – NuGet Package Manager – Package Manager Console and install dotnet ef by executing the commands.
Code:
dotnet tool install --global dotnet-ef
Then install Microsoft.EntityFrameworkCore.Design Package by executing the commands on the PMC window.
Code:
dotnet add package Microsoft.EntityFrameworkCore.Design
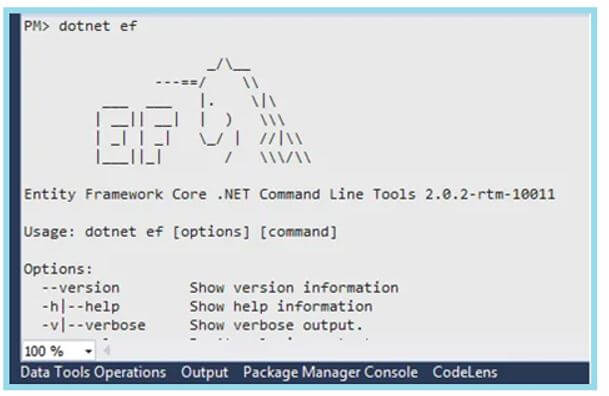
To test the package by executing the command in PMC as follows:
Code:
PM> dotnet ef
You can visualize the picture of the horse when the dotnet CLI has been installed successfully.
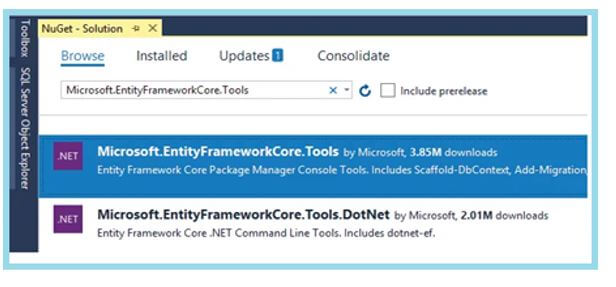
2. (PMC) Package Manager Console Tools
To use this, go to NuGet UI and find Microsoft.EntityFrameworkCore.Tools select and install it.
Entity Framework in .Net Core Model
Entity Framework is the tool that makes mapping objects in software to the tables of a relational database simpler. Entity Framework was released to interact between the relational database and .NET Applications.
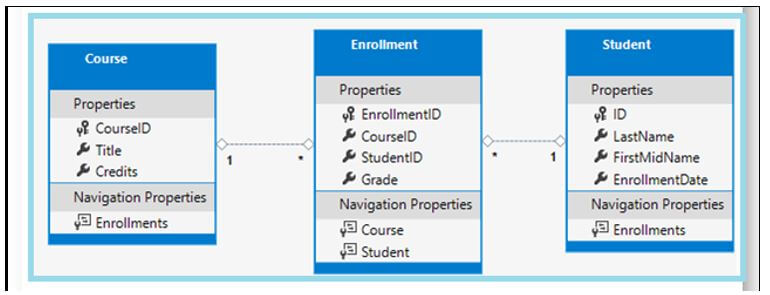
Let’s see the following Model classes to develop the application.
Let’s see the following relationship between entities:
The Student and Enrolment Entities have a One-to-many relationship; Students can enroll in any number of courses, so they have that relationship. On the other hand, the Course and Enrolment entities have a One-to-many relationship, in which the course can have many students enrolled.
Let’s create the Model Folder in the Solution Explorer for creating the model classes, and create the Student Class as follows:
Code:
using System;
using System.Collections.Generic;
namespace EF_netCore.Models
{
public class Student
{
public int ID { get; set; }
public string LastName { get; set; }
public string FirstMidName { get; set; }
public DateTime EnrollmentDate { get; set; }
public ICollection<Enrollment> Enrollments { get; set; }
}
}
Then create the Enrolment model class as follows,
using System;
using System.Collections.Generic;
namespace EF_netCore.Models
{
public enum Grade
{
A, B, C, D, F
}
public class Enrollment
{
public int EnrollmentID { get; set; }
public int CourseID { get; set; }
public int StudentID { get; set; }
public Grade? Grade { get; set; }
public Course Course { get; set; }
public Student Student { get; set; }
}
}
Then create the Course Model class as follows:
Code:
using System.Collections.Generic;
using System.ComponentModel.DataAnnotations.Schema;
namespace EF_netCore.Models
{
public class Course
{
[DatabaseGenerated(DatabaseGeneratedOption.None)]
public int CourseID { get; set; }
public string Title { get; set; }
public int Credits { get; set; }
public ICollection<Enrollment> Enrollments { get; set; }
}
}
Then to create the database context:
The class that organizes the EF functionality for giving model data in DbContext class is the derived class from Microsoft.EntityFrameworkCore.DbContext. In the Project Solution Explorer, create the Data folder containing the db-related data; let’s see the SchoolContext class.
Code:
using EF_netCore.Models;
using Microsoft.EntityFrameworkCore;
namespace EF_netCore.Data
{
public class SchoolContext : DbContext
{
public SchoolContext(DbContextOptions<SchoolContext> options)
: base(options)
{
}
public DbSet<Course> Courses { get; set; }
public DbSet<Enrollment> Enrollments { get; set; }
public DbSet<Student> Students { get; set; }
}
}
The above code builds the DbSetproperty for every entity set. The terminology of Entity Framework is an entity set corresponding to a database table. The entity corresponds to the row in the table.
The DbSet<Enrollment> and DbSet<Course> statements omit and work for the same; it adds them implicitly because:
- First, the entity of the student references the Enrollment entity.
- Next, the entity of Enrollment references the Course entity.
Once the database is created, the Entity Framework creates the table with the same name as the DbSet property names. The property’s name is plural, for example, Student instead of Students.
Let’s see the DbSet property:
Code:
using EF_netCore.Models;
using Microsoft.EntityFrameworkCore;
namespace EF_netCore.Data
{
public class SchoolContext : DbContext
{
public SchoolContext(DbContextOptions<SchoolContext> options)
: base(options)
{
}
public DbSet<Course> Courses { get; set; }
public DbSet<Enrollment> Enrollments { get; set; }
public DbSet<Student> Students { get; set; }
protected override void OnModelCreating(ModelBuilder modelBuilder)
{
modelBuilder.Entity<Course>().ToTable("Course");
modelBuilder.Entity<Enrollment>().ToTable("Enrollment");
modelBuilder.Entity<Student>().ToTable("Student");
}
}
}
Conclusion
In this article, we have seen about the Entity Framework in.NetCore, which helps to integrate, the EF in .Net Core applications. Entity Framework supports various database providers.
Recommended Articles
This is a guide to Entity Framework in .Net Core. Here we discuss the introduction and how to create an entity framework in .Net Core. You may also have a look at the following articles to learn more –
- ASP.NET Core Filter
- ASP.NET Core JWT Authentication
- asp.net core environment variables
- ASP.NET Core Razor Pages
