What are Excel Forms?
Excel Forms are a data collection tool that allows users to directly add data into a ready-made pop-up box that has text boxes and data labels.
As we know, typing data directly into individual cells can be time-consuming and lead to errors. So, using Excel forms saves time, reduces mistakes, and allows you to collect data in a structured manner.
There are two types of Excel forms: basic and data entry. While you can use the basic form for a single record entry only, the data entry form lets you add multiple data one by one.
To create a data entry form, Excel has an in-built form command, which opens as a dialog box that we can use to enter data quickly in the database.
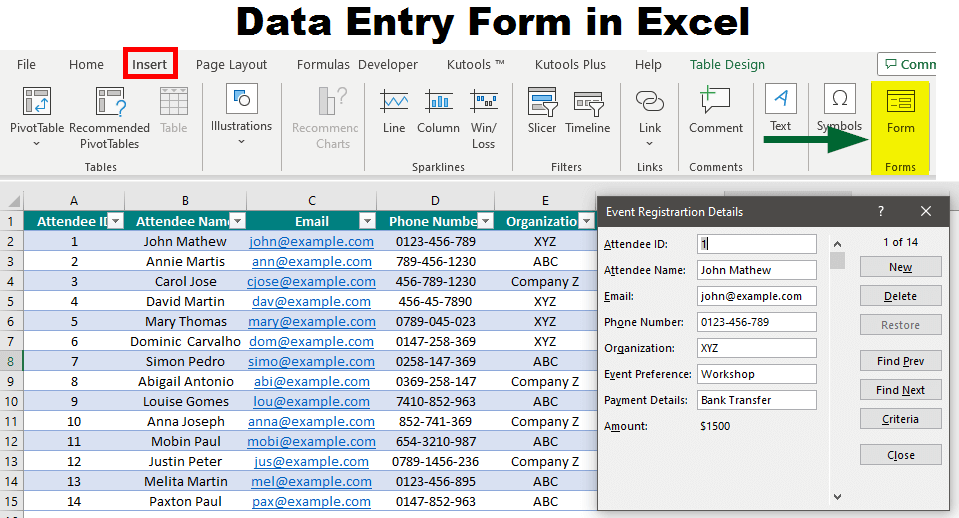
Table of Contents
- What are Excel Forms?
- How to Add Form Command in Excel Ribbon?
- How to Make a Basic Form? (Product Rating Form)
- What are Data Entry Excel Forms?
- How to Create a Data Entry Form? (Event Form)
- How to Use Formulas in Excel Forms?
- What to do if the Excel form is not Working?
How to Add Form Commands in Excel Ribbon?
The form command is not available in the Excel ribbon by default. Thus, to add the forms command shortcut in your Excel ribbon, follow the steps below.
Step 1: Right-click on the Excel ribbon (top menu) and select Customize the Ribbon option.
Step 2: On the right side, you will see a list of tabs that are present on the ribbon. Choose the tab where you want the “Forms” button to appear. We are adding the command to the “Insert” tab.
Step 3: Click the “New Group” button at the bottom.
Step 4: Click the “Rename” button and add a meaningful name, i.e., “Forms.”
Step 5: In the left-hand dropdown list of “Choose commands from, ” “Select All Commands,” scroll down, find “Forms,” and select it.
Step 6: Click the “Add” button to move the command to the new group.
Step 7: Click “OK.” Now, you can click on the “Insert Tab” to check for the added “Forms” section.
How to Make a Form Using Form Controls?
Basic Forms in Excel are the ones that we can create using the Excel form controls (label, option, etc.) that are available in the Developer and Data tab. To collect data using basic forms, you can share them with all the required individuals and then collect the filled forms. Remember that after collecting the filled forms, you will have to manually create a database, as the basic form does not do that automatically.
Example: Product Rating Form
Let’s create a basic Excel form where users can input the product name, select its category, and give a product rating. We will use the Excel form controls to create this form.
Given:
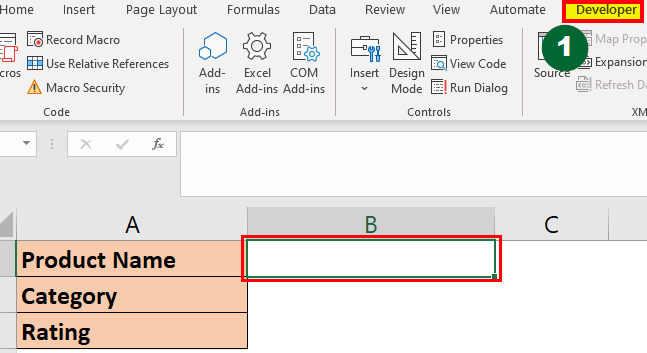
Step 1: Select cell B1, and click on “Developer Tab.”
Step 2: Select “Insert” from “Controls Group.”
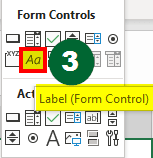
Step 3: The “Forms Control” dropdown menu opens. From that, select “Label” Control.
Step 4: Click and drag your control button (label) to the location(cell B1).
Step 5: Add the product name as “Samsung” in the “Label.”
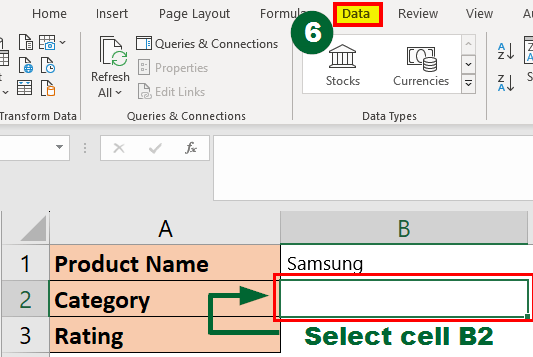
Step 6: For Category, select cell “B2” and go to the “Data Tab.”
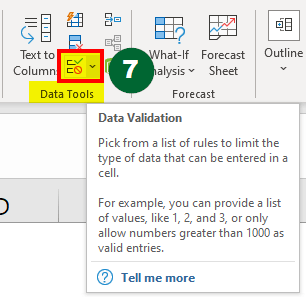
Step 7: Select “Data Validation” from the “Data Tools” group.
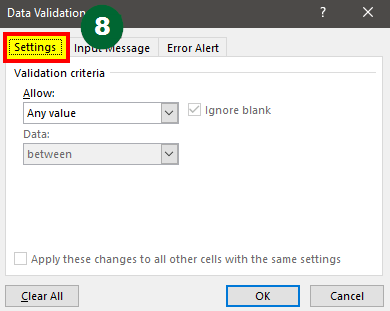
Step 8: The “Data Validation” Dialog Box will appear. Select the “Settings” section to go ahead.
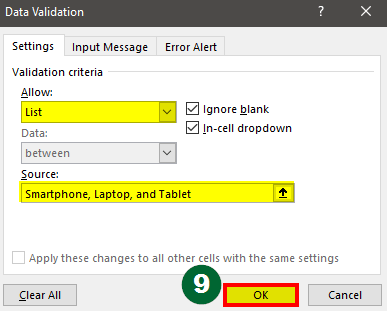
Step 9: In the “Allow” section, select “List” and then mention the categories such as Smartphone, Laptop, and Tablet in the “Source,” and click “OK.”
Result: The dropdown list is added.
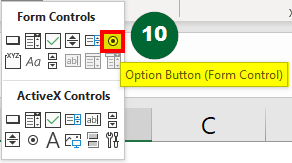
Step 10: For Rating, select cell “B3,” repeat steps 1 and 2, and select the “Option Button” from “Form Controls.”
Step 11: Click and drag your control button (option) to the location(cell B3).
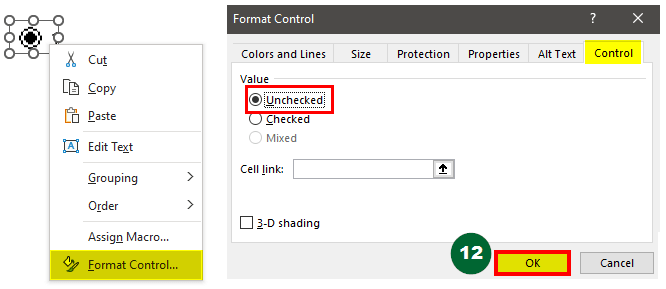
Step 12: Right-click on the “Option button,”
- Select “Format Control”
- Go to the “Control” section
- Click on the “Unchecked” value
- Click “OK.”
Step 13: Create more 4 option buttons and rename them as 1,2,3,4 & 5
Result:
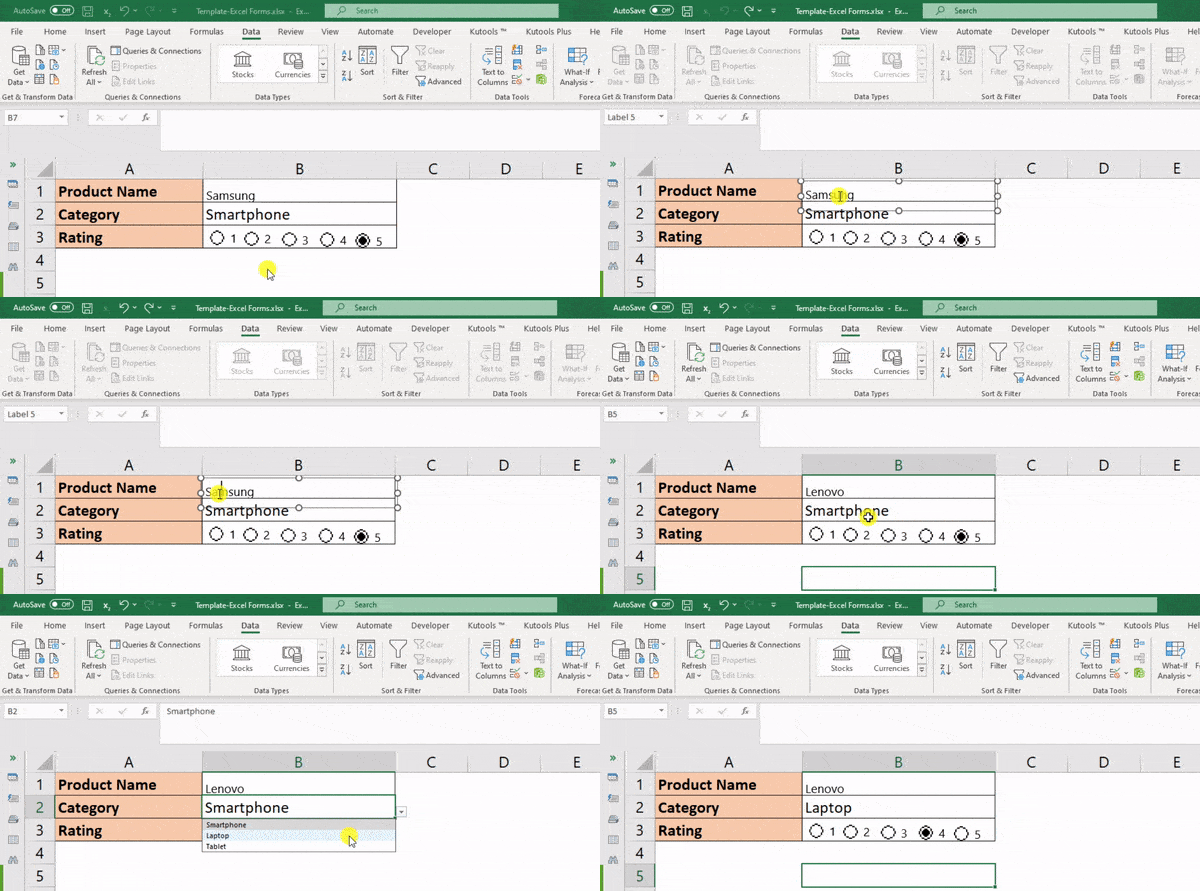
Your basic form is ready. We have easily added a product name (Lenovo), chose the category (laptop), and changed it to our desirable rating (4).
What are Data Entry Excel Forms?
A data entry form in Excel is a tool that allows us to create a form in Excel using a table. We can convert any table into Excel forms. This feature shows a dialog box with all the necessary controls that we can use to add, delete, update, and search for data in the table or database.
Components
Each component below performs a specific task in the data entry process.
- New: This button allows users to create a new record or entry in the form.
- Delete: The delete button lets users remove a selected record from the form.
- Restore: Assume that you changed a data field, but now you want to restore the previous data. You can use this button to return to the old data. However, it works only if you haven’t started a new entry or pressed Enter.
- Find Prev: This feature allows users to find the previous record or entry in the dataset. It’s especially useful when users need to review or edit previously entered data.
- Find Next: Similar to “Find Prev,” this feature allows users to navigate to the next record or entry in the dataset.
- Criteria: This section helps users find specific data entries based on the given criteria. It is usually useful with the “Find Prev” and “Find Next” buttons.
- Close: The close button lets users exit the data entry dialog box.
How to Create Data Entry Excel Forms?
Example: Event Registration Form
Let’s create a data entry form for a registration event with details like attendee name, email, number, etc.
Given below are the data columns we need in our form:
A) How to Create the Form?
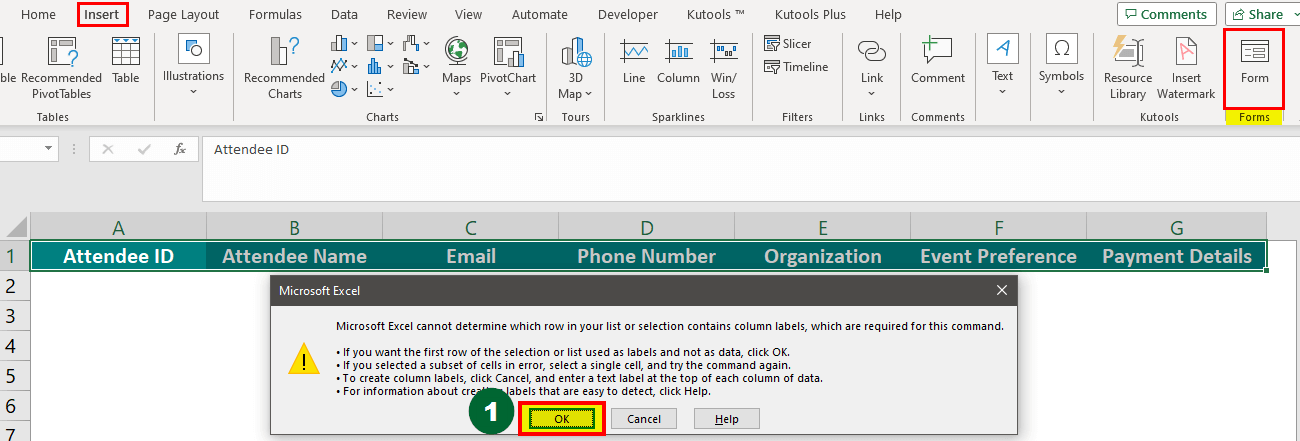
Step 1: Select cell A1:G1 (all the cells that you want to add as a form). Then,
- Go to Insert > Forms > Form.
- A dialog box will appear
- Click “OK.”
OR
Press Ctrl+T to create a table,
- Click on “My table has headers.”
- Click on the “OK”
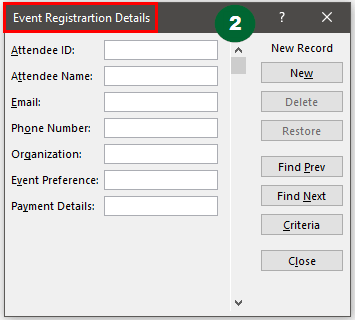
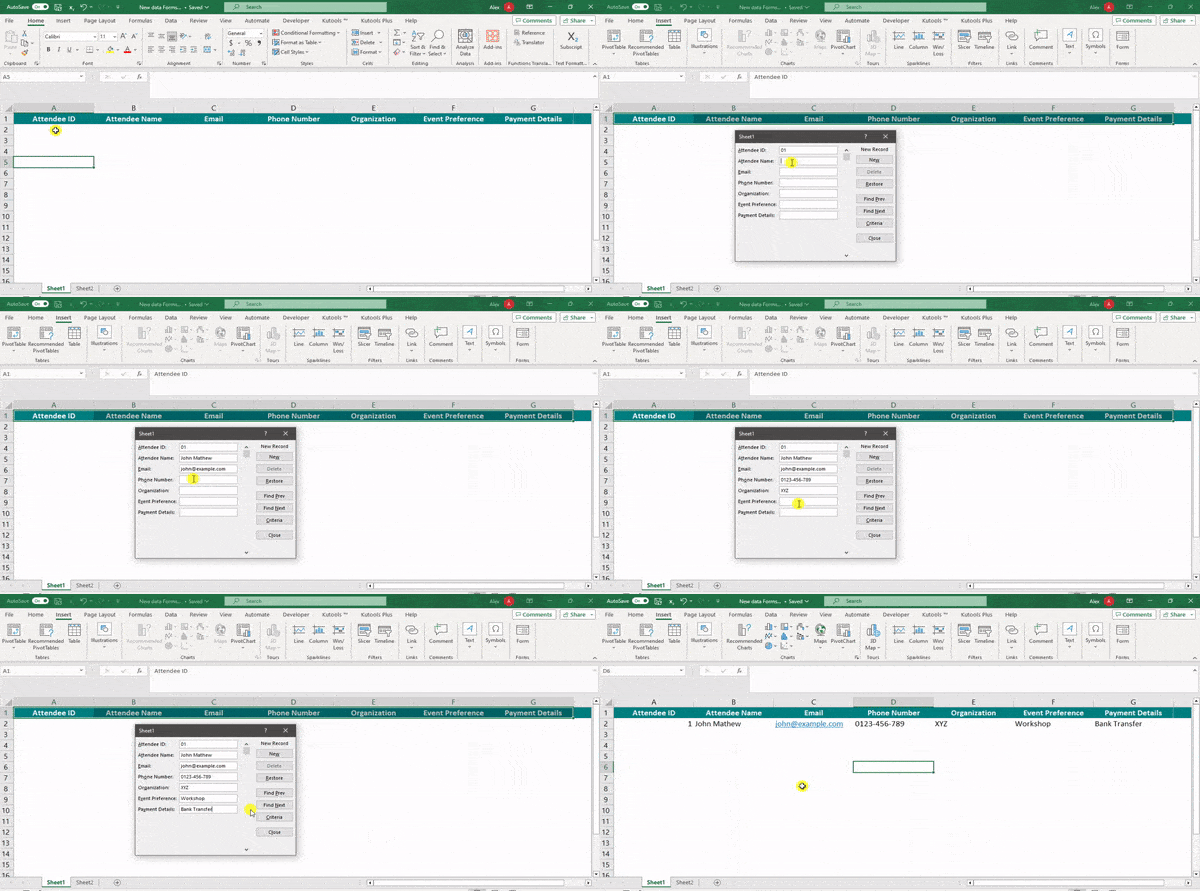
Step 2: Select Insert > Forms > Form, and the event registration details dialog box will appear.
B) How to Add Data?
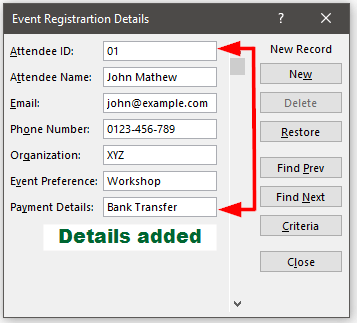
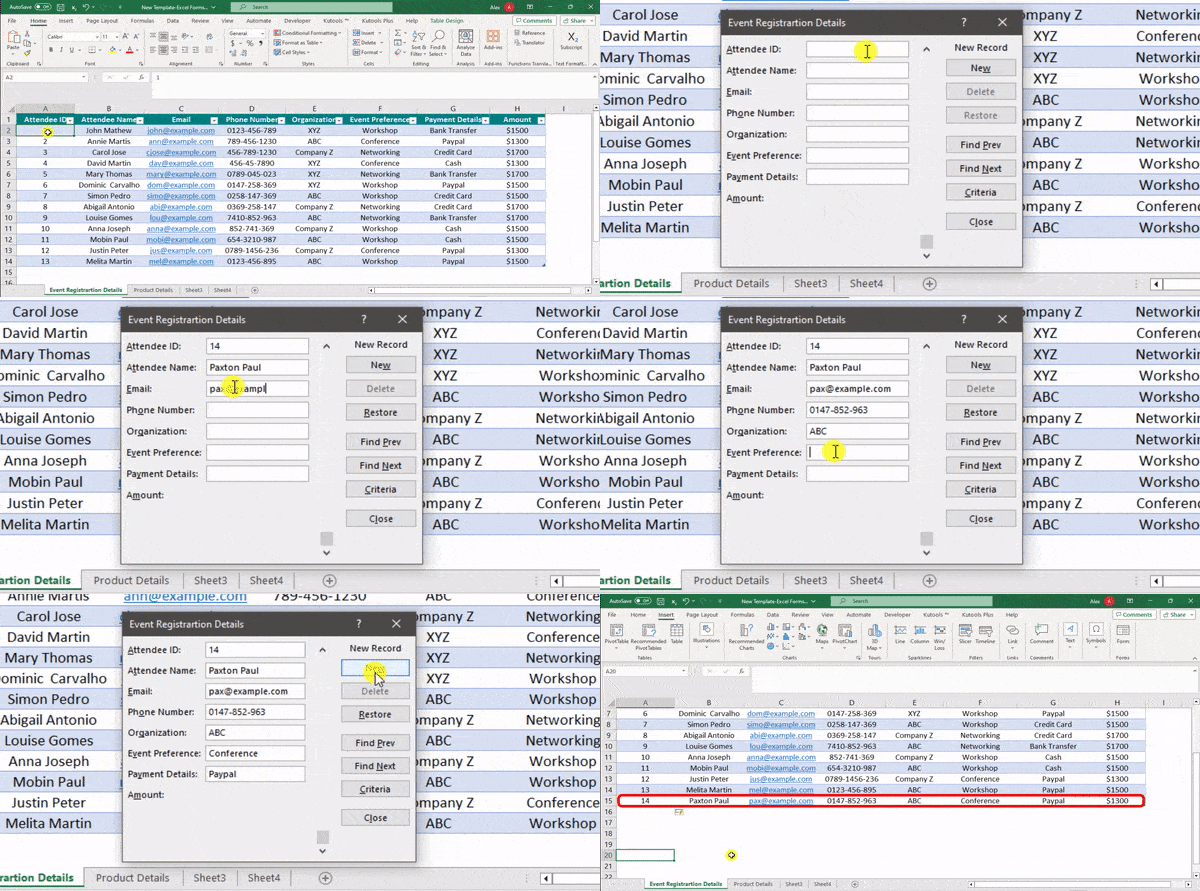
- In the dialog box that opens, you can view all the data columns that are present in the table. Just fill in all the text boxes accordingly.
- Click on “New” to add new data to your database. As you can see below, “Attendee 1” details have are added to the table.
Follow the same process to add as many details as you want to reflect in your table.
C) How to Restore Data?
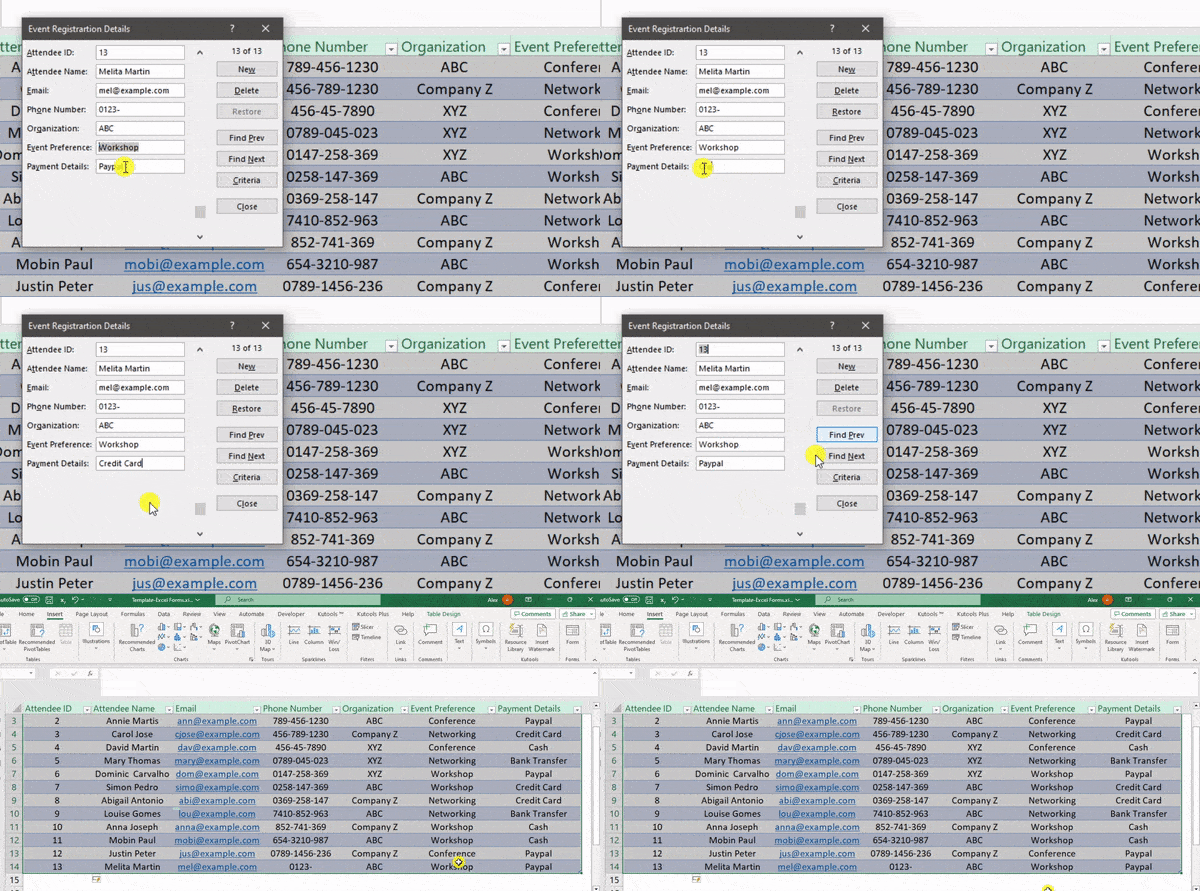
Suppose you wanted to make changes to the 13th row of data. So you change “Payment Details” from “Paypal” to “Credit Card.” However, you want to change it back to the original text after the change.
Click on the “Restore” button to restore the data back to “Paypal.”
D) How to Search Records?
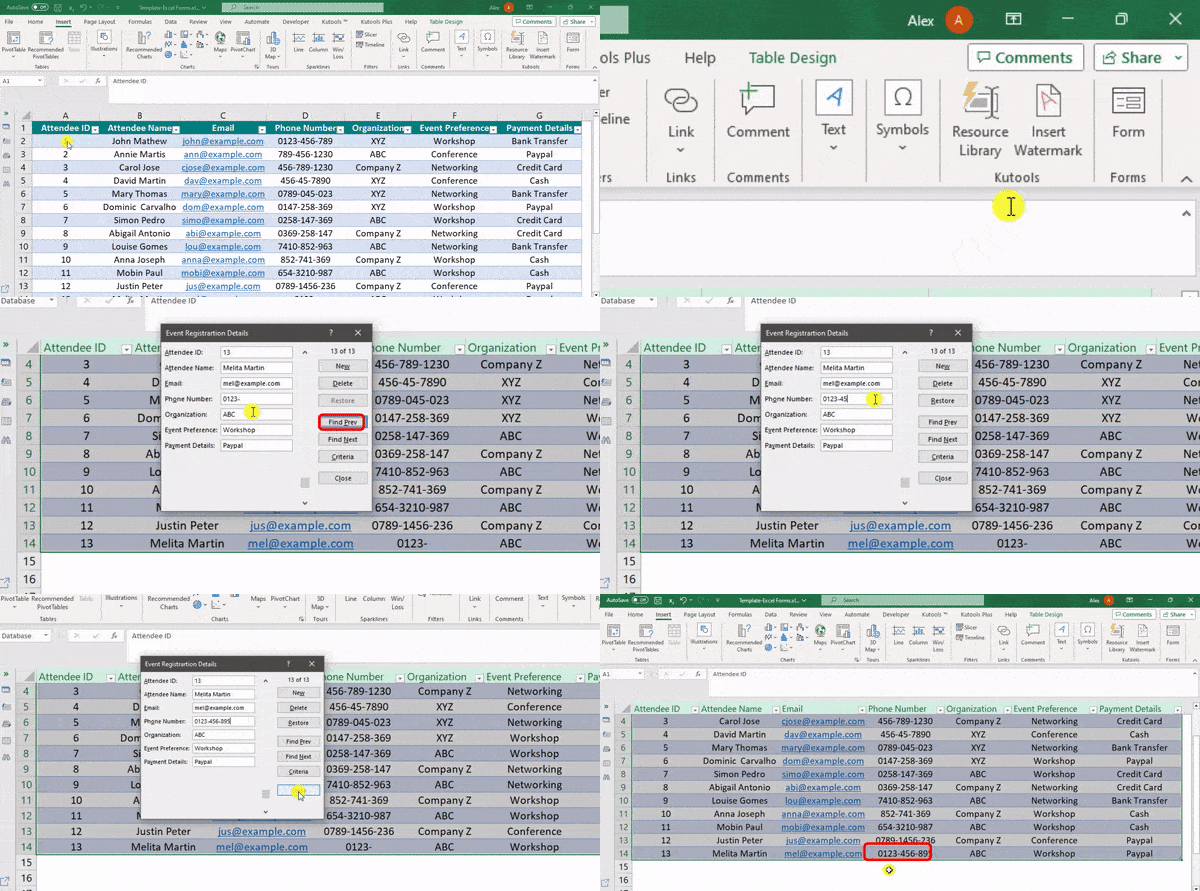
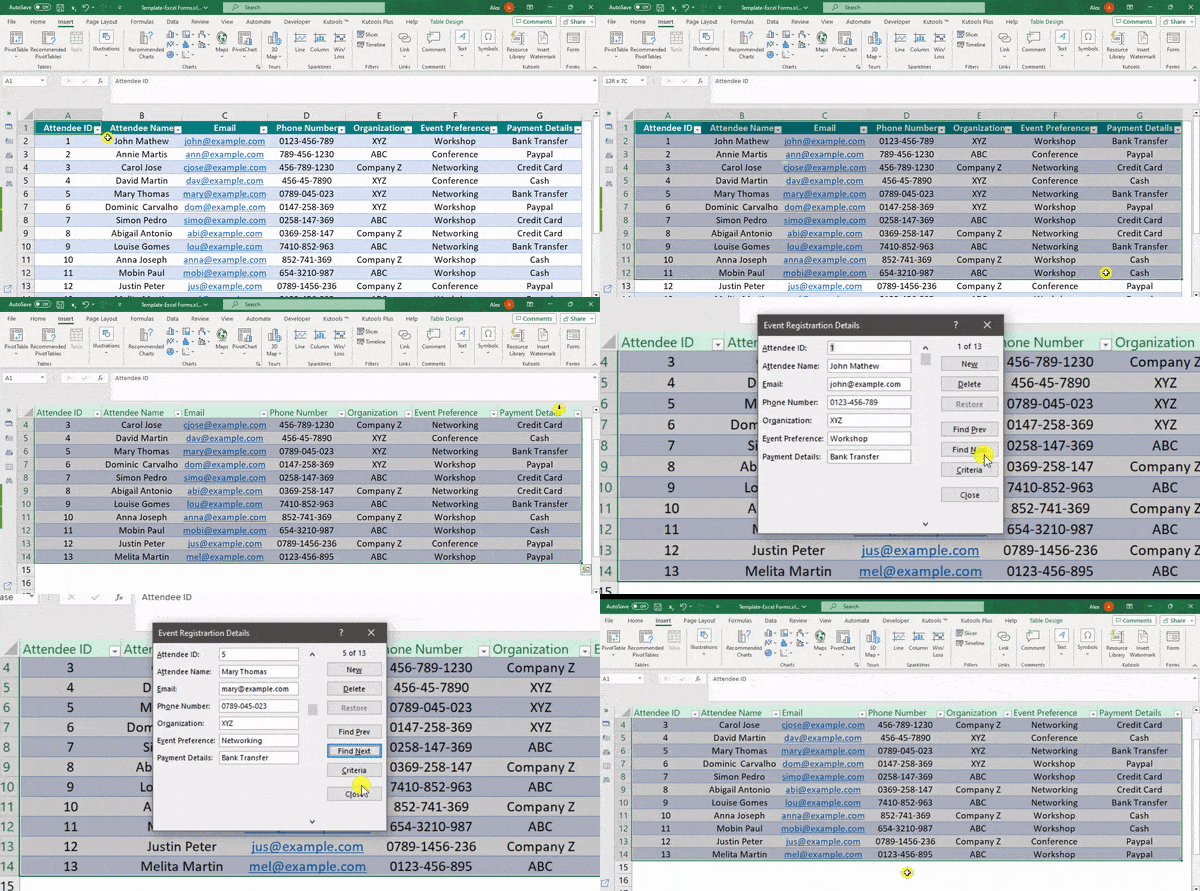
The data entry form provides you with three buttons that help you search any record in the database.
- The “Find Prev” lets you search data records before the current one.
- The “Find Next” lets you search data records after the current one.
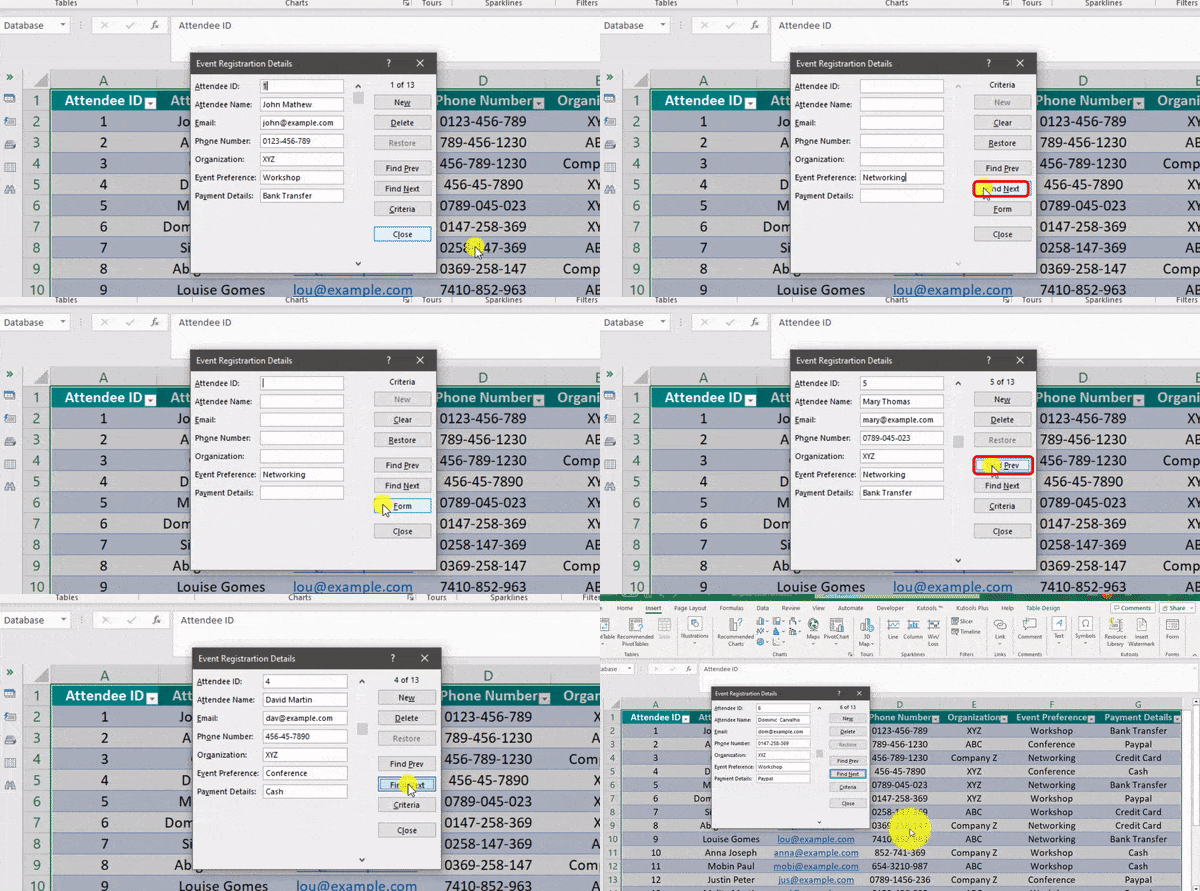
- The “Criteria” button lets you search for records that have specific data. For instance, in the below image, you can see which records have “corporation” as “XYZ” or “Event Preference” as “Networking.”
E) How to Delete Data?
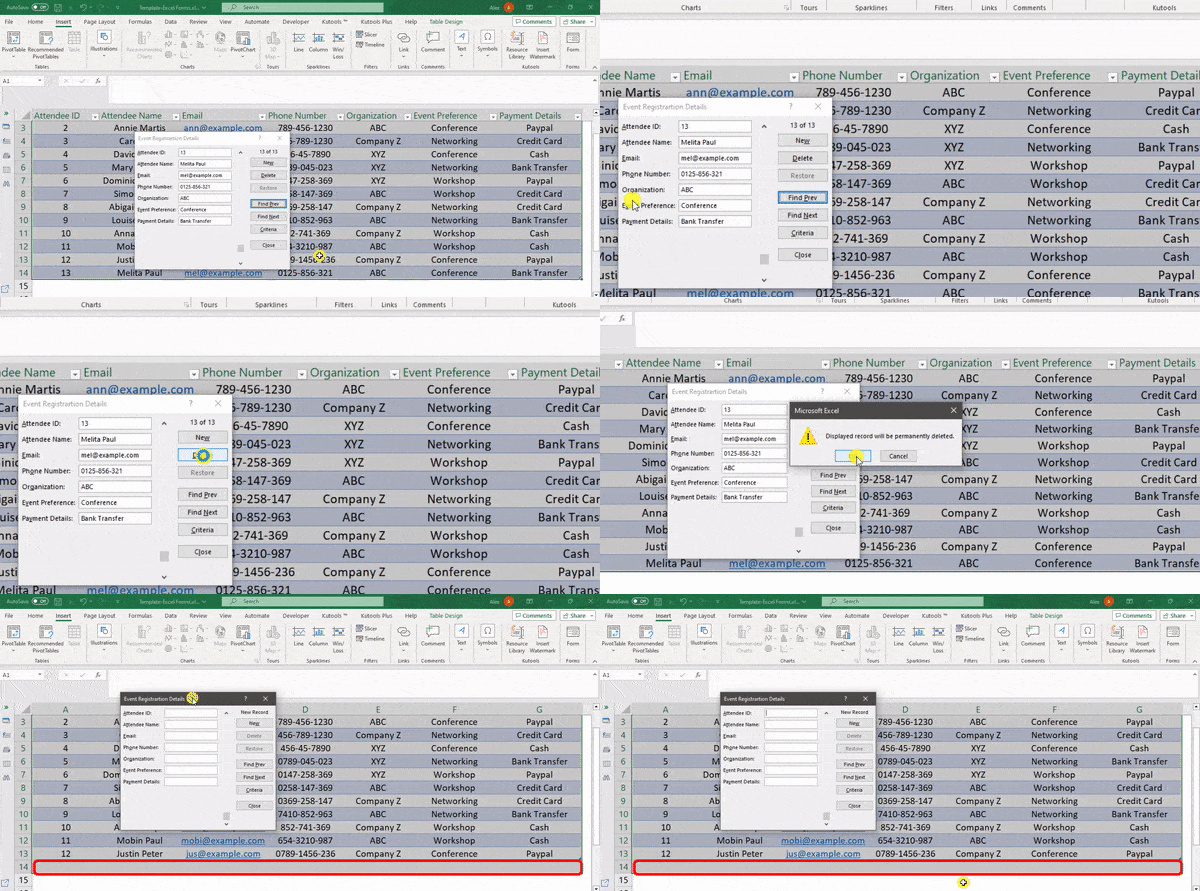
Let’s say you want to delete a record from the form. You can use the above-shown search options to locate the record and then use the “Delete” button to remove the record from the database.
How to Use Formulas in Excel Forms?
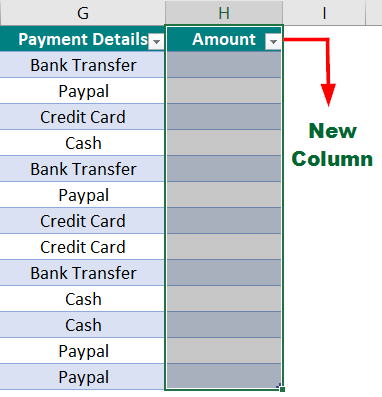
Let us say we want to add a new column to the above example to display the amount each individual has to pay for a particular event. We can use Excel formulas to determine the amount based on the selected event.
We can use the IF Function in Excel to add the amount for all the data records.
Step 1: Create a new column and name it “Amount.”
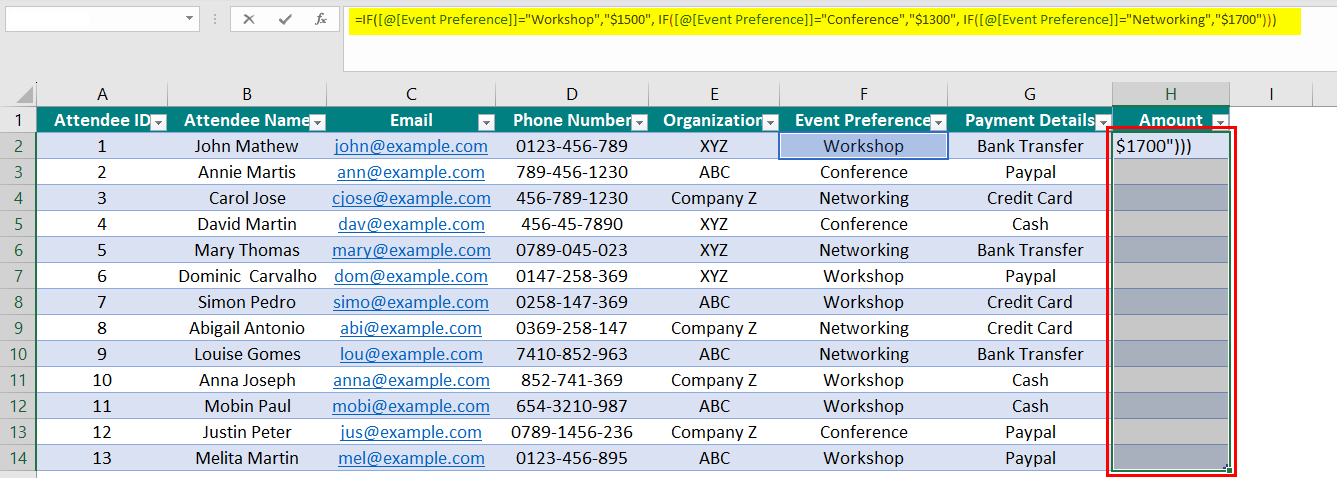
Step 2: Select All the cells, i.e., from H2:H14, and add the following formula:
Step 3: Press Enter.
Result:
You can see that Excel uses the formula to determine the amount each attendee has to pay.
What to do if my data entry Excel form is not working?
If you are unable to enter data in your Excel form, check if your Excel form has the following:
- Excel forms can have a maximum of 32 data fields (data columns). So, add 32 or fewer data columns to your table.
- If your cursor is placed outside the form or table, it will show an error. So, place the cursor within the form’s range.
- If your Excel sheet has existing data below the form, it won’t let your user add new data. This is because Excel has no space to add the new row in the database.
- If you have added protection to your form, users won’t be able to add any data. Therefore, remove any unnecessary restrictions.
Frequently Asked Questions (FAQs)
Q1. Can you add protection and restriction in Excel forms?
Answer: Yes, you can add restrictions to your Excel forms. There are two methods by which you can protect your Excel forms. You can either protect the Excel workbook entirely or lock particular cells in Excel.
Q2. What are some importance and limitations of Excel Forms?
Answer:
| Importance | Limitation |
| Efficient Data Collection: Excel Forms streamline data collection, ensuring consistency and saving time. | Limited Customization: Excel forms can’t be customized as extensively as other specialized tools, making it harder to design unique and appealing forms. |
| Data Validation: They enforce rules and formats, reducing errors and maintaining data accuracy. | Complexity: Creating advanced forms with logic or complex features requires a deep understanding of Excel’s functions and formulas. |
| Quick Analysis: Linked to Excel, they enable instant data analysis through formulas and visuals. | Data Security: Excel forms lack advanced security features, risking unauthorized access or changes to data. |
Recommended Articles
This is a detailed stepwise guide to creating basic and data entry Excel Forms. We have also explained how to add formulas to the data entry form. For more such articles, visit the following recommendations.
