Updated July 3, 2023

Introduction to Expression Transformation in Informatica
Expression Transformation in Informatica is one of the passive transformation features that is used to manipulate row-wise data through mapping. It accepts data from input ports and processes the record-wise data modification using several operations or functions through the variable ports and output ports. It supports multiple expressions on multiple output ports in an expression transformation that helps create the calculated or transformed values. Expression transformation supports dynamic and pass-through ports for data propagation. One of the use cases of expression transformation in Informatica is calculating the retail price of the products based on the tax rates and the regular sales prices using the price list data.
How to Perform Expression Transformation in Informatica?
Here we will see how to perform expression transformation in Informatica using the Informatica cloud, which is the latest offering from Informatica for data integration. Informatica Cloud is a software as a service (Saas) that provides a cloud-based platform and functionality to develop data integration solutions.
Given below are the steps to use expression transformation in Informatica.
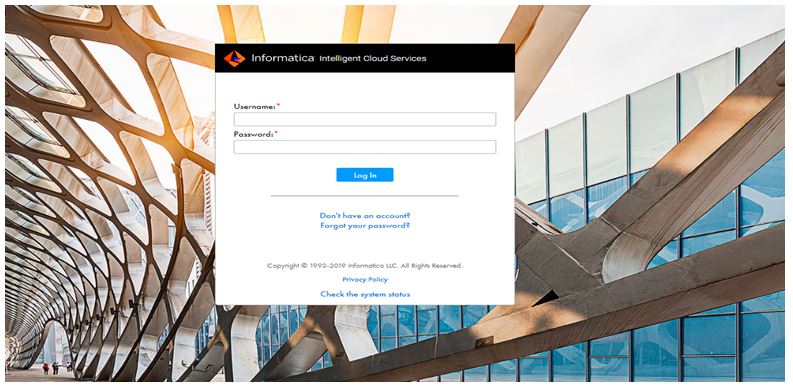
Step 1: Log in to the Informatica cloud.
The first step for developing data integration through the Informatica cloud is to log into the cloud instance provided by Informatica. Use the credentials to log in to the Informatica cloud environment.
Step 2: Navigate to the Data Integration option.
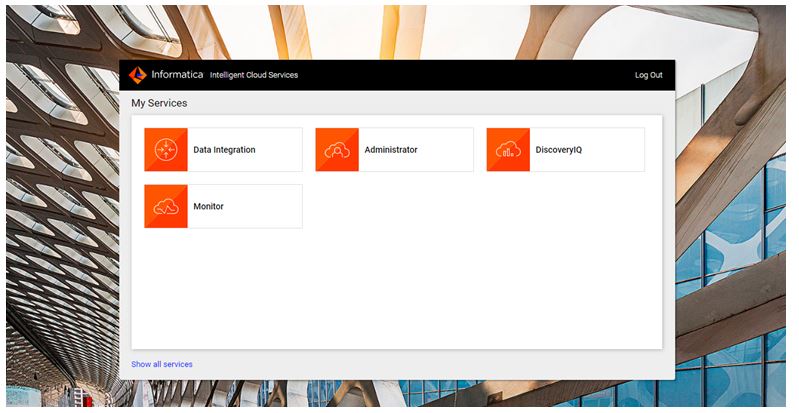
Once the login is successful, the My Services dashboard will appear. This section of the dashboard view is based on the license subscription options of Informatica.
Select the Data Integration in the My Service section to enter into the data integration tool dashboard. The other Tabs, such as Administrator, DiscoveryIQ, and Monitor, shown in the dashboard, are for configuring and managing the data integration resources.
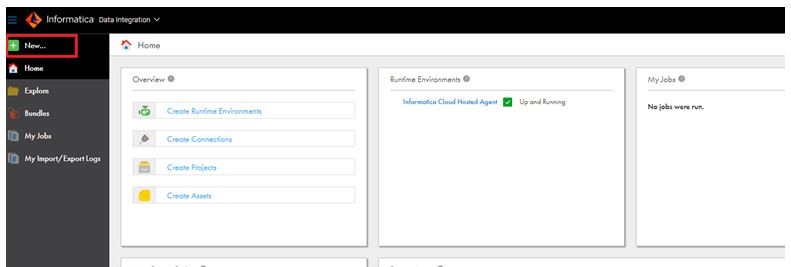
Step 3: Selecting the New option from the data Integration dashboard.
The Data Integration homepage displays the various sections for resource and artifacts creation and the summary of the artifacts.
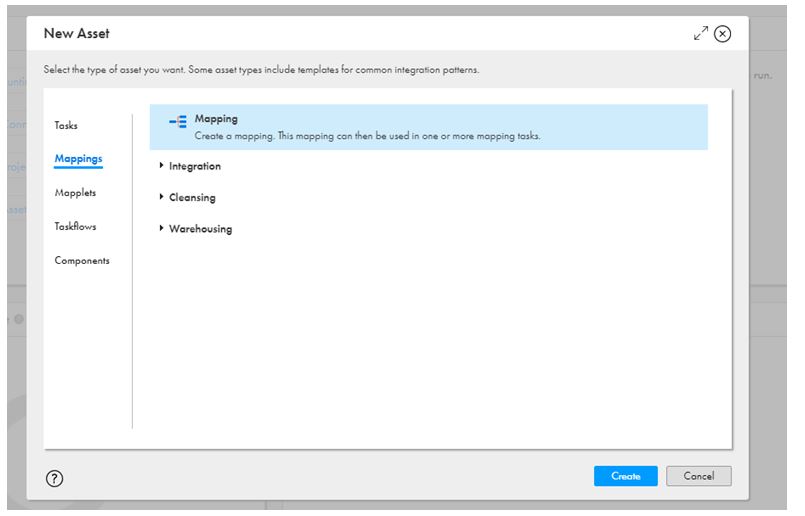
Step 4: Create a new mapping from the ‘New Asset’ options.
The New Asset window shows multiple options, such as creating new Tasks, mappings, Templates, Task Flows, and Components. The New Mapping is the design of the data integration flow using the inbuilt features and functionalities that help in the extract, transform, and load (ETL) process.
Step 5: Name the Mapping with a meaningful word.
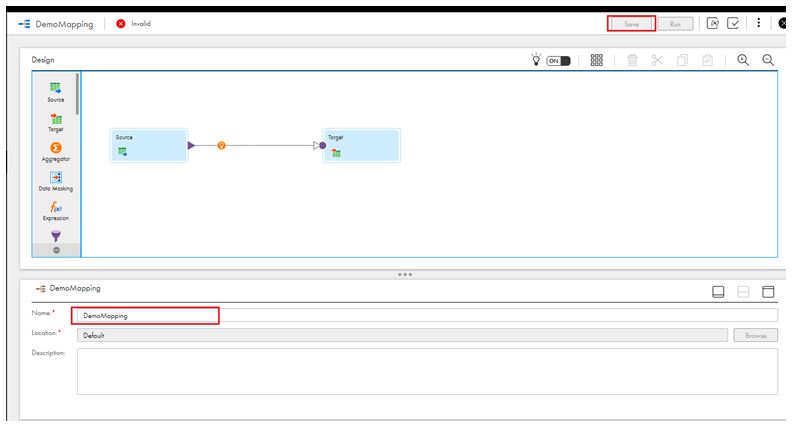
The Mapping windows show the default view with source and target component views in the design palette. It shows the properties section that allows the user to enter names, select the location and enter the description of the mapping.
We will provide the mapping name as ‘DemoMapping’ in the Name text box and click on the ‘save’ button shown on the Top to apply the Name to the mapping.
By default, it will show the ‘Invalid’ label on the top of the mapping window. This indicates the source and the destination pallets are not configured with the proper connections. It will be shown as ’valid’ once the connection configuration will be applied.
Step 6: Add the Expression transformation to the mapping.
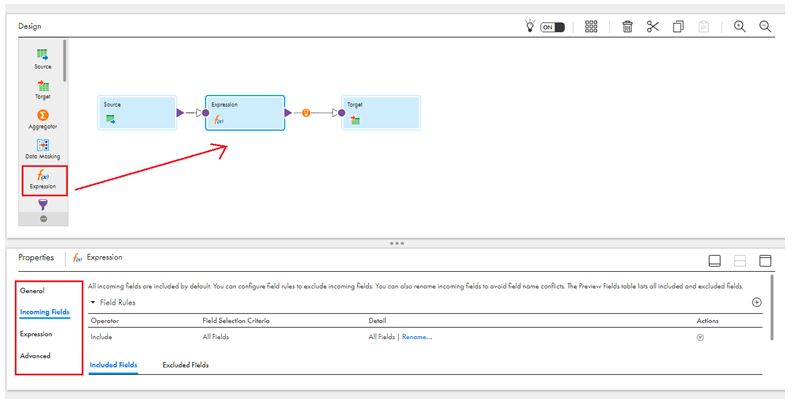
To add the expression to the mapping, select and drag it to the position after the source as shown in the image and save the mapping. Informatica will automatically connect it with the source and target components. Expression properties shown in the bottom section provide the configuration option for General, Incoming Fields, Expression, and Advanced properties.
Step 7: In the next step, we will write an expression transformation to concatenate two string values representing the first name and last name to an output Field called FullName to show the use of Expression.
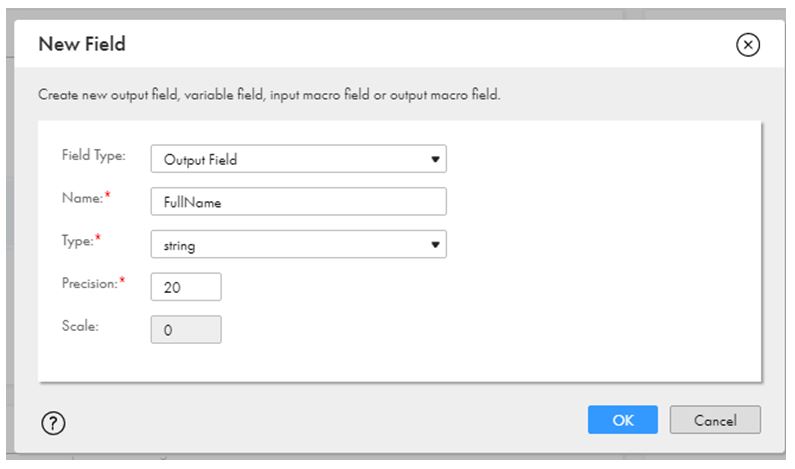
Select the Expression option in the properties and click on the + icon to create a new one by selecting the Field Type as Output Field, and entering Name as FullName. Selecting Type as a string and providing the precision as 20 to define the output field size.
Next, we will assign a fixed string value to the value by using the string function available in the Expression option for configuring the output field.
Select the Configure option shown in the Expression section.
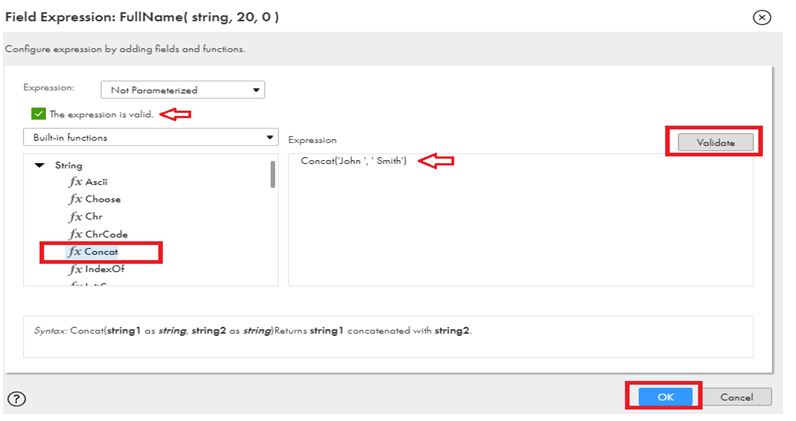
Next, to apply the string function in the expression, select the ‘built-in function’ option in the second dropdown list of the Field expression window.
Next, select the string option followed by the ‘fx concat’ function from the list. For the example expression, we enter ‘John’ as string1 and ’Smith’ as string 2 in the Concat function parameter.
The next step is to validate the expression by clicking on the validate button. If there is no syntax issue, the green checkbox with the ‘The expression’ is valid’ message will appear, as shown in the subsequent image. If there is any issue, you can fix that in the expression editor and validate it again.
Once the expression for the field is valid, click Ok to return to the Properties View of Expression.
On the Expression properties window, the field-level expression will be shown. Save the mapping to apply the expression.
We have completed how to perform expressions in Informatica.
Similarly, there are various ways to use the expression that is implemented based upon the business requirements and according to the target systems.
Conclusion
The expression transformation is very useful to develop the custom business logic and apply it to transform the source data and load it on that target system because of the variety of features. This transformation is mostly used transformation in the Informatica mappings and is used for complex data manipulation.
Recommended Articles
This is a guide to Expression Transformation in Informatica. Here we discuss the introduction and how to perform expression transformation in informatica? You may also have a look at the following articles to learn more –
