Introduction
FileZilla Server is a powerful and user-friendly FTP server application designed for Windows operating systems. It makes it simple for users to share files and folders across a local network or the internet. With its feature-rich feature set and user-friendly interface, FileZilla Server provides a secure and efficient way to manage file transfers. The application supports file transfer protocols, including FTP, FTPS (FTP over SSL/TLS), SFTP (SSH File Transfer Protocol), and HTTP/HTTPS. It also offers robust security options, such as IP filtering, SSL/TLS encryption, and user access control, ensuring your data remains protected. Whether you’re an individual or a business, FileZilla Server is an excellent choice for setting up a reliable and user-friendly file-sharing solution on your Windows system.
Table of Contents
Prerequisites
- Operating System Compatibility: Ensure you’re running a supported Windows operating system. Windows Vista, 7, 8, 8.1, 10, and Windows Server 2008, 2012, 2016, and 2019 are compatible with FileZilla Server.
- Administrator Privileges: Installing FileZilla Server requires administrator access to make necessary changes to your system configuration.
- Network Configuration: Properly configure your network infrastructure to allow FTP traffic. If setting up the FileZilla Server behind a firewall, ensure that the ports (usually TCP port 21 for FTP control and, optionally, TCP port 20 for FTP data) are open and accessible.
Step-by-Step Installation and Configuration
Now that you have the prerequisites covered let’s get started with installing and configuring FileZilla Server:
1. Downloading FileZilla Server
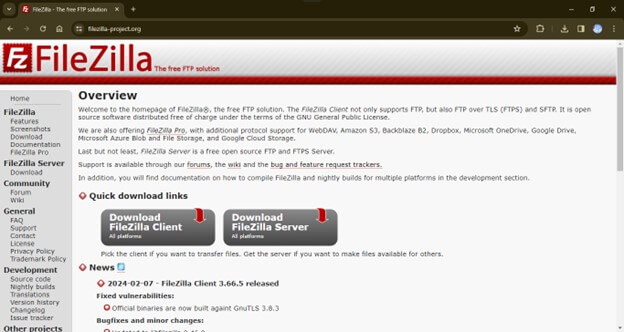
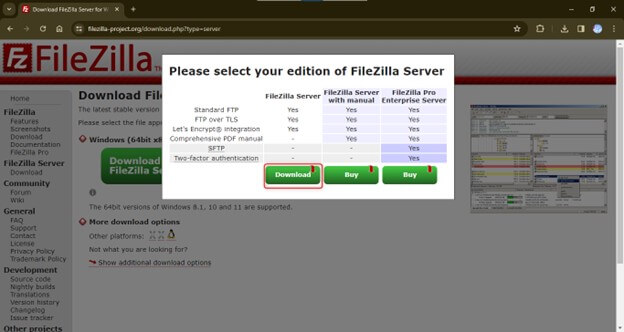
- Visit the official FileZilla Project website.
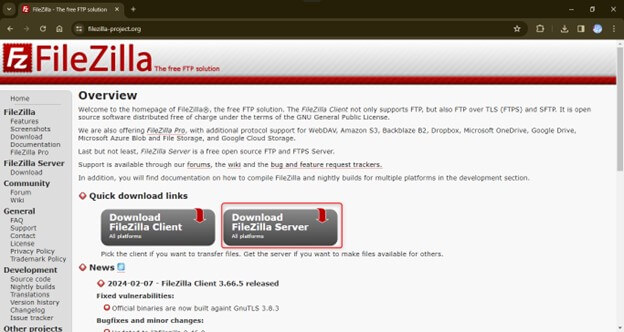
- Navigate to the download section for FileZilla Server.
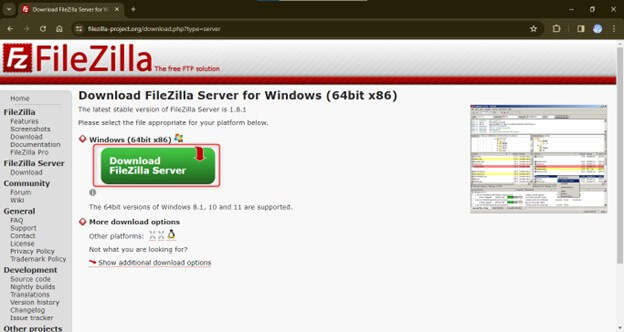
- Download the installer for the compatible version of your Windows system (32-bit or 64-bit).
- To begin the downloading, click the “download” button.
2. Running the Installer
- Once you download the FileZilla Server installer executable (.exe) file, locate it where you saved it.
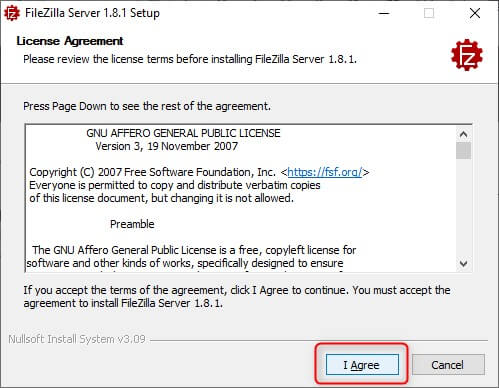
- Double-click the installer file to start the FileZilla Server Setup Wizard.
Accept the license agreement.
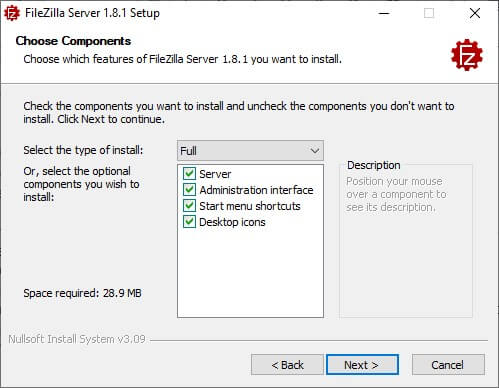
- Please select any additional components you wish to install (We are going with Full Installation).
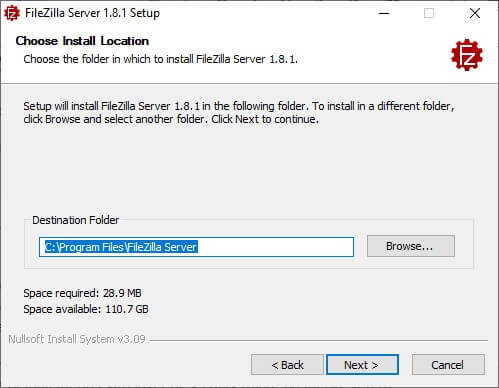
- If desired, you can adjust the installation location, but the default option usually works well.
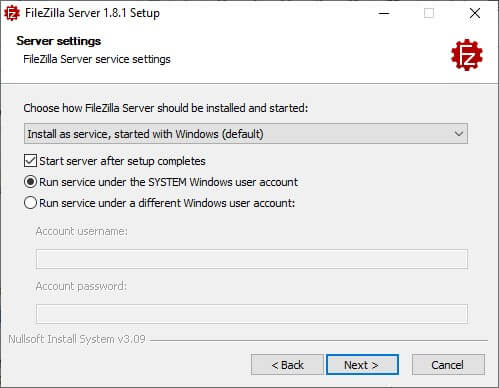
The next step is to select the server settings. In this step, FileZilla Server asks when to start the FileZilla Server’s service.
- Choose how FileZilla Server should be installed and started has two options:
- Install as service, started with Windows (default): This is the default option, and it’s recommended for most users. It installs FileZilla Server as a Windows service, which starts automatically when Windows starts and runs in the background.
- Install as service, start manually: This option installs FileZilla Server as a Windows service, which means it will run in the background. Later, you can manually start and stop the service. This differs from the default option, which installs FileZilla Server as a service and automatically starts when Windows starts.
- Start Server after setup completes: This option is tick by default, and the installation process will start the FileZilla Server service as soon as you complete it.
- Run service under the SYSTEM Windows user account: This option runs the FileZilla Server service under the SYSTEM account, a built-in Windows account with the highest privileges.
- Run service under a different Windows user account: This option allows you to specify a different user account to run the FileZilla Server service.
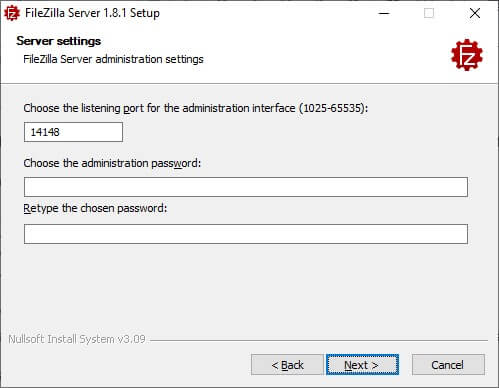
The next step is to choose the listing port and password for the administration interface.
- Choose the listening port for the administration interface (1025-65535): This field lets you specify the port number that the FileZilla Server administration interface will use to listen for incoming connections. The default port number is 14148, already filled in the field. Keeping the default port number is recommended unless you have a specific reason for changing it.
- Choose the administration password: In this field, you set the password to access the FileZilla Server administration interface. The administration interface allows you to manage FileZilla Server by creating users, setting permissions, and configuring other settings. It’s important to choose a strong password to protect your FileZilla Server. (Note: You can leave it empty or set your password; in this case, we are leaving it empty.)
- Retype the chosen password: This field confirms the password you entered in the previous field. Typing it again helps ensure you entered it correctly.
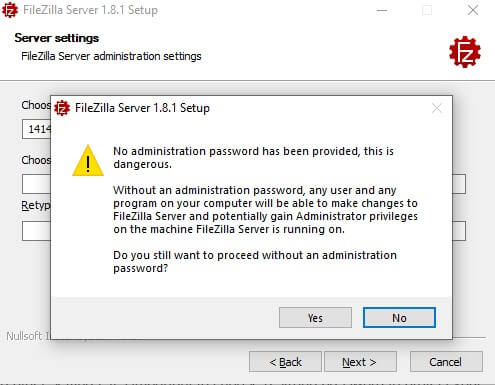
FileZilla Server will show a warning message because we have not entered a password. Click Yes to proceed.
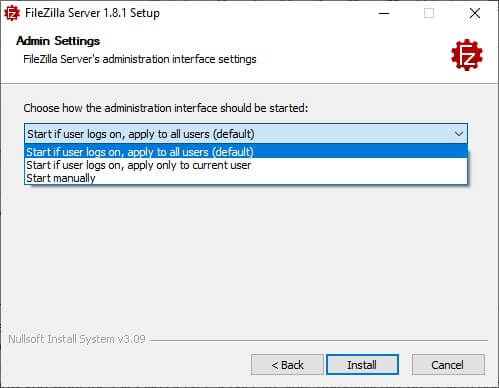
FileZilla Server will ask us how the administration interface should start in this step. We have three options:
- Start if the user logs on and applies to all users (default): This is the default option, which will start the FileZilla Server administration interface whenever a user logs on to Windows.
- Start if the user logs on and applies only to the current user: This option will only start the FileZilla Server administration interface when the current user logs on to Windows.
- Start manually: This option does not automatically start the FileZilla Server administration interface. It would be best to manually start it using the FileZilla Server icon in the Start menu or a command-line tool.
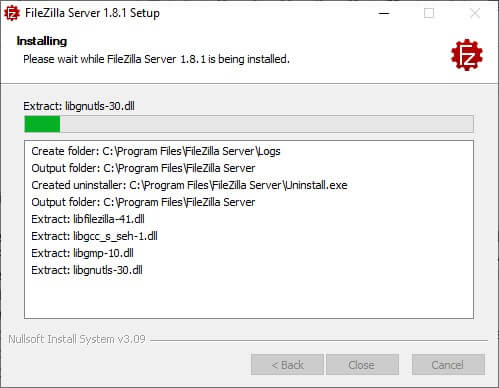
- We now click the install button to start the installation.
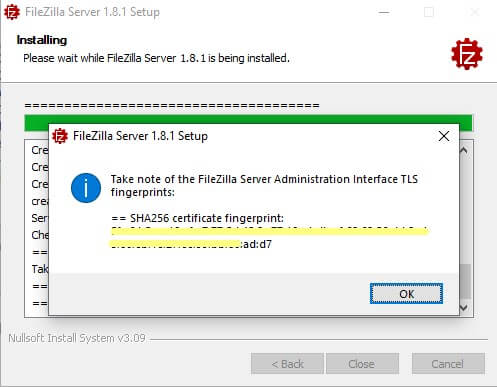
During installation, the system will prompt you about the TLS fingerprints:
- Please take note of the FileZilla Server Administration Interface TLS fingerprint: This instructs you to copy and save the fingerprint displayed below it.
- SHA256 certificate fingerprint: This is a long string of characters. It is the FileZilla Server Administration Interface’s TLS fingerprint, a unique identifier of its security certificate.
- What you can do with this fingerprint?:
- You can use this fingerprint to verify the identity of the FileZilla Server Administration Interface when you connect to it remotely. It is helpful if you are concerned about man-in-the-middle attacks.
- To verify the fingerprint, compare it to the fingerprint displayed by the FileZilla Server Administration Interface when you connect to it. If the fingerprints match, you can be sure you connect to the legitimate Server. (Click OK to proceed.)
3. Accessing the Admin Interface
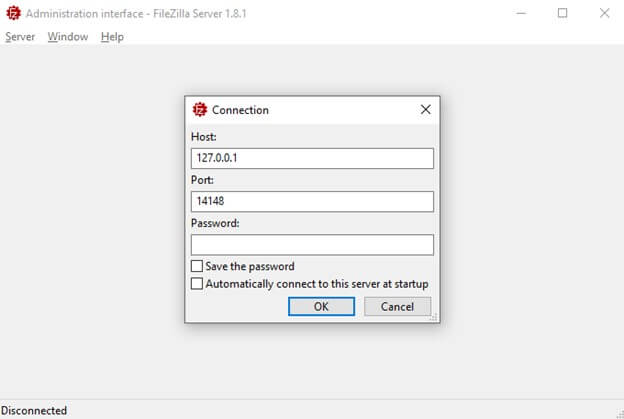
- Once the installation is complete, you can start the FileZilla Server Interface by clicking on the desktop shortcut or in the Start menu. This Interface provides a graphical user interface (GUI) for managing your FTP server.
- The system will prompt you to enter the server address, username, and password. By default, the server address is “localhost” (or “127.0.0.1”), and the username and password are those specified during the installation process.
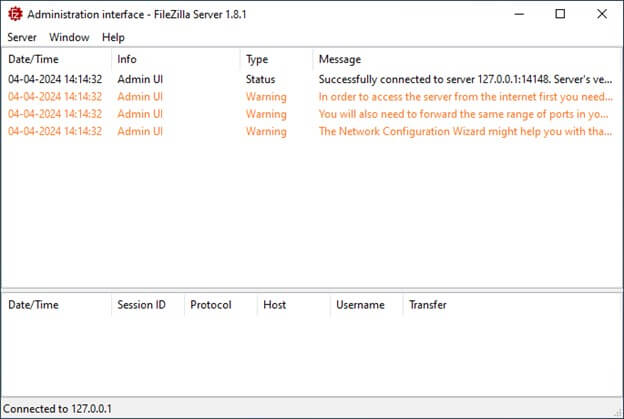
Below is how the Administration Interface of FileZilla Server looks like
4. Creating User Accounts
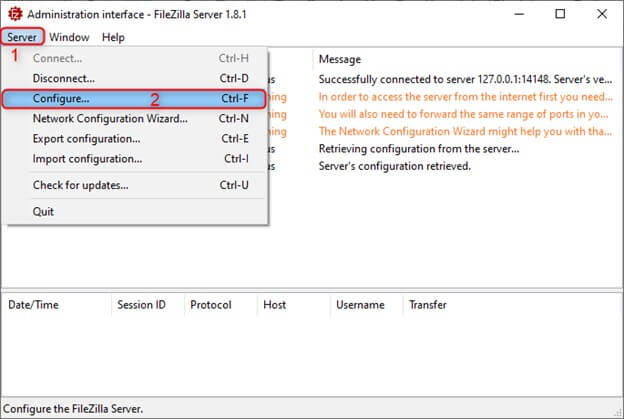
- Once logged into the FileZilla Server Interface, navigate to the “Server” menu and select “Configure.”
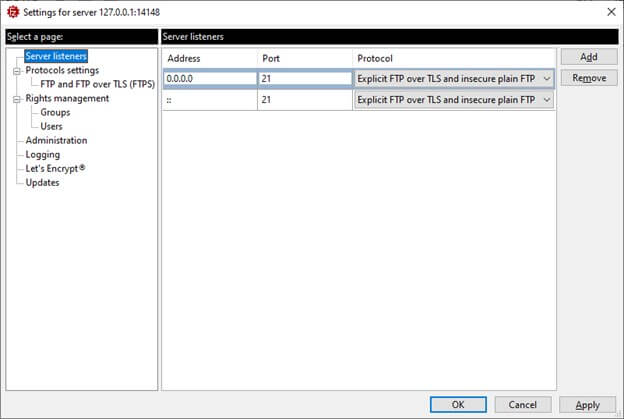
It opens up the settings page for FileZilla Server Management.
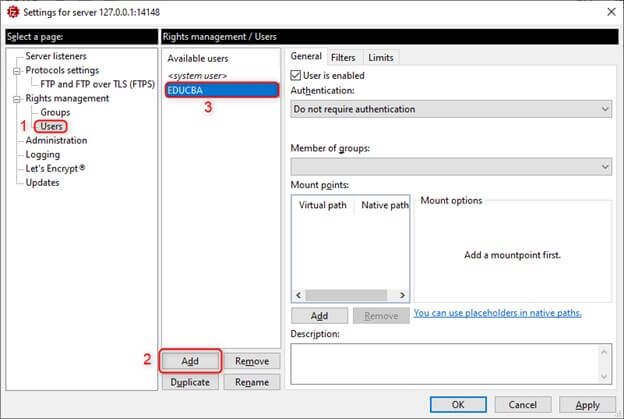
- Click on the “Users” button to create a new user account.
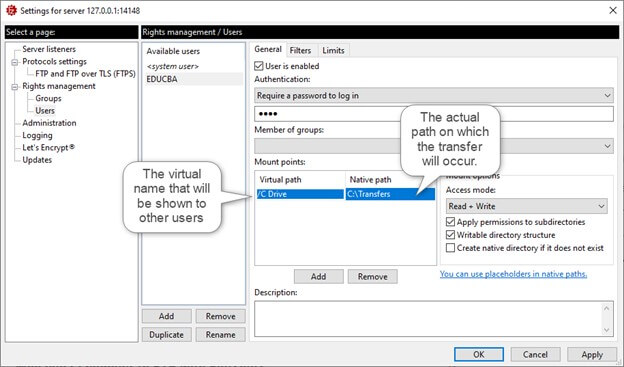
- Enter a username for the new user and set a password. You can also specify the home directory for the user, as well as their permissions and access rights.
- Add a home directory in the virtual path by adding ‘/’ followed by your path name, and in the Native Path, add the actual location of your folder. The home directory will be shown to other users (created in Step 3). You can specify the access rights for users (e.g., read-only, read/write).
- Click “Apply” and “OK” to save the user account.
5. Firewall Configuration
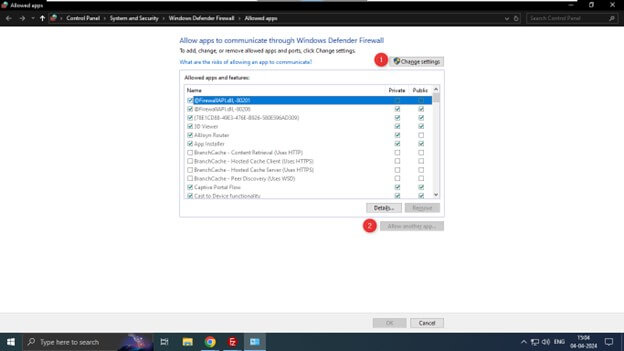
- If you’re running a firewall on your Windows system, you must configure it to allow FTP traffic through.
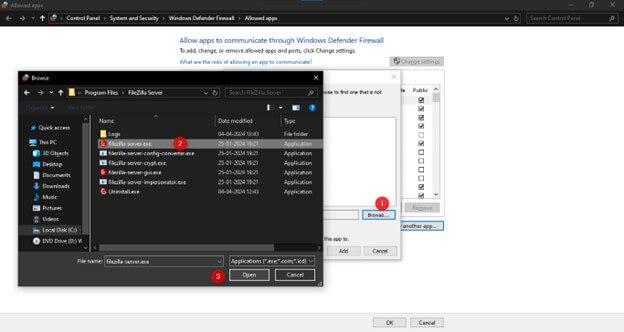
- Open the Windows Firewall settings and allow FileZilla Server through the Firewall.
- Click on “Allow another app…” and browse for “filezilla-server.exe” and “filezilla-server-gui.exe” in the FileZilla directory.
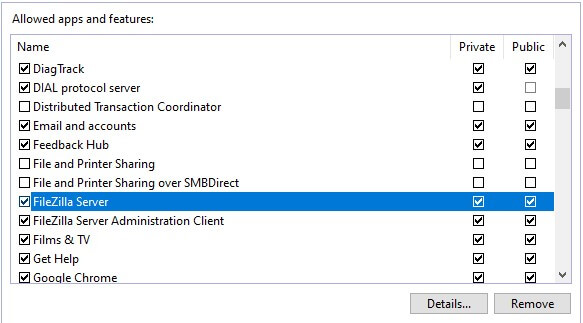
- Tick FileZilla Server and FileZilla Server Administration Client for Private and Public to allow access through the Firewall.
Advanced Settings
1. Security
- Encryption: FileZilla Server supports FTP over TLS (FTPS) and FTPS Implicit. Enabling encryption ensures that data transferred between the Server and clients is encrypted, enhancing security. You can configure TLS settings in FileZilla Server Interface under the “SSL/TLS settings” section.
- User Authentication: Implement authentication mechanisms, such as using SFTP (SSH File Transfer Protocol) instead of FTP or enforcing complex password policies for user accounts.
- IP Filtering: Restrict access to your FTP server by defining allowed or banned IP addresses or IP ranges. This will increase security by limiting connections to specific trusted sources to a greater degree.
2. Performance
- Transfer Speed Limits: Limit upload and download speeds for individual users or groups. This can help manage bandwidth allocation or prioritize critical transfers.
- Maximum Number of Transfers: Define the maximum number of simultaneous transfers allowed on the Server. This helps optimize resource utilization and prevent overloading.
- Active vs. Passive Mode: Depending on your network configuration and firewall settings, you can choose between active and passive mode FTP. Firewalls and NAT devices generally recommend using passive mode for better compatibility.
Using FileZilla Server
- Once the FileZilla Server is up and running, the user you created above can connect to your Server and access the location you provided (C:/)
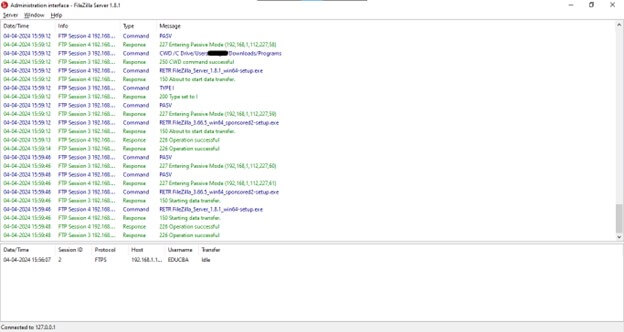
- When a user named EDUCBA is connected to your
Server, this is how the Server looks.
- It is how it looks on the client’s machine.
Troubleshooting
- Check Logs: Review the server logs within the FileZilla Server Interface to identify any errors or warnings that may indicate issues with connections, file transfers, or configurations
- Firewall Configuration: Ensure that the ports on your Firewall are open to allow FTP traffic. If clients cannot connect to the Server, the firewall settings may block incoming connections.
- Antivirus/Security Software: Temporarily disable any antivirus or security software that may interfere with FileZilla Server operations.
- Restart Services: If you encounter unexpected errors or issues, try restarting the FileZilla Server or rebooting the server machine.
Security Best Practices
- Regular Updates: Update FileZilla Server with the most recent security patches and upgrades to address any vulnerabilities or security issues
- Strong Passwords: Enforce strong password policies for user accounts, requiring complex and regularly updated passwords.
- Encryption: Enable encryption for FTP connections using FTP over TLS (FTPS) to protect data in transit from eavesdropping and interception.
Conclusion
Once installed and set up, FileZilla Server provides a reliable and versatile solution for facilitating secure file transfers for personal use, small businesses, or enterprise environments. It is a strong tool for managing files with ease and security. Using FileZilla Server on Windows can significantly improve your file management efficiency, allowing seamless file transfers within your network. Following the provided instructions, you can ensure a smooth and trouble-free deployment of FileZilla Server on your Windows system.
Frequently Asked Questions (FAQs)
Q1. Can I use FileZilla Server for commercial purposes?
Answer: Yes, FileZilla Server is free to use for personal and commercial purposes. Distribution of it is permitted by the GNU General Public License (GPL).
Q2. How do I access the FileZilla Server remotely?
Answer: To access FileZilla Server remotely, On your router, port forwarding needs to be configured to forward FTP traffic to the Server’s internal IP address. You can then use an FTP client such as FileZilla Client to connect to the Server using its public IP address or domain name.
Q3. Can I use FileZilla Server with other FTP clients?
Answer: Yes, FileZilla Server is compatible with many FTP clients, including FileZilla Client, WinSCP, Cyberduck, and others. Any FTP client that supports FTP, FTPS, or SFTP protocols can connect to FileZilla Server.
Q4. Do I need to change the default port for the admin interface?
Answer: A: While not strictly necessary, it’s recommended to change the default admin interface port for an extra layer of security. This makes it less predictable for potential attackers.
Recommended Articles
We hope that this EDUCBA information on “FileZilla Server on Windows” was beneficial to you. You can view EDUCBA’s recommended articles for more information,
