Updated April 18, 2023

Definition on Flask Migrate
Flask migrate is defined as an extension that is used in the Flask application for handling database migrations for SQLAlchemy using Alembic. This module enables developers to quickly set up and starts the database schema migrations. The reason we require database migrations can be explained as follows. Suppose we build a database, and then require it to be modified by adding an extra column. Post addition we feel that the schema now present doesn’t fit well into the full application architecture and would like to return back to the original one. In a normal case it is difficult to do so, but with flask migrate the tasks are much smoother! In this article, we will look at ways on how we perform migration in Flask.
Syntax
Database migrations are the art of managing changes that are incremental, reversible, and controlled by version in the relational database schema. In the definition, we saw that we perform any migration when we feel the necessity to update into a newer version or even revert back to the older version. In this section, we will learn about migration in a flask from the syntax perspective so that when we learn about how to perform the migration, it is easier to map it back with the syntax learned here for a complete picture of the topic in discussion.
Installing flask migrate and configuring it:
pip install flask-migrateInstalling SQLAlchemy in Flask:
pip install flask-sqlalchemyConfiguring the Database URI in configuration parameter:
<Flaskapp variable >.config["SQLALCHEMY_DATABASE_URI"] = "< Link of the SQL Database>"Initializing Migrate command:
migrate = Migrate(<Flask application variable>, <SQLAlchemy variable>)Creation of migration repository:
flask db initCreation of initial migration:
flask db migrateHow to perform migrate in Flask?
Before we think about performing migrate in Flask, we need to make sure that the module is installed in the python environment. For that, we would need to run the command pip install flask-migrate which will ensure that the module is installed in the environment where the python code will be running from. One needs to also make sure that the SQL alchemy module is also installed for smooth running of the migrate in Flask. Once everything is set, we are ready for the next steps in performing migrate in Flask.
Flask applications sometimes feel the necessity to dynamically using or insert their own settings in the Alembic configuration. For taking care of the utility, we use the decorator utility which uses the configure callback. Post the decorator utility and callback a function is defined. This function can modify the configuration object or completely replace it with the new variable within the function. Using decorator allows usage of multiple configuration callbacks and the order in which the callbacks are invoked are undetermined. Once the configuration piece is sorted, it would be time for binding the databases. The installation of the SQL alchemy module provides features to allow Flask-migrate to track migrations to multiple databases. This is possible with the binds feature of SQL alchemy. Including –multidb argument into the command enables the creation of multiple database migration repositories.
Now once the configurations and inclusion of arguments are taken care of, it is time for us to use the classes exposed by the module Flask migrate. This is to fill in all the settings in the python code to make sure that we proceed with the 3 migration commands. Before learning about using them for performing the migration in Flask, let us know about the classes individually. The classes which are exposed are Migrate and MigrateCommand. Migrate class itself covers all the functionality and utility of the extension whereas MigrateCommand is used when there is a need of exposing the database migration commands through the usage of the Flask script extension. Now to perform the next step of migrate, we would need to initialize the object and is done by command: Migrate(< Flask application variable >, < SQLAlchemy DB variable >). The 2 arguments that the Migrate class use is the application instance and the SQL alchemy database instance. Additional keywords are also taken which are the same that are passed to Alembic’s EnvironmentContext.configure() method. And finally, as a standard practice, Flask-migrate can be initialized using the init_app method. He other class which gets exposed to the user is MigrateCommand and once the initialization of Migrate is done, we need to declare an instance of Manager from the flask_script package by passing through it the application instance. Now that the manager object is instantiated, we would need to add a command to this object, and that will be MigrateCommnad.
The flow follows as:
from flask_script import Manager
from flask_migrate import MigrateCommand
appFlask = Flask(__name__)
manager = Manager(appFlask)
manager.add_command('< SQLAlchemy variable >', MigrateCommand)
Once the settings are done, we would proceed with the 3 migrations commands i.e. init, migrate and upgrade to perform the database migrations. The details of the database migrations are covered in another article in full detail.
Examples
Let us discuss examples of Flask Migrate.
Example #1
Installation of the Flask migrate module in Python environment:
Syntax:
pip install flask-migrateOutput:
Example #2
Initializing the migrate instance:
Syntax:
from flask_migrate import Migrate
from flask import Flask
appFlask = Flask(__name__)
from flask_sqlalchemy import SQLAlchemy
db = SQLAlchemy(appFlask)
migrate = Migrate(appFlask, db)
migrate
Output:
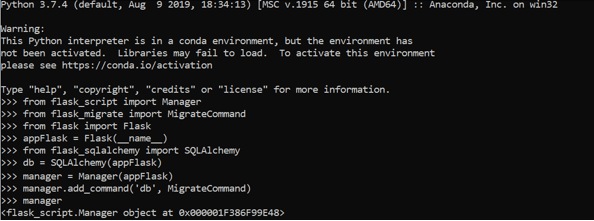
Example #3
Adding the MigrateCommand into the list of commands in the manager:
Syntax:
from flask_script import Manager
from flask_migrate import MigrateCommand
from flask import Flask
appFlask = Flask(__name__)
from flask_sqlalchemy import SQLAlchemy
db = SQLAlchemy(appFlask)
manager = Manager(appFlask)
manager.add_command('db', MigrateCommand)
manager
Output:
Conclusion
In conclusion, in this article, we have learned about the migrate configuration and application in Flask. We can also use this methodology to include migration of an existing project as well so that developer doesn’t need to delete everything and then start from scratch. The only thing which needs to be kept in mind during the task of including migration in an existing project is some changes need to be made in the models of the source code. Like anytime else, rest is to you for experimentation.
Recommended Articles
This is a guide to Flask Migrate. Here we discuss the definition, syntax, How to perform migrate in Flask? and examples respectively. You may also have a look at the following articles to learn more –


