Updated March 17, 2023

Introduction to Git Origin Master
When you work on any project with Git then knowing about its remote is necessary. Basically, with git, you will be working on the remote repository which will be managed with versions by the git. Remote in contrast to the term suggests the availability of code on the server which can be local or connected by the internet. These repos can be assigned read-write access categories depending on the type of users who are accessing them. So when we collaborate with others on development we need to manage these repositories (also includes creating and removing repos) as well as pushing and pulling the data to them. In this topic, we are going to learn about Git Origin Master.
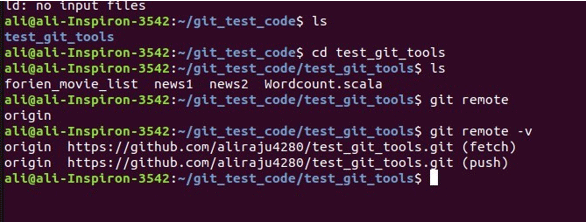
Git remote command can be used to get to know on which remote repo we are working. This command lists them with their short names which admin or creator of repo might have mentioned while creating it. If no name specified by default origin is the short name that’s given to the repo from which we might have cloned. In the below screenshot you can see these. I have cloned the repo from GitHub and kept in the test_git_tools directory which implicitly adds the repo called origin. To see more details of a repo we can give git remote -v as shown below and it will list all the remotes with their short names on which the programmer is working. Here its only one.
We can add remote to repo we want to clone simple by using git remote add <name (if not given it will be origin)> <branch path>. You can refer below screenshot where I have added test_get remote to https://github.com/aliraju4280/test_git_tools.git and listed them with git remote -v option.
We have seen that when we clone the code origin is default short name given to it. So we have to fetch command for git which can be used to update the local repo where we cloned. So, in fact, git fetch origin will pull the updates to your working directory. It only downloads the data but will not automatically merge its local repository.
We manually need to perform it. Alternatively, we can use git pull command which will automatically perform this combined task of downloading the data and merging it with master or whichever branch that is tracked by the git clone command when our working directory got created.
We can use git push which will only when the user has the write access to send our work to the upstream from which we have cloned which will be origin remote. The command is git push <remote- origin most of the time> <branch>
Where the origin is the remote short name if there was not any name. <branch> will be the bit bucket or GitHub branch name. But default when you create a branch in a repository it will be called a master branch and this particular branch in the corporate development environment will be in sync with the production and we must be careful before we alter or merge anything to master. Anything done to the master will be tracked and occasionally audited. So when we have to work on the source code we create a copy from the master and this brach can be feature or custom. We work on these copied or feature branches and once the developed code is stable then only we merge it master branch and not all the developers have the permissions to do it. So when we push anything to master directly for which we might have access we give the command as git push origin master/git pull origin master and if we work on feature or any other type of brach which was created from master or some other branch then we will give as git push origin feature_branchname / git pull origin feature_branchname.
Origin master —–> can be interpreted as a master branch on the remote name called as the origin.
Inspecting the Origin Remote
If we want to get further details of the remote branch the git provides something called as git show command which can be used as below like git remote show <origin or any other short name for the remote>
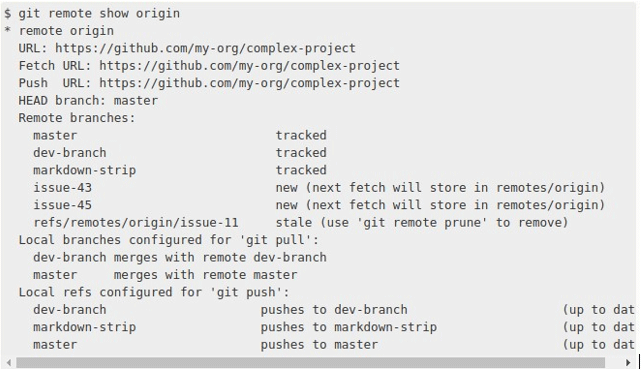
This particular will list the URL and as well as tracking branch details for the remote. The details from this command will be useful when we are working lots of remotes and branches as it can provide on which branch we can pull or push our changes to in detail. Here since I have only one branch created above screenshot only lists those details. To get more info I have taken a screen grab from official documentation page of git below:
If we see above the git remote show origin command, it lists the details of some five branches and which branches can be merged with which particular branch along with push and pull details like when we give git push or git pull then to which particular branch the details will be uploaded or downloaded from.
We can as well rename remote origin with some other name by using rename command as shown below
git remote rename origin to test_origin
you can see that I have successfully changed the origin remote to test_origin in the above screenshot and this command will change all its tracking references as well. We can use all the above commands we have seen earlier with a new remote name in place of origin like below.
git push test_origin master / git pull test_origin master.
Similarly, we can remove a created remote using git remote remove or git remote rm command as seen below
once the remote is removed all its tracking references will also be deleted. So we must be careful while using this command.
So when we start working with git, origin, and master are its basics and knowing them will be a boom when getting confused with the pull or push and merge commands especially when your server is home multiple remotes or branches.
Recommended Articles
This is a guide to Git Origin Master. Here we discuss the Git remote command and branches and Inspecting the Origin Remote. You may also look at the following article to learn more –


