Updated March 28, 2023
Introduction to Git Tools
We have super effective tools available with git, which can make our version tracking effective to provide deeper meaning to the version control system. These automated tools will save us from most of the difficult tasks and tracking while working on the branches.
Some instances where git tools have helped a lot can be found in detail below:
Various Git Tools
Some of the areas where git tools can be applied effectively:
- Revision Selection
- Interactive Staging
- Stashing and Cleaning
- Signing Your Work
- Tools for Searching – Grep
- Rewrite History
- Tools for Advanced Merge
- Tools to Debug
- Git Submodule etc
1. Revision Selection
One of the most effective tools to work on commits. We can keep track of commits we performed and can refer them basing our requirements as well. There are two ways with which we can reach out to a commit.
- Single or Individual Commits
- Range Commits
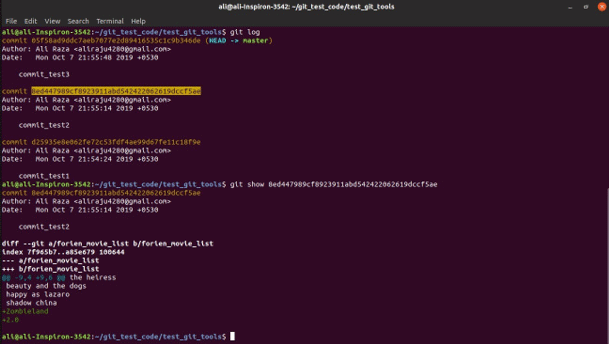
Single of Individual Commits: Whenever we commit something in git, a corresponding SHA – 1 hash key will be generated and based on this key, we can refer to them simple git show command. SHA – 1 key is generated from the hashing algorithm, which takes input and generates 160 bit or 20- byte hash value
- A sample screenshot can be seen below where the git log presents all the vents performed on the branch, and we can refer to a specific commit with its particular hash value. Here I am referring to commit_test2. We can use short-form notation as well in the show command, and git will identify its key and provide its details. Like below:
- Similarly, we can use flogs and HEAD with git to get details of each event, as shown in the screenshot below. The first event on the branch is termed as HEAD or Master.
Specify Range Commits: We can specify range commits as well using the show command. This is most useful when we have multiple branches, and we want to know where they are getting merged etc.
- From above, refA refers to branch A, and refB refers to point B. The first statement above represents the commit range between reference branch A and B, whereas the second one commits range which is not in the range of A and B branches. The third statement in the above screenshot is similar to the second.
2. Interactive Staging
- With an interactive staging tool, you can play or add more meaning to your commits. You can select which changes need to be staged and which are not. This particular tool is useful when we have done modifications to a number of files, but we are not certain about a few of the changes. So instead of committing, all this interactive staging tool helps to commit only required files or parts within the file by deciding what needs to be staged and unstaged.
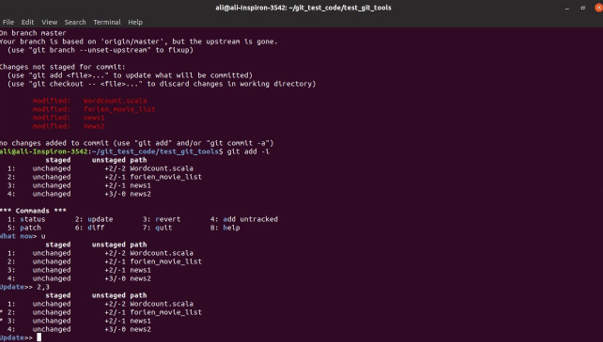
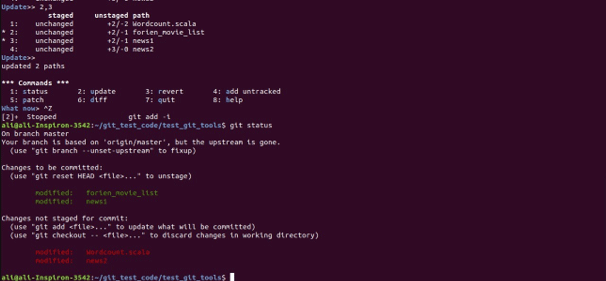
- In the below screenshot, we have four unstaged files, and with interactive staging using git add -I or git add –interactive options, I added only two files to staging, and the remaining two files are still unstaged. So we can easily commit the staged files and still work on unstaged file changes and commit later.
- We need to use the update(u or 2) option in what now>> prompt o add the files to staging.
- If you observe the first screenshot after update>> 2,3, we can see that in 2nd and 3rd row * is marked, indicating the selected file or part to be staged and if press enters again, these 2 and 3 will be staged. In the next commit, the staged files will be committed.
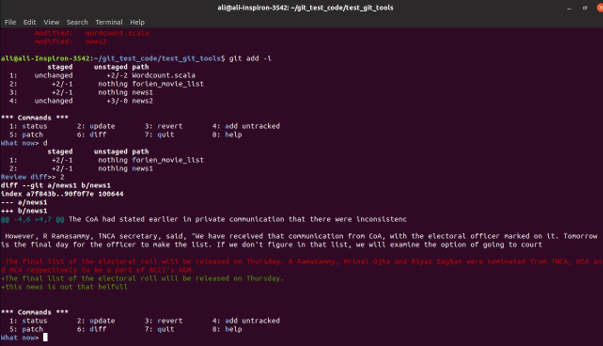
- Similarly, we can use other interactive tools like revert (3 or r) to revert the changes done to the file, diff (6 or d) to get the difference or modification done in the file as shown in the above screenshot. I have applied diff on the news1 file wherein red is showing the modification that is removed and in green that newly added. Similarly, patch options can be used to stage only certain parts of a particular file, not the complete file.
3. Stashing and Cleaning
- Sometimes we may have to switch the branches to work on something else, and we don’t want to commit the changes done on half-done work, but changes need to be tracked and saved. The solution is using a git stashing tool. Git stash will collect all your staged, tracked files and places them in a stack so that we can reapply the changes whenever we want to work on them again.
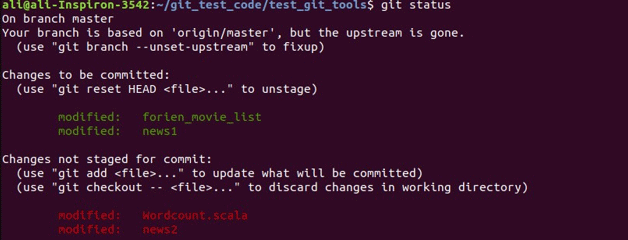
- If I apply git status to my present working directory, then it looks like the below screenshot:
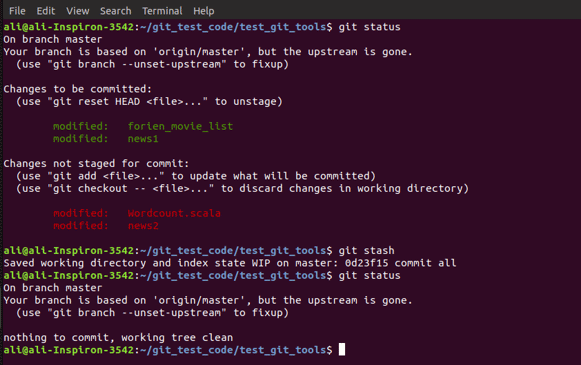
- Here we have two files staged, and the remaining files are unstaged. Now when I apply git stash, all my changes that are being tracked, i.e. staged and unstaged, will be moved to a memory stack with stash ID, as shown in the below screenshot.
- Once we apply stash and the git status, we can see that there is nothing to commit on the branch, and all my changes have been moved. We can see the stash versions we have in the memory by the git stash list command, as shown below.
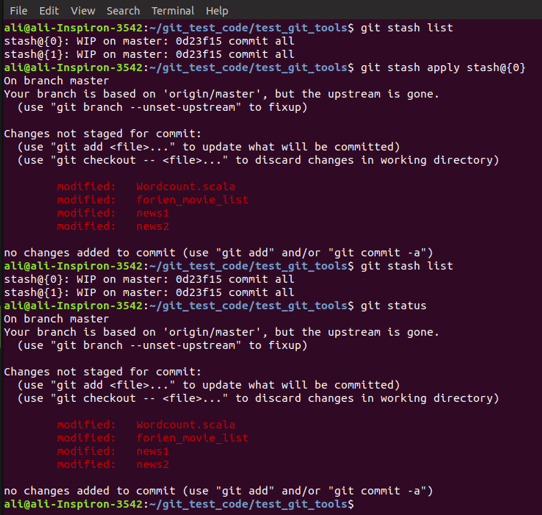
- We can have two versions of stash data saved in the stack, and we can recover them back by applying the git stash apply command, which will apply the top stack stash. If we want to apply a particular stash, we can submit that as well as shown in the below screengrab.
- I have applied stash@{0}, and my files have been applied back. But there is one major difference when I applied stash back. You can observe that before applying the stash, two of my files were staged and remaining unstaged. But after apply and reapplying the stash, all of my files are unstaged. Stash will not take care of files that are staged or unstaged. It adds all to the unstaged state. And even after applying, the stash will remain on the stack memory.
- We need to explicitly mention the git stack drop command. Alternatively, we can also use git status pop to apply the stash and drop it one go.
- You can see from the above screengrab that I dropped stash@{0} and in the list, we can see stash@{1} that I had earlier will move back to top stack stash@{0}
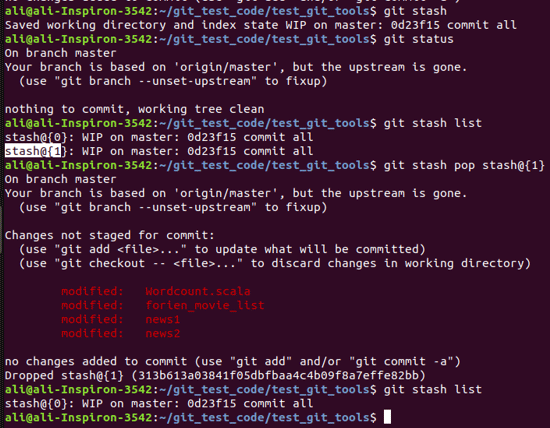
- You can see the usage of the pop command in the above screenshot where I am applying stash@{1} and dropping it in one go by pop command. In the git stash list, you could see that earlier, I have two stash versions, but now only one since others got dropped.
- Similar to stash, which presents a clean working directory by stashing modified files in the stack, we can use the git clean command as well. But here, we won’t be able to save or reapply anything back, and we must be careful and certain while using this. It is often better to prefer stash over clean. There are multiple sub-options as well while using git clean that we can explore.
Conclusion
These are some of the tools which have made our messy work on the branches a lot simpler, and there are other tools as well, especially like Submodule, Debug, Advanced Merge, etc., which can more help us in various situations while working on branches as well.
Recommended Articles
This is a guide to Git Tools. Here we discuss the basic concept with various Git Tools in a detailed explanation. You can also go through our other related articles to learn more-

